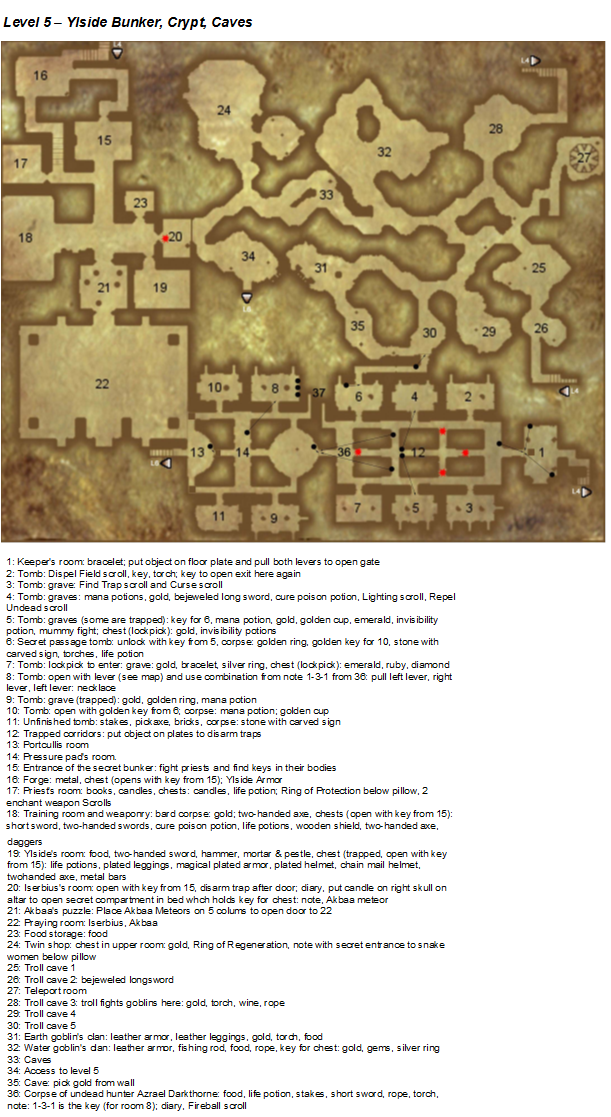
Prices are inferior to those in Arx, so try not to buy or sell here. Buy the Stregum rune first so you can cast Mega Stregum Vitae (Bless) to increase your stats, thereby increasing Intuition to get better prices.
In Rinco's room, if you douse all the lights he does not re-light them, so you can look around and steal safely as long as you are not too close to him.
[20 Iserbius's Room] You can kill the Black Beast by raising the portcullis in the tank (click the handle on top of the tank) and then lowering it again on the creature.
[22 Akbaa] Defeating Akbaa was disappointingly easy for a mage using Life Drain (and potions to keep up Health and Mana). See video below -- SPOILER!
[25-30 Hostile Trolls] Trolls here are hostile if you do not have a Troll's Amulet. Since they contribute nothing to the plot and are hostile, you might as well NOT carry the amulet and kill all the trolls anyway. They all carry an amulet, so cache them somewhere.
[32 Water Goblins] One of the goblins sits and uses a Pole to roast a fish. When he puts down the Pole, if you pick it up and put it in your inventory, they become hostile. If you use a Rope on it to change it into a Fishing Rod, you can safely pick it up. If you kill the Goblin while it is using the Pole, it disappears.
Prices are inferior to those in Arx, so try not to buy or sell here. Buy the Stregum rune first so you can cast Mega Stregum Vitae (Bless) to increase your stats, thereby increasing Intuition to get better prices.
In Rinco's room, if you douse all the lights he does not re-light them, so you can look around and steal safely as long as you are not too close to him.
[20 Iserbius's Room] You can kill the Black Beast by raising the portcullis in the tank (click the handle on top of the tank) and then lowering it again on the creature.
[22 Akbaa] Defeating Akbaa was disappointingly easy for a mage using Life Drain (and potions to keep up Health and Mana). See video below -- SPOILER!
[25-30 Hostile Trolls] Trolls here are hostile if you do not have a Troll's Amulet. Since they contribute nothing to the plot and are hostile, you might as well NOT carry the amulet and kill all the trolls anyway. They all carry an amulet, so cache them somewhere.
[32 Water Goblins] One of the goblins sits and uses a Pole to roast a fish. When he puts down the Pole, if you pick it up and put it in your inventory, they become hostile. If you use a Rope on it to change it into a Fishing Rod, you can safely pick it up. If you kill the Goblin while it is using the Pole, it disappears.
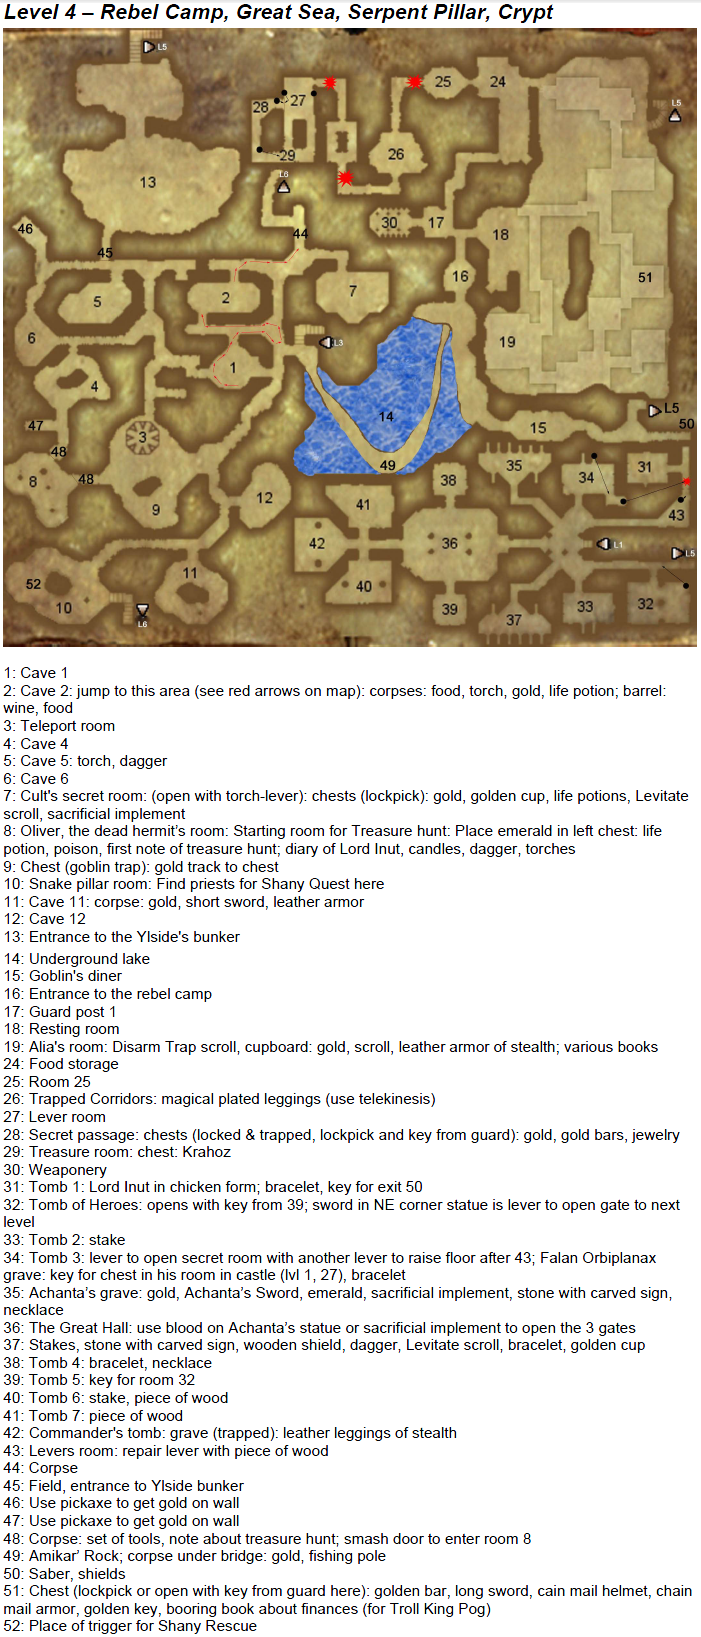
[11 Tomb with Shield of the Ancients] When you open the tomb, a lich spawns and starts moving to your location. If you wait too long to exit and engage it, it may reach [14 Lava Traps]. Even if you have kept the floorplates closed, it will fall in and die instantly. You can still loot the body but you get no XP because you did not deal the killing blow.
Pull the levers to close the portcullis before you open the tomb for the Shield of the Ancients. This way the lich may not be able to pathfind to you at all.
Alternatively, lure it to the portcullis and rush ahead to pull the lever. It is then safely behind and you can bombard it with the blast radius from Aam Yok Taar (fireball) until it is dead, if you are having a hard time killing it. Using Aam Yok Spacium to roast it indirectly from safely behind the bars does not seem to work.
[13 Secret Tomb] This area is accessible when you have solved the guardian's puzzle [area 10].
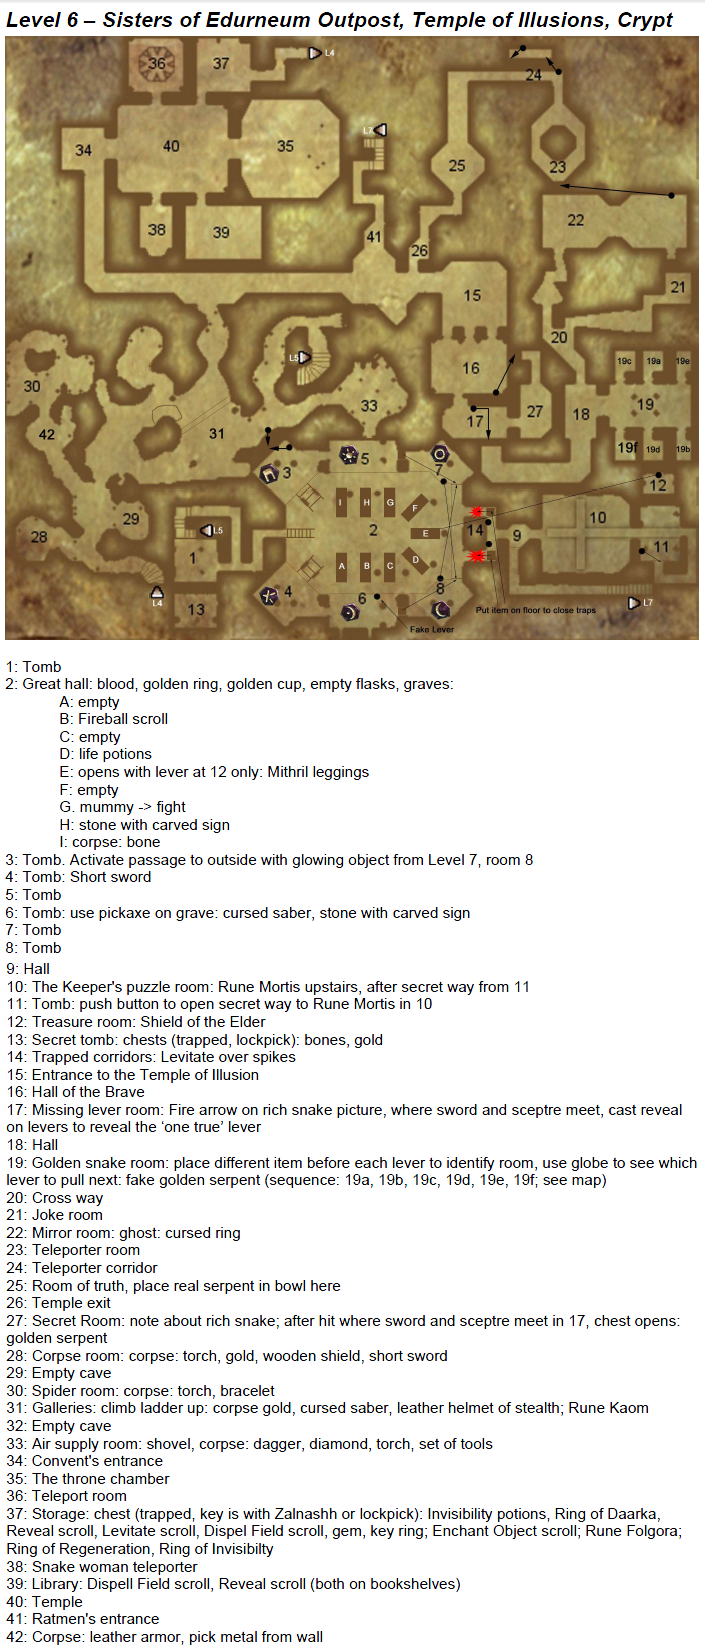
[31 Galleries]
The Kaom Rune can be picked up from the ground. You can just see it on the ledge -- approach slowly until your cursor changes to allow interaction and then pick it up.
The Rat-Man assassin that stalked you since you found out you were the Guardian ends up here and stays in this area. If you kill it while it is becoming invisible (backflip and shrink), the corpse may be invisible until you exit the area and re-enter. You might also not get its weapon (assassin dagger, which you can get elsewhere).
[35 Sisters Throneroom] If you try to give the queen Krahoz, she will ask the location of the Rebels.
[11 Tomb with Shield of the Ancients] When you open the tomb, a lich spawns and starts moving to your location. If you wait too long to exit and engage it, it may reach [14 Lava Traps]. Even if you have kept the floorplates closed, it will fall in and die instantly. You can still loot the body but you get no XP because you did not deal the killing blow.
Pull the levers to close the portcullis before you open the tomb for the Shield of the Ancients. This way the lich may not be able to pathfind to you at all.
Alternatively, lure it to the portcullis and rush ahead to pull the lever. It is then safely behind and you can bombard it with the blast radius from Aam Yok Taar (fireball) until it is dead, if you are having a hard time killing it. Using Aam Yok Spacium to roast it indirectly from safely behind the bars does not seem to work.
[13 Secret Tomb] This area is accessible when you have solved the guardian's puzzle [area 10].
[31 Galleries]
The Kaom Rune can be picked up from the ground. You can just see it on the ledge -- approach slowly until your cursor changes to allow interaction and then pick it up.
The Rat-Man assassin that stalked you since you found out you were the Guardian ends up here and stays in this area. If you kill it while it is becoming invisible (backflip and shrink), the corpse may be invisible until you exit the area and re-enter. You might also not get its weapon (assassin dagger, which you can get elsewhere).
[35 Sisters Throneroom] If you try to give the queen Krahoz, she will ask the location of the Rebels.
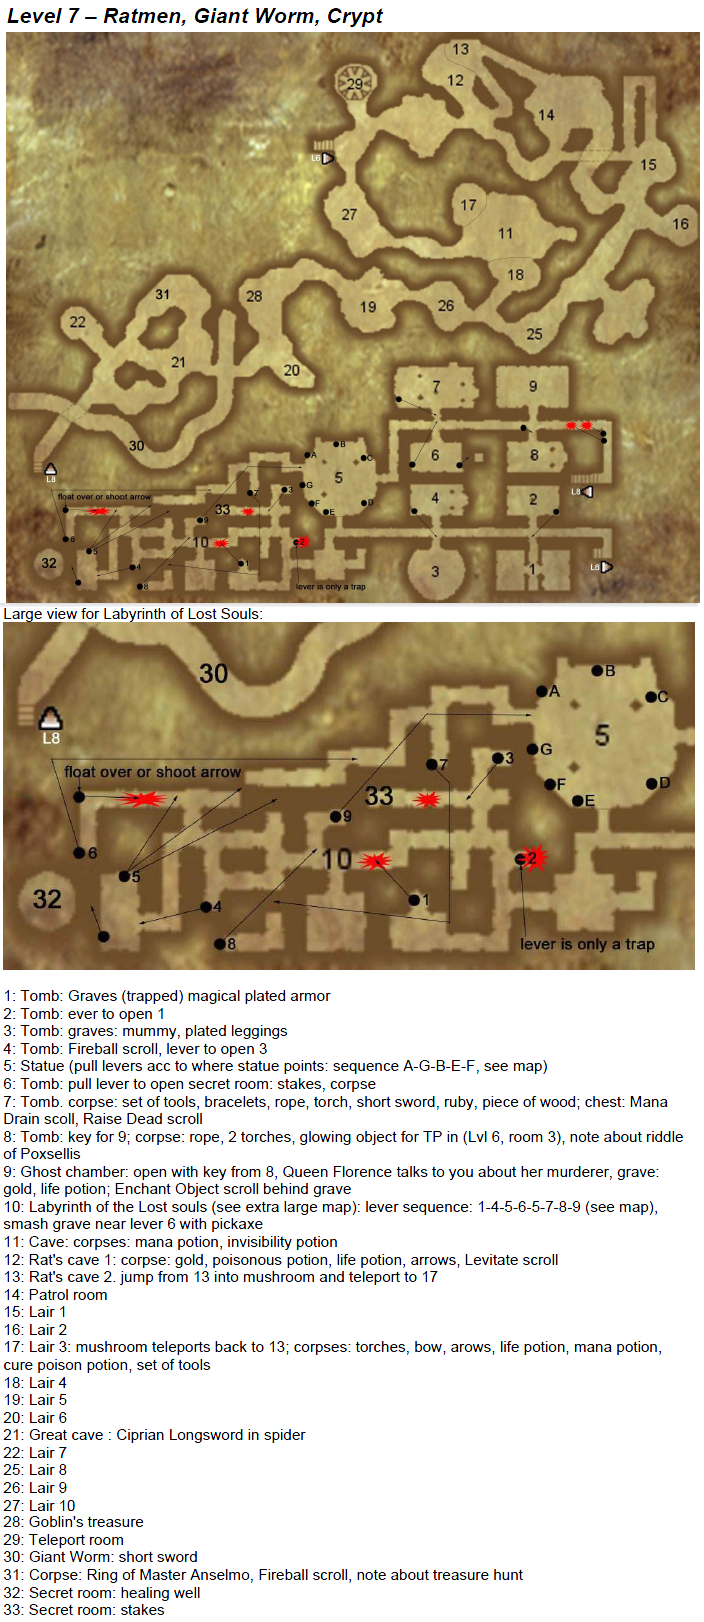
The Labyrinth is confusing because some areas close off when you open new paths to get toward [area 5]. Backtrack if you have to until you find new areas open.
The Labyrinth is confusing because some areas close off when you open new paths to get toward [area 5]. Backtrack if you have to until you find new areas open.
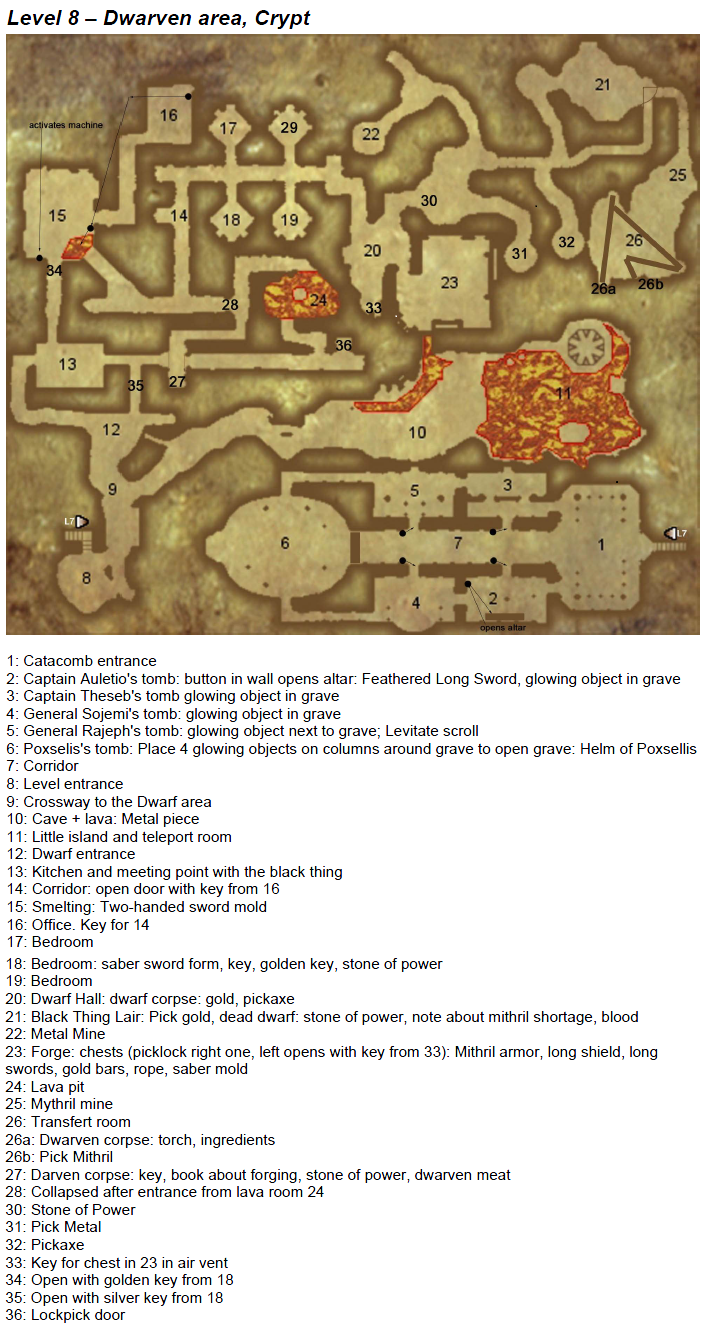
To use the "glowing objects", use them on the column instead of dragging the item onto the column.
After you pick up the Helm, two liches appear and you must defeat both to exit the tomb. For weaker characters, the key is to hide and wait till you are ready to do a hit-and-run. The tomb is dark, so it is easy to stay hidden and rest to restore mana. Our tactic was to rush and Fireball them, then use Invisiblity to make them stop pursuit so we could hide. See the video below.
Invisibility and Drain Life also work just fine if you can sustain the Mana cost.
[15 Ore crushing room] The lever you need to work the crusher is not the wooden one on ground level, but upstairs on the walkway.
[23 Forge] Both chests can be lockpicked.
[26 Transfer Room] climb up the wooden chutes to get to the single large chunk of mithril. Use the machine on ground level to transfer it to [area 15], then use the crusher to get 4 chunks of mithril.
To use the "glowing objects", use them on the column instead of dragging the item onto the column.
After you pick up the Helm, two liches appear and you must defeat both to exit the tomb. For weaker characters, the key is to hide and wait till you are ready to do a hit-and-run. The tomb is dark, so it is easy to stay hidden and rest to restore mana. Our tactic was to rush and Fireball them, then use Invisiblity to make them stop pursuit so we could hide. See the video below.
Invisibility and Drain Life also work just fine if you can sustain the Mana cost.
[15 Ore crushing room] The lever you need to work the crusher is not the wooden one on ground level, but upstairs on the walkway.
[23 Forge] Both chests can be lockpicked.
[26 Transfer Room] climb up the wooden chutes to get to the single large chunk of mithril. Use the machine on ground level to transfer it to [area 15], then use the crusher to get 4 chunks of mithril.
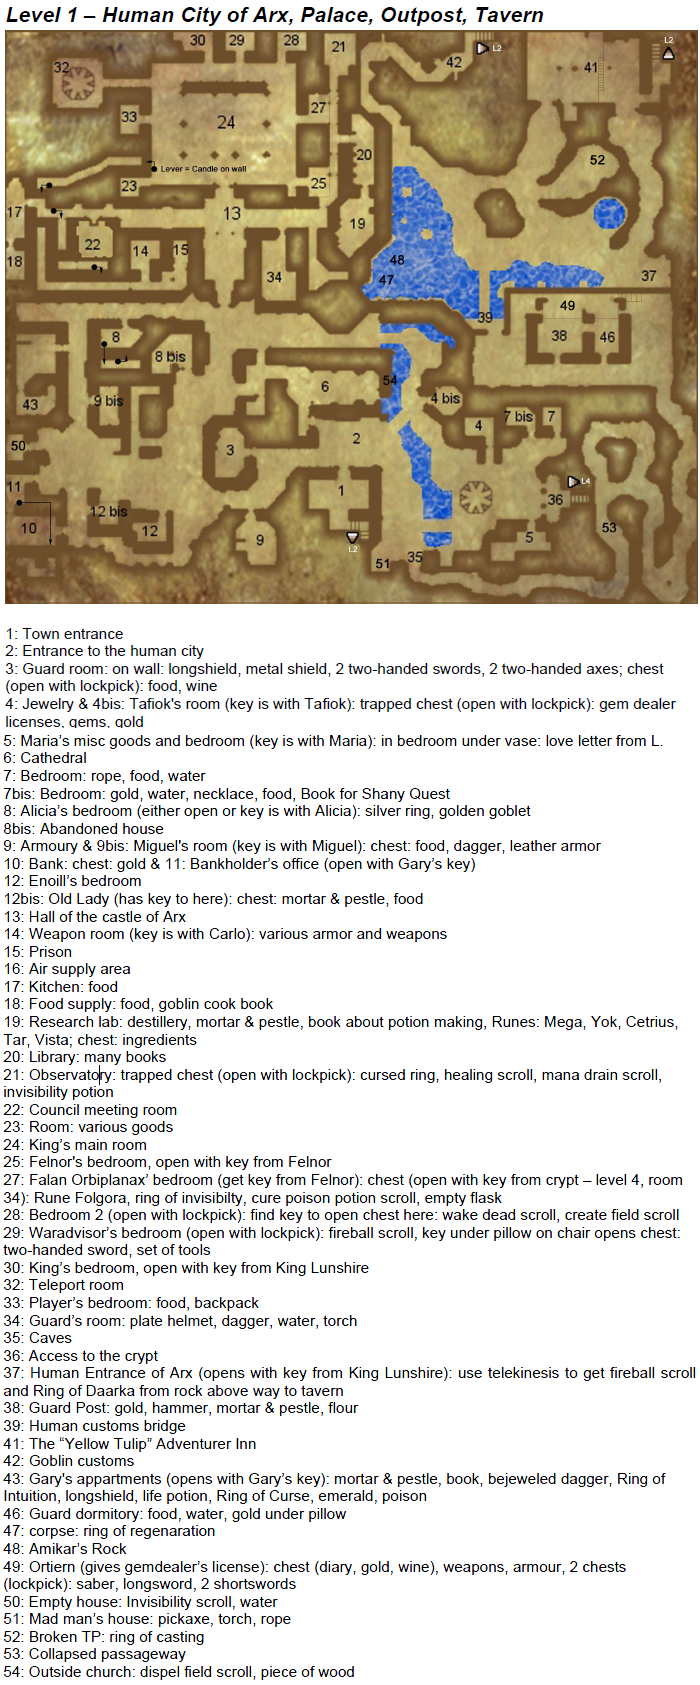
You can rob Tafiok's chest while he is in his home and he does not react.
He stays here from the time you report the outpost attack to King Lunshire, until you return the Troll Idol to the Troll King Pog AND report back to King Lunshire.
Prior to you returning the Troll Idol, you can use Uncut Gems and Gem Dealer Licenses on him, and he pays 180 gold for each.
While he is here, his shop is locked, so that is the only time you can lockpick that door for XP.
It is very hard even at Skill 85. If you don't have enough lockpicking skill, you can try lockpicking your way down into the Crypt, and from there exit to [level 5] and the traders there to buy the Stregum Rune necessary for Bless (Mega Stregum Vitae).
Each time you re-enter this area, the door locks and you can pick it again for XP. Since it is so hard, you are unlikely to realistically get that many attempts unless you simply reload to avoid Durability loss on your Tools.
[5 Maria's General Store] After Shany is rescued, returning her and opening the door to the shop starts a cutscene dialogue. Despite what Maria says, the reward from the shopkeeper is 2 potions given during the cutscene. You cannot take anything from her store inventory for free.
[7bis] You do not actually need the book to trigger the cultists at the rendezvous point.
[9 Smithy]
The smith does not appear until report the outpost attack to King Lunshire. This is your opportunity to lockpick the door, but at this early stage of the game you will have to invest heavily in the skill to do so (even at 60 skill, it is "too complicated" and you have no chance at all). See note at [4bis] about how to try to get around this.
There are three unfinished swords. You can finish crafting them and take them or sell them to the smith. Put them on the forge, use the bellows to heat them up, then use a blacksmith hammer on them while they are glowing orange-hot.
Try to stack items and use space in the store chests efficiently as you may sell a lot of items before the store resets its inventory and clears out all the items you sold.
Intuition has no effect on repair price when you use an item on Miguel to have him repair it.
[10 Bank]
Prior to ending the Troll Strike, you can buy Mining Shares here at a reduced price. Once you have ended the strike by reporting it to Goblin King Alotar, you can sell them at a greatly increased price, BUT you must sell them back to the chest they were initially stored in.
Even if the Banker is not in the Bank, you cannot rob the store inventory chests -- opening them starts the buy/sell interface. If the Banker is not there, however, you are still trespassing and city guards will try to kill you.
If you are standing inside the enclosed vault area (left side with two trapped chests), you are typically not visible to anyone outside of that area. So you can pick up gold from the table and loot the chests without needing to be invisible.
[13 Arx Castle Main Hall] As part of the main quest, you will be met by Sister Chinkashh who gives you Mega Spacium runes and teaches you that spell to activate the teleporters -- but only if you haven't already activated any of the portals.
[19 Research Lab] Prior to receiving the quest to investigate Falan's death, you can lockpick into the lab and speak with Felnor (and after the cutscene, the chests in that room unlock; they cannot be picked). Felnor gives partial dialog related to the quest but the quest itself does not appear to be broken by doing this.
[36 Crypt] At a relatively low Skill you can lockpick your way in early and get the Shield of the Ancients, which has no requirements to wield and is indestructible.
[39 Drawbridge, 49 Ortiern] Both these guards will die once you have the Gem Dealer's License from Ortiern and you leave the outpost for the first time. You could kill them first for XP. Trying to heal them with a potion apparently makes no difference.
[41 "Yellow Tulip" Adventurer Inn]
Enoill is the one-eyed man you are looking for as part of a side quest.
To complete the side quest you need to buy him a beer from the innkeeper downstairs. If he disappears but you can still hear him shouting at the innkeeper for beer, just put the beer on the table in front of him anyway. The beer should vanish, indicating that he drank it. The quest continues normally.
The wall on his left has the first hint for Oliver's quest.
The wheel of fortune gambler at the inn leaves after you win twice, no matter the amount. You can reload-to-win a maximum of 600 gold by placing all three tokens on the same number, and spin / reload until that number wins twice.Since you will shortly get so much money in the game (as long as you diligently pick up every weapon and armor and sell it), it is pointless to really waste your time doing this.
The innkeeper has a key to the metal door leading to the cult area. You can thereby gain access to this area quite early, but will probably make the inn hostile to you unless you pickpocket it from her. You cannot lockpick the door.
There is a Ylsid right behind the metal door that requires a password.
He cannot be lured out with spell damage thereby tricked into opening the door for you. You can use this to your advantage by casting Aam Yok Spacium from the outside and burn him to death behind the door for an easy 500xp (although he CAN chop you from behind the door if you stand too close).
If you want to gain entry the "normal" way with the password, you must not kill the Ylside so as there would then be no one to talk to or open the door for you. Once inside and down the stairs, a level 1 character strong in magic (70+) can clear all the priests quite easily with Magic Missile or Fireball, both available by the time you exit the Goblin Prison.
If you give the password, the Ylsid does not attack you. When you enter [level 2 area 37 Meteor Chamber], the Ylsid disappears.
[51 Fisherman's House] Has a hoe which you cannot pick up. No pickaxe.
You can rob Tafiok's chest while he is in his home and he does not react.
He stays here from the time you report the outpost attack to King Lunshire, until you return the Troll Idol to the Troll King Pog AND report back to King Lunshire.
Prior to you returning the Troll Idol, you can use Uncut Gems and Gem Dealer Licenses on him, and he pays 180 gold for each.
While he is here, his shop is locked, so that is the only time you can lockpick that door for XP.
It is very hard even at Skill 85. If you don't have enough lockpicking skill, you can try lockpicking your way down into the Crypt, and from there exit to [level 5] and the traders there to buy the Stregum Rune necessary for Bless (Mega Stregum Vitae).
Each time you re-enter this area, the door locks and you can pick it again for XP. Since it is so hard, you are unlikely to realistically get that many attempts unless you simply reload to avoid Durability loss on your Tools.
[5 Maria's General Store] After Shany is rescued, returning her and opening the door to the shop starts a cutscene dialogue. Despite what Maria says, the reward from the shopkeeper is 2 potions given during the cutscene. You cannot take anything from her store inventory for free.
[7bis] You do not actually need the book to trigger the cultists at the rendezvous point.
[9 Smithy]
The smith does not appear until report the outpost attack to King Lunshire. This is your opportunity to lockpick the door, but at this early stage of the game you will have to invest heavily in the skill to do so (even at 60 skill, it is "too complicated" and you have no chance at all). See note at [4bis] about how to try to get around this.
There are three unfinished swords. You can finish crafting them and take them or sell them to the smith. Put them on the forge, use the bellows to heat them up, then use a blacksmith hammer on them while they are glowing orange-hot.
Try to stack items and use space in the store chests efficiently as you may sell a lot of items before the store resets its inventory and clears out all the items you sold.
Intuition has no effect on repair price when you use an item on Miguel to have him repair it.
[10 Bank]
Prior to ending the Troll Strike, you can buy Mining Shares here at a reduced price. Once you have ended the strike by reporting it to Goblin King Alotar, you can sell them at a greatly increased price, BUT you must sell them back to the chest they were initially stored in.
Even if the Banker is not in the Bank, you cannot rob the store inventory chests -- opening them starts the buy/sell interface. If the Banker is not there, however, you are still trespassing and city guards will try to kill you.
If you are standing inside the enclosed vault area (left side with two trapped chests), you are typically not visible to anyone outside of that area. So you can pick up gold from the table and loot the chests without needing to be invisible.
[13 Arx Castle Main Hall] As part of the main quest, you will be met by Sister Chinkashh who gives you Mega Spacium runes and teaches you that spell to activate the teleporters -- but only if you haven't already activated any of the portals.
[19 Research Lab] Prior to receiving the quest to investigate Falan's death, you can lockpick into the lab and speak with Felnor (and after the cutscene, the chests in that room unlock; they cannot be picked). Felnor gives partial dialog related to the quest but the quest itself does not appear to be broken by doing this.
[36 Crypt] At a relatively low Skill you can lockpick your way in early and get the Shield of the Ancients, which has no requirements to wield and is indestructible.
[39 Drawbridge, 49 Ortiern] Both these guards will die once you have the Gem Dealer's License from Ortiern and you leave the outpost for the first time. You could kill them first for XP. Trying to heal them with a potion apparently makes no difference.
[41 "Yellow Tulip" Adventurer Inn]
Enoill is the one-eyed man you are looking for as part of a side quest.
To complete the side quest you need to buy him a beer from the innkeeper downstairs. If he disappears but you can still hear him shouting at the innkeeper for beer, just put the beer on the table in front of him anyway. The beer should vanish, indicating that he drank it. The quest continues normally.
The wall on his left has the first hint for Oliver's quest.
The wheel of fortune gambler at the inn leaves after you win twice, no matter the amount. You can reload-to-win a maximum of 600 gold by placing all three tokens on the same number, and spin / reload until that number wins twice.Since you will shortly get so much money in the game (as long as you diligently pick up every weapon and armor and sell it), it is pointless to really waste your time doing this.
The innkeeper has a key to the metal door leading to the cult area. You can thereby gain access to this area quite early, but will probably make the inn hostile to you unless you pickpocket it from her. You cannot lockpick the door.
There is a Ylsid right behind the metal door that requires a password.
He cannot be lured out with spell damage thereby tricked into opening the door for you. You can use this to your advantage by casting Aam Yok Spacium from the outside and burn him to death behind the door for an easy 500xp (although he CAN chop you from behind the door if you stand too close).
If you want to gain entry the "normal" way with the password, you must not kill the Ylside so as there would then be no one to talk to or open the door for you. Once inside and down the stairs, a level 1 character strong in magic (70+) can clear all the priests quite easily with Magic Missile or Fireball, both available by the time you exit the Goblin Prison.
If you give the password, the Ylsid does not attack you. When you enter [level 2 area 37 Meteor Chamber], the Ylsid disappears.
[51 Fisherman's House] Has a hoe which you cannot pick up. No pickaxe.
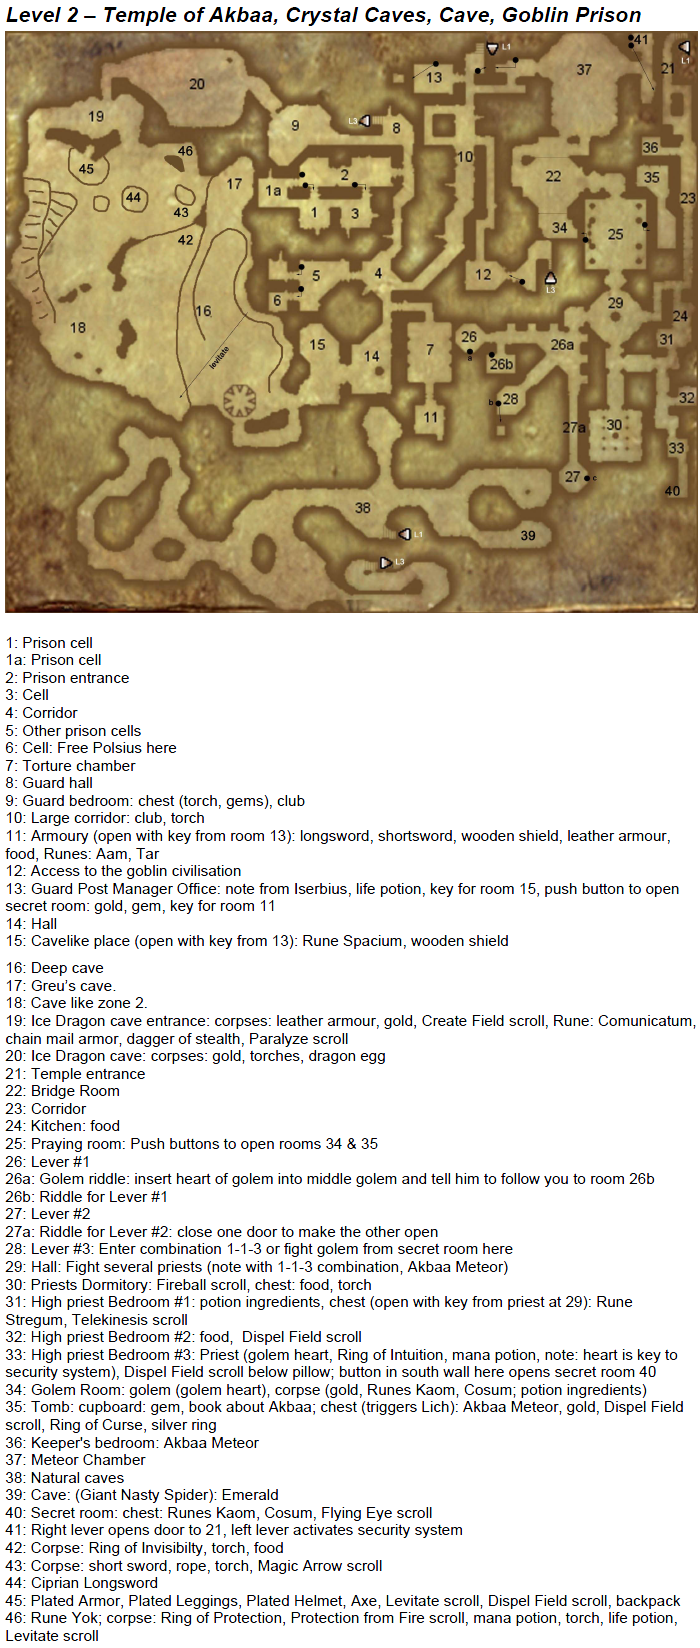
[3 Kultar's Cell] If you do not free Kultar prior to jumping down the chute, he does not appear to help you with the Goblin Lord at [level 3 area 49]. When you then return to the Goblin Prison, he no longer be there, having apparently escaped and killed another Goblin.
[4 Goblin Prison junction]
A hostile Goblin Lord appears here much later (after Sister Chinkashh teaches you Mega Spacium?)
[6 Polsius's Cell] Polsius can be made to sign the Goblin Authorization Papers before he is released from his cell, but he won't give them back until you release him. You will also not get the dialogue cutscene with him at the Yellow Tulip [level 1 area 41] later.
[12 Goblin Guardpost]
The Goblin Lord who controls the portcullis at the goblin prison upper level says he can do instead with a "little present" if you have neither a gem dealer's license nor the goblin authorization. This is 300 gold per document you haven't given to him; to give him gold, click on the pouch icon on the lower right side and then use the gold on the Goblin Lord. The gold remains in his inventory so you can kill him and get it back later.
You can also provoke the guards from your side of the portcullis by hitting the closest one with Aam Yok Spacium or the blast from Aam Yok Taar or by drawing pursuing goblins into their line of sight. The Goblin Lord will then open the portcullis to reach you. Whenever you re-enter this area the portcullis resets to closed position and a Goblin Lord has to open it; if they are dead, you can double-click to open the portcullis from either side.
[13 Guard Post Manager Office]
Secret button is a brick near the cupboard on the right side.
A hostile Goblin Lord appears here much later (after Sister Chinkashh teaches you Mega Spacium?)
[16 Cavern] The rat here occasionally respawns, sometimes without any Uncooked Ribs.
[19 Ice Dragon]
You can get (useless) dialogue from the Ice Dragon regarding being tasked by Queen Florence [level 7 area 9].
Killing the dragon gets you 800 XP and Dragon Bones but nothing much else of interest. It is very easy to kill:
Get ready with Dispel Field and Fireball. Fire off the fireball then run to the entrance and cast Dispel Field to get out. The dragon cannot follow. It can come up the ramp a bit but you can simply retreat. Only its Paralyze spell can hold you but you are out of reach anyway.
Safely in the tunnel you can wait for your mana to recover and prepare more Fireballs. Just keep using Fireball until it dies.
To steal the eggs, use the Telekinesis spell Spacium Communicatum.
[28 Lever #3] You can enter a wrong code and pull the lever to open a secret door, behind which is a hostile golem. Lead that golem to [26b] to stand on the pressure plate, then destroy it to keep it there. This saves you from having to use a Golem Heart. You still need to enter the correct combination and pull the lever in order to trigger the bridge to the Meteor room.
[37 Meteor Chamber]
Life Drain (Vitae Movis) seems to be a good way to kill the Demon.
After you destroy the Meteor with Krahoz and Zohark, you can give them to Alia.
Give one of them to get a creepy cutscene with Alia.
Give both to get back the Shield of the Ancients.
[38 Crystal Caves]
The rats here occasionally respawn, sometimes without any Uncooked Ribs.
[3 Kultar's Cell] If you do not free Kultar prior to jumping down the chute, he does not appear to help you with the Goblin Lord at [level 3 area 49]. When you then return to the Goblin Prison, he no longer be there, having apparently escaped and killed another Goblin.
[4 Goblin Prison junction]
A hostile Goblin Lord appears here much later (after Sister Chinkashh teaches you Mega Spacium?)
[6 Polsius's Cell] Polsius can be made to sign the Goblin Authorization Papers before he is released from his cell, but he won't give them back until you release him. You will also not get the dialogue cutscene with him at the Yellow Tulip [level 1 area 41] later.
[12 Goblin Guardpost]
The Goblin Lord who controls the portcullis at the goblin prison upper level says he can do instead with a "little present" if you have neither a gem dealer's license nor the goblin authorization. This is 300 gold per document you haven't given to him; to give him gold, click on the pouch icon on the lower right side and then use the gold on the Goblin Lord. The gold remains in his inventory so you can kill him and get it back later.
You can also provoke the guards from your side of the portcullis by hitting the closest one with Aam Yok Spacium or the blast from Aam Yok Taar or by drawing pursuing goblins into their line of sight. The Goblin Lord will then open the portcullis to reach you. Whenever you re-enter this area the portcullis resets to closed position and a Goblin Lord has to open it; if they are dead, you can double-click to open the portcullis from either side.
[13 Guard Post Manager Office]
Secret button is a brick near the cupboard on the right side.
A hostile Goblin Lord appears here much later (after Sister Chinkashh teaches you Mega Spacium?)
[16 Cavern] The rat here occasionally respawns, sometimes without any Uncooked Ribs.
[19 Ice Dragon]
You can get (useless) dialogue from the Ice Dragon regarding being tasked by Queen Florence [level 7 area 9].
Killing the dragon gets you 800 XP and Dragon Bones but nothing much else of interest. It is very easy to kill:
Get ready with Dispel Field and Fireball. Fire off the fireball then run to the entrance and cast Dispel Field to get out. The dragon cannot follow. It can come up the ramp a bit but you can simply retreat. Only its Paralyze spell can hold you but you are out of reach anyway.
Safely in the tunnel you can wait for your mana to recover and prepare more Fireballs. Just keep using Fireball until it dies.
To steal the eggs, use the Telekinesis spell Spacium Communicatum.
[28 Lever #3] You can enter a wrong code and pull the lever to open a secret door, behind which is a hostile golem. Lead that golem to [26b] to stand on the pressure plate, then destroy it to keep it there. This saves you from having to use a Golem Heart. You still need to enter the correct combination and pull the lever in order to trigger the bridge to the Meteor room.
[37 Meteor Chamber]
Life Drain (Vitae Movis) seems to be a good way to kill the Demon.
After you destroy the Meteor with Krahoz and Zohark, you can give them to Alia.
Give one of them to get a creepy cutscene with Alia.
Give both to get back the Shield of the Ancients.
[38 Crystal Caves]
The rats here occasionally respawn, sometimes without any Uncooked Ribs.
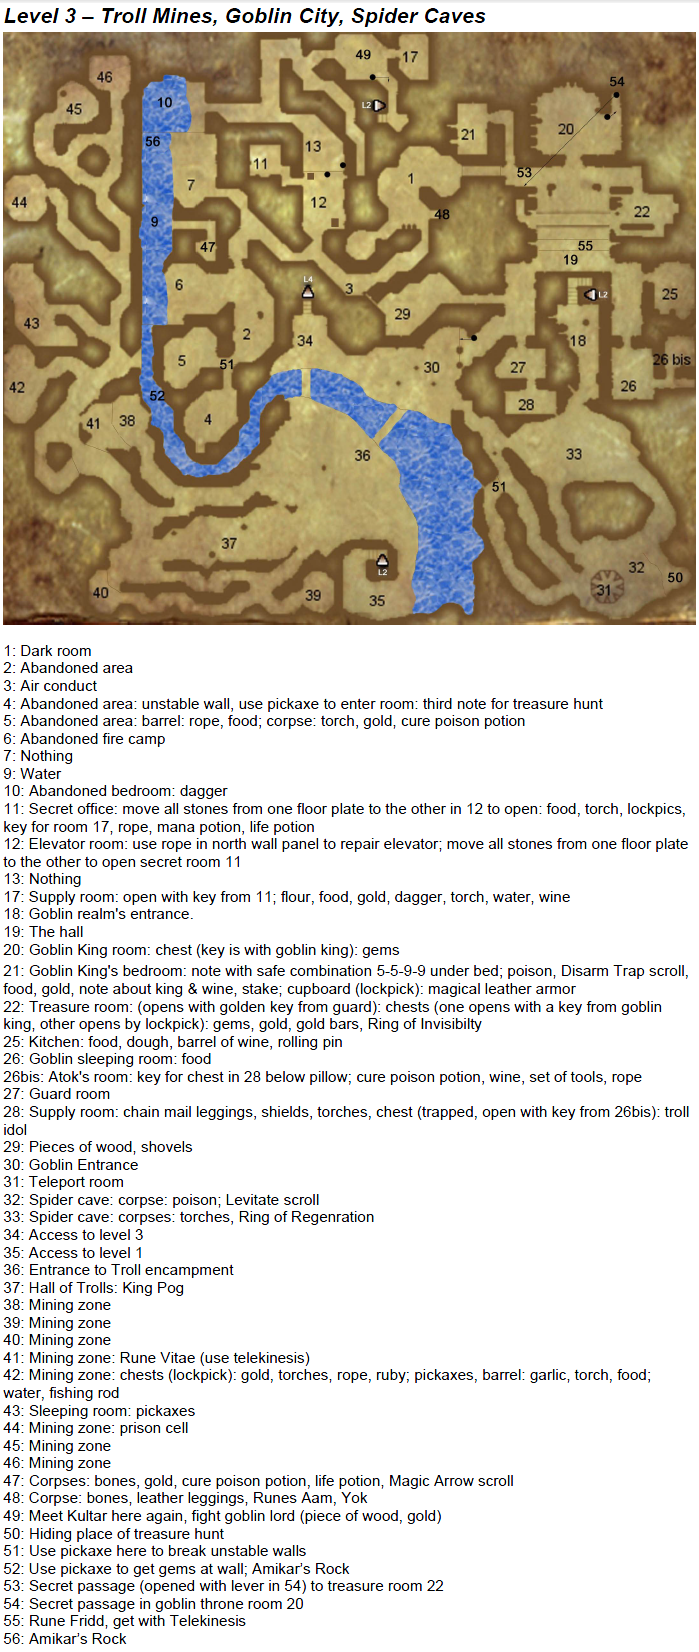
[6 Campfire] A bit later into the game, two hostile goblins are here fishing.
[17 Supply Room] The message when you try to lockpick is that it is too complicated and your Tools are damaged by 1 Durability unit. However, even at over 100 Technical skill it cannot be lockpicked -- you must use the key.
[20 Throne Room]
You can bring the Goblin King apple pies (double click on pie, then click on door). Therefore you can also spike the pies with wine first to cause him to exit the throne room.
You can spike the cakes that the cook makes by going to the kitchen and using Wine on the biggest piece of dough (right side on table).
You can lockpick the door and enter. This will not make the guards hostile.
[22 Treasure Room] When you are near the door, you can see out the crack between the door and the wall. This way, you can check if the sentry has moved aside, allowing you to work on the chest directly in front of that door (where you would otherwise be spotted). If you douse the torch with spell Nhi Yok, you can stand in front of the door and look through the peephole for the guard; as long as you have hidden status (crouching person icon at lower left corner of the screen) the guard will not spot you.
[28 Reservation]
There are five unlit torches in the Reservation that will be lit once you are formally granted access by the King. To preserve their 20/20 durability and stackability in your inventory, you need to lockpick the door and get them first. After lockpicking you can enter without the guard becoming hostile from your trespass unless you are seen taking something.
Do not open the chest (whether you take the Troll Idol or not) before getting permission from the King to get access to this area. If you do, Atok will appear but either have the wrong dialogue cutscene (if you haven't spoken with him at [26 Goblin Sleeping Room]) or just stand there after killing the guard. The quest appears to still complete normally, however.
[37 Troll King Pog]
There is a shortcut to King Pog's throne room -- Once you enter the troll area [36], go left up the stone stairs. There will be a "window" with bars on the right at the top of the stairs. Jump onto that ledge outside the window, crouch, and walk between the bars. You can exit the same way.
Once you return the Idol to Pog, the strike is over and the main quest proceeds back at the Throneroom in Arx. However, various parts of the strike are not completely over. You must speak with Izak the Foreman (who appears at [29bis]) and King Alotar (in his throne room; he becomes a gem trader but with inferior prices compared to Tafiok). Until you have completed this step, Mining Shares you bought in Arx cannot be sold for more than you bought them.
After you give Pog the book on Finance, you must exit the area and re-enter it for there to be changes: The goblins become hostile and Pog becomes the new gem dealer. He gives good prices if you buy from him, lousy ones if you sell to him.
[42 two chests] The trolls here move away to mine once the Troll Strike is over, and you can then come here and steal from the chests without anyone seeing you.
[44 Troll Prisoner] If the trolls become your enemy, you can still clear the rubble blocking the human city of Arx and the human Outpost on level 1 by freeing this prisoner (if you speak with him a second time he tells you who has the key). If you return the Troll Idol to King Pog, this room becomes unlocked, the prisoner will have vanished, and you can then pickaxe the gem deposits on the walls.
[49 Kultar]
Although Kultar cannot apparently die during the fight with the Goblin Lord, you can kill him after. Whether you do or not will determine the dialogue you get when you meet him again later.
The Goblin Lord will turn to fight you if you hit it. If it cannot hit you (e.g., because you ran away) and Kultar hits it, its attention will turn back to Kultar. In this way you can quite safely engage it. But unless you land the killing blow, you do not get XP for the Goblin Lord.
[6 Campfire] A bit later into the game, two hostile goblins are here fishing.
[17 Supply Room] The message when you try to lockpick is that it is too complicated and your Tools are damaged by 1 Durability unit. However, even at over 100 Technical skill it cannot be lockpicked -- you must use the key.
[20 Throne Room]
You can bring the Goblin King apple pies (double click on pie, then click on door). Therefore you can also spike the pies with wine first to cause him to exit the throne room.
You can spike the cakes that the cook makes by going to the kitchen and using Wine on the biggest piece of dough (right side on table).
You can lockpick the door and enter. This will not make the guards hostile.
[22 Treasure Room] When you are near the door, you can see out the crack between the door and the wall. This way, you can check if the sentry has moved aside, allowing you to work on the chest directly in front of that door (where you would otherwise be spotted). If you douse the torch with spell Nhi Yok, you can stand in front of the door and look through the peephole for the guard; as long as you have hidden status (crouching person icon at lower left corner of the screen) the guard will not spot you.
[28 Reservation]
There are five unlit torches in the Reservation that will be lit once you are formally granted access by the King. To preserve their 20/20 durability and stackability in your inventory, you need to lockpick the door and get them first. After lockpicking you can enter without the guard becoming hostile from your trespass unless you are seen taking something.
Do not open the chest (whether you take the Troll Idol or not) before getting permission from the King to get access to this area. If you do, Atok will appear but either have the wrong dialogue cutscene (if you haven't spoken with him at [26 Goblin Sleeping Room]) or just stand there after killing the guard. The quest appears to still complete normally, however.
[37 Troll King Pog]
There is a shortcut to King Pog's throne room -- Once you enter the troll area [36], go left up the stone stairs. There will be a "window" with bars on the right at the top of the stairs. Jump onto that ledge outside the window, crouch, and walk between the bars. You can exit the same way.
Once you return the Idol to Pog, the strike is over and the main quest proceeds back at the Throneroom in Arx. However, various parts of the strike are not completely over. You must speak with Izak the Foreman (who appears at [29bis]) and King Alotar (in his throne room; he becomes a gem trader but with inferior prices compared to Tafiok). Until you have completed this step, Mining Shares you bought in Arx cannot be sold for more than you bought them.
After you give Pog the book on Finance, you must exit the area and re-enter it for there to be changes: The goblins become hostile and Pog becomes the new gem dealer. He gives good prices if you buy from him, lousy ones if you sell to him.
[42 two chests] The trolls here move away to mine once the Troll Strike is over, and you can then come here and steal from the chests without anyone seeing you.
[44 Troll Prisoner] If the trolls become your enemy, you can still clear the rubble blocking the human city of Arx and the human Outpost on level 1 by freeing this prisoner (if you speak with him a second time he tells you who has the key). If you return the Troll Idol to King Pog, this room becomes unlocked, the prisoner will have vanished, and you can then pickaxe the gem deposits on the walls.
[49 Kultar]
Although Kultar cannot apparently die during the fight with the Goblin Lord, you can kill him after. Whether you do or not will determine the dialogue you get when you meet him again later.
The Goblin Lord will turn to fight you if you hit it. If it cannot hit you (e.g., because you ran away) and Kultar hits it, its attention will turn back to Kultar. In this way you can quite safely engage it. But unless you land the killing blow, you do not get XP for the Goblin Lord.
To rescue Shany, you must let one of the cultists open the secret door with the torch-lever; otherwise, she will always be dead by the time you enter. Her cries for help are scripted based on distance, so if you are having trouble letting the cultist open the door, just hang back until you hear the door opening, then charge in.
If a cultist is moving toward Shany at the altar, make sure you stop him first; sometimes they all turn to attack you, which makes it easier to just Aam Yok Taar the lot of them in one go.
If you are too slow, she will be sacrificed and transform into a demon. After the cultists are clear, you can sacrifice her yourself to summon a demon hostile to you.
You do not actually have to escort Shany back to her mother.
[9 Goblin Trap] If you can somehow get behind the chest, the goblins have dialogue where they charge out, but you do not actually encounter them until you open the chest.
[24 Food Corridors / Restricted Area]
Traps just sound an alarm.
Here and beyond, if you kill anyone quickly (before they pull the lever to sound the alarm or before anyone from the main camp notices) the rest of the Rebel Camp will not be alerted. In this way you can acquire Krahoz without making the main camp hostile. If you even just open the chest containing Krahoz (whether you take it or not) your quest log updates and a guard stands in front of the Rebel Leader's tent, making it impossible for you to get by and give her the Shield of the Ancients.
[30 Quartermaster] Buys and sells weapons, armour, food, and general goods.
To rescue Shany, you must let one of the cultists open the secret door with the torch-lever; otherwise, she will always be dead by the time you enter. Her cries for help are scripted based on distance, so if you are having trouble letting the cultist open the door, just hang back until you hear the door opening, then charge in.
If a cultist is moving toward Shany at the altar, make sure you stop him first; sometimes they all turn to attack you, which makes it easier to just Aam Yok Taar the lot of them in one go.
If you are too slow, she will be sacrificed and transform into a demon. After the cultists are clear, you can sacrifice her yourself to summon a demon hostile to you.
You do not actually have to escort Shany back to her mother.
[9 Goblin Trap] If you can somehow get behind the chest, the goblins have dialogue where they charge out, but you do not actually encounter them until you open the chest.
[24 Food Corridors / Restricted Area]
Traps just sound an alarm.
Here and beyond, if you kill anyone quickly (before they pull the lever to sound the alarm or before anyone from the main camp notices) the rest of the Rebel Camp will not be alerted. In this way you can acquire Krahoz without making the main camp hostile. If you even just open the chest containing Krahoz (whether you take it or not) your quest log updates and a guard stands in front of the Rebel Leader's tent, making it impossible for you to get by and give her the Shield of the Ancients.
[30 Quartermaster] Buys and sells weapons, armour, food, and general goods.
General Tips and Notes Character Build / Attributes / Skills
Strength, Intelligence, Dexterity, and Constitution can all go over 23, and Skills can exceed 100 (although they may not necessarily benefit you more at a score of over 100).
Plan to reach only character level 9.
Do not raise utility skills to 100. Instead, raise them and then use Bless to bring them up the rest of the way.
You can equip gear with requirement you do not meet by casting Bless to meet those requirements. You will not automatically un-equip them when the Bless expires.
Your (Magic Skill/10, rounded) is basically your effective magic level, not your character level.
Bless has a maximum bonus of +10, which you will get at Magic Skill 90+. A +10 bonus provides +20 to most skills and +25 to Object Knowledge (out of 70-75 needed for the game).
You can Bless yourself and then store an Autocast Bless that is based on your currently improved stats. Cancel the current Bless and use the Autocast one to access the improved Bless.
Because you can do this, you really only need your Magic skill to 90+ AFTER Bless. It is fairly easy to acquire two Rings of Casting for +20% Magic, so your final Magic Skill only needs to be 64 (+20% from rings = 76, +16 from resulting Bless = 92).
To cast Bless you require Mega Stregum Vitae. The hardest to get is Stregum. To get it early, lockpick into the Crypt in Arx and use the secret passages to get to the caves where you can buy it from the Twin Traders.
You will only really have trouble in the Dwarf mines on floor 8 where magic is not allowed, but a Technical Skill of around 70+ should allow you to lockpick anything that can be lockpicked.
Technical Skill
You get XP for picking locks and disarming traps with A Set of Tools instead of using a key or spell. Some doors re-lock every time you enter the area, such as Tafiok's shop while he is at home, and the kitchen in the human castle at Arx when the cook is not in.
You will know if a key is necessary if the feedback from the character is that it is impossible; in almost all cases your lockpicks will not lose Durability.
[Level 3 Area 1] is an exception -- despite the audio message, you must use the key. Even at a Technical skill of 110 you cannot lockpick it.
You need about a skill of 90 to easily handle most locks, even in some early game areas like the city of Arx. 95+ for the human castle -- so ultimately you will want to aim for 100 to get maximum XP.
Object Knowledge - Repairing
You always lose Durability on items you repair unless your Object Knowledge is 100+ AND you are wielding a Blacksmith Hammer.
Magic
When you pre-cast a spell, your current magic skill is recorded. So, if you cast a Bless before pre-casting a spell, that recorded spell will be cast as if you had the Bless effect even when the Bless effect is no longer on you.
The fastest way to get early overwhelming firepower is Magic and Aam Yok Taar. If you focus on the Magic skill, you can basically one-shot almost anything with the Fireball spell.
Invisibility (Nhi Vista)
You can cast spells, including attack spells, while invisible (Nhi Vista) and remain invisible. It is not foolproof against being detected, however, as you still make noise walking.
You can use it to trespass areas and even open/close doors while invisible. In this way you can easily avoid detection by guards and resulting hostility, even if you just use it briefly to enter/exit the restricted area. Opening/closing a door to a restricted area will not trigger hostility, so you can lockpick open a door, then use Nhi Vista to enter and shut the door (thereby blocking the line of sight of guards).
Lightning Strike Aam Folgora Taar hits everything it contacts. While the spell is active, you can turn and "spray" the attack like a water hose.
Runes of Guardian (purple glowing traps on the floor) can be triggered by creatures other than yourself.
Use a Summon (e.g., Raise Dead) near it and walk away before the summon actually appears and triggers the trap, making it explode. Then because typically your summon is hostile to you unless you have a control spell, cancel the summon spell to banish your creature.
Miscellaneous Notes
Any blade weapon (and, strangely enough, a Blacksmith Hammer that can be wielded as a weapon) can unmake a Fishing Rod or cut A Piece of Wood into Stakes (which stack in inventory, unlike sticks).
Note that you need at least 2 Piece of Wood to repair floor levers in the Crypt (and typically a Piece of Wood will be nearby), so don't immediately convert all of them.
If you click on the Piece of Wood while it is in inventory, you get two Stakes instead of just one.
A Fishing Rod sells for as much as a Rope, so you might as well sell the deconstructed Pole and Rope separately.
Many areas eventually respawn some vermin like Rats and Spiders. Other areas may spawn enemies based on your quest / sidequest progress for tasks in that area. Quantity is typically very little, maybe 1-2 scattered over the area.
Containers and Stacking
You can stack more than 10 units of an item in a container. First, put in a stack of 9 or less. Then, put in a stack of any size and let the interface automatically place it (e.g., by dragging the stack over an item of another type in the container). The interface will select a stack of the same type of item that is not yet at maximum (10) and add to it, even if the new total will be over 10.
You can sometimes get a stack of more than 10 units of an item by getting it from a container that already has such a stack. Use the "get all" button at the lower left of the container inventory window.
Oliver’s Treasure Hunt locations:
note #1 - level 1 room 42 Tavern upstairs, to the left of Enoill
note #7 - level 3 room 50, south-eastern most point, need shovel; attempt to equip your shovel as a weapon to "use it" and the key will appear
treasure - level 4 room 8, other chest
An interesting alternate "walkthrough" is this Arx Fatalis speed-run video where the player basically shortcuts most of the game and ignores most of the quests, and therefore has to do a lot of things in an alternate way.
General Tips and Notes Character Build / Attributes / Skills
Strength, Intelligence, Dexterity, and Constitution can all go over 23, and Skills can exceed 100 (although they may not necessarily benefit you more at a score of over 100).
Plan to reach only character level 9.
Do not raise utility skills to 100. Instead, raise them and then use Bless to bring them up the rest of the way.
You can equip gear with requirement you do not meet by casting Bless to meet those requirements. You will not automatically un-equip them when the Bless expires.
Your (Magic Skill/10, rounded) is basically your effective magic level, not your character level.
Bless has a maximum bonus of +10, which you will get at Magic Skill 90+. A +10 bonus provides +20 to most skills and +25 to Object Knowledge (out of 70-75 needed for the game).
You can Bless yourself and then store an Autocast Bless that is based on your currently improved stats. Cancel the current Bless and use the Autocast one to access the improved Bless.
Because you can do this, you really only need your Magic skill to 90+ AFTER Bless. It is fairly easy to acquire two Rings of Casting for +20% Magic, so your final Magic Skill only needs to be 64 (+20% from rings = 76, +16 from resulting Bless = 92).
To cast Bless you require Mega Stregum Vitae. The hardest to get is Stregum. To get it early, lockpick into the Crypt in Arx and use the secret passages to get to the caves where you can buy it from the Twin Traders.
You will only really have trouble in the Dwarf mines on floor 8 where magic is not allowed, but a Technical Skill of around 70+ should allow you to lockpick anything that can be lockpicked.
Technical Skill
You get XP for picking locks and disarming traps with A Set of Tools instead of using a key or spell. Some doors re-lock every time you enter the area, such as Tafiok's shop while he is at home, and the kitchen in the human castle at Arx when the cook is not in.
You will know if a key is necessary if the feedback from the character is that it is impossible; in almost all cases your lockpicks will not lose Durability.
[Level 3 Area 1] is an exception -- despite the audio message, you must use the key. Even at a Technical skill of 110 you cannot lockpick it.
You need about a skill of 90 to easily handle most locks, even in some early game areas like the city of Arx. 95+ for the human castle -- so ultimately you will want to aim for 100 to get maximum XP.
Object Knowledge - Repairing
You always lose Durability on items you repair unless your Object Knowledge is 100+ AND you are wielding a Blacksmith Hammer.
Magic
When you pre-cast a spell, your current magic skill is recorded. So, if you cast a Bless before pre-casting a spell, that recorded spell will be cast as if you had the Bless effect even when the Bless effect is no longer on you.
The fastest way to get early overwhelming firepower is Magic and Aam Yok Taar. If you focus on the Magic skill, you can basically one-shot almost anything with the Fireball spell.
Invisibility (Nhi Vista)
You can cast spells, including attack spells, while invisible (Nhi Vista) and remain invisible. It is not foolproof against being detected, however, as you still make noise walking.
You can use it to trespass areas and even open/close doors while invisible. In this way you can easily avoid detection by guards and resulting hostility, even if you just use it briefly to enter/exit the restricted area. Opening/closing a door to a restricted area will not trigger hostility, so you can lockpick open a door, then use Nhi Vista to enter and shut the door (thereby blocking the line of sight of guards).
Lightning Strike Aam Folgora Taar hits everything it contacts. While the spell is active, you can turn and "spray" the attack like a water hose.
Runes of Guardian (purple glowing traps on the floor) can be triggered by creatures other than yourself.
Use a Summon (e.g., Raise Dead) near it and walk away before the summon actually appears and triggers the trap, making it explode. Then because typically your summon is hostile to you unless you have a control spell, cancel the summon spell to banish your creature.
Miscellaneous Notes
Any blade weapon (and, strangely enough, a Blacksmith Hammer that can be wielded as a weapon) can unmake a Fishing Rod or cut A Piece of Wood into Stakes (which stack in inventory, unlike sticks).
Note that you need at least 2 Piece of Wood to repair floor levers in the Crypt (and typically a Piece of Wood will be nearby), so don't immediately convert all of them.
If you click on the Piece of Wood while it is in inventory, you get two Stakes instead of just one.
A Fishing Rod sells for as much as a Rope, so you might as well sell the deconstructed Pole and Rope separately.
Many areas eventually respawn some vermin like Rats and Spiders. Other areas may spawn enemies based on your quest / sidequest progress for tasks in that area. Quantity is typically very little, maybe 1-2 scattered over the area.
Containers and Stacking
You can stack more than 10 units of an item in a container. First, put in a stack of 9 or less. Then, put in a stack of any size and let the interface automatically place it (e.g., by dragging the stack over an item of another type in the container). The interface will select a stack of the same type of item that is not yet at maximum (10) and add to it, even if the new total will be over 10.
You can sometimes get a stack of more than 10 units of an item by getting it from a container that already has such a stack. Use the "get all" button at the lower left of the container inventory window.
Oliver’s Treasure Hunt locations:
note #1 - level 1 room 42 Tavern upstairs, to the left of Enoill
note #7 - level 3 room 50, south-eastern most point, need shovel; attempt to equip your shovel as a weapon to "use it" and the key will appear
treasure - level 4 room 8, other chest
An interesting alternate "walkthrough" is this Arx Fatalis speed-run video where the player basically shortcuts most of the game and ignores most of the quests, and therefore has to do a lot of things in an alternate way.