Pages

Showing posts with label Deus Ex Human Revolution Director's Cut. Show all posts

Walkthrough - Deus Ex Human Revolution Director's Cut - Singapore, Panchaea

This is a minimal walkthrough for Deus Ex: Human Revolution (Director's Cut), The Missing Link (between Hengsha part 2 and Singapore). We only go over things you may not have considered; a detailed walkthrough is already available from the Deus Ex Wiki.

General
Start collecting a Laser Rifle and Cyberboost Bars. They will be handy in Panchaea when you just want to ignore the numerous enemies that give no XP and usually drop no useful loot.

Singapore
M1 - Rescuing Megan and Her Team
  • Although uploading the virus will also disable the GPL jamming, you will lose some XP compared to disabling the GPL jamming prior to uploading the virus. You get only inconsequentially different dialogue.
  • Jaron Namir
    • To defeat Namir, you can do what you did to the other two Spec Op bosses -- activate automated enemies. The safest way to the computer is through the ventilation in the room near the door to the computer room.
    • Once inside, if Namir is nearby he will see you and hits from him can knock you off the computer, forcing you to start all over. If this happens, you can either use an AUD (but you lose any rewards from hacking) or your Cloaking augmentation (and a lot of batteries).
    • Prior to hacking you can try putting boxes on either side of the computer to block his line of sight. To speed up your hack and ensure success, use Nukes to capture nodes so you get maximum XP.
    • It is possible that Namir's grenades will destroy the bots but this is rare. If he does destroy a bot, you still get Hunk of Junk XP for that bot.
    • If you have to kill Namir manually, notice his tactic and use it against him -- he leaps over walls when hurt or to pursue, so you can just duck back and forth around walls, especially to avoid his grenades. You can also try looking for the ventilation shaft to the roof and using your hits-through-walls laser on him. If you are feeling brave, rush to use a kill-Takedown while he is getting up after a jump over a wall.
  • You cannot highlight the Gramaphone in Megan's room as an interactable object but you can interact with it.
  • If you saved Malik earlier, your reward is that she will take out all enemies in the helicopter bay for you, thereby presumably preventing you from getting XP for defeating them yourself. Thanks Malik. NOT.
Panchaea
M1 - Shutting Down Darrow's Signal 
  • The crazed humans here give no XP but can still cost you Ghost bonuses if they see you so you might want to handle them with stealth and take them all down.
  • When you first go outside to the Ring portion, there are a lot of workers and it can be hard to separate them for takedowns without being detected. There are also basically no throwables to use as noise distractions. You can instead go to the platform above or below and make some noise there by running or jumping. This lures one at a time to your location where you can use a Takedowns on them.
    • A good location to use is the green portable toilet on the east side near the entrance back into the facility. Once an enemy is Alarmed, hide behind the black tarped crates and let them walk by before doing a Takedown on them from behind. Drag their bodies to hide in the corridor nearby.
  • Hyron Project
    • Just get a bit closer to Zhao and shoot her with your laser. If you remembered to bring one. This ending will disable all the terminals you could otherwise have hacked, as well as turrets and bots in storage, but it is the end game already, and in any case you would have long ago gotten all the augmentations you need.
  • Finish watching the credits to get one final cutscene / dialogue.
      This is a minimal walkthrough for Deus Ex: Human Revolution (Director's Cut), The Missing Link (between Hengsha part 2 and Singapore). We only go over things you may not have considered; a detailed walkthrough is already available from the Deus Ex Wiki.

      General
      Start collecting a Laser Rifle and Cyberboost Bars. They will be handy in Panchaea when you just want to ignore the numerous enemies that give no XP and usually drop no useful loot.

      Singapore
      M1 - Rescuing Megan and Her Team
      • Although uploading the virus will also disable the GPL jamming, you will lose some XP compared to disabling the GPL jamming prior to uploading the virus. You get only inconsequentially different dialogue.
      • Jaron Namir
        • To defeat Namir, you can do what you did to the other two Spec Op bosses -- activate automated enemies. The safest way to the computer is through the ventilation in the room near the door to the computer room.
        • Once inside, if Namir is nearby he will see you and hits from him can knock you off the computer, forcing you to start all over. If this happens, you can either use an AUD (but you lose any rewards from hacking) or your Cloaking augmentation (and a lot of batteries).
        • Prior to hacking you can try putting boxes on either side of the computer to block his line of sight. To speed up your hack and ensure success, use Nukes to capture nodes so you get maximum XP.
        • It is possible that Namir's grenades will destroy the bots but this is rare. If he does destroy a bot, you still get Hunk of Junk XP for that bot.
        • If you have to kill Namir manually, notice his tactic and use it against him -- he leaps over walls when hurt or to pursue, so you can just duck back and forth around walls, especially to avoid his grenades. You can also try looking for the ventilation shaft to the roof and using your hits-through-walls laser on him. If you are feeling brave, rush to use a kill-Takedown while he is getting up after a jump over a wall.
      • You cannot highlight the Gramaphone in Megan's room as an interactable object but you can interact with it.
      • If you saved Malik earlier, your reward is that she will take out all enemies in the helicopter bay for you, thereby presumably preventing you from getting XP for defeating them yourself. Thanks Malik. NOT.
      Panchaea
      M1 - Shutting Down Darrow's Signal 
      • The crazed humans here give no XP but can still cost you Ghost bonuses if they see you so you might want to handle them with stealth and take them all down.
      • When you first go outside to the Ring portion, there are a lot of workers and it can be hard to separate them for takedowns without being detected. There are also basically no throwables to use as noise distractions. You can instead go to the platform above or below and make some noise there by running or jumping. This lures one at a time to your location where you can use a Takedowns on them.
        • A good location to use is the green portable toilet on the east side near the entrance back into the facility. Once an enemy is Alarmed, hide behind the black tarped crates and let them walk by before doing a Takedown on them from behind. Drag their bodies to hide in the corridor nearby.
      • Hyron Project
        • Just get a bit closer to Zhao and shoot her with your laser. If you remembered to bring one. This ending will disable all the terminals you could otherwise have hacked, as well as turrets and bots in storage, but it is the end game already, and in any case you would have long ago gotten all the augmentations you need.
      • Finish watching the credits to get one final cutscene / dialogue.
          reade more... Résuméabuiyad

          Walkthrough - Deus Ex Human Revolution Director's Cut - The Missing Link

          This is a minimal walkthrough for Deus Ex: Human Revolution (Director's Cut), The Missing Link (between Hengsha part 2 and Singapore). We only go over things you may not have considered; a detailed walkthrough is already available from the Deus Ex Wiki.

          General
          Prior to leaving Hengsha, sell everything except your favourite weapons because you're going to lose not only your gear but your augments, including inventory space. You can get your weapons back (but without ammunition) and all your credits, if you have the Director's Cut.
          Or, don't bother because you get all your credits back at some point, and you probably have more than you will ever need.

          Praxis feels very tight in the early part of this mission if you want to try to grab all XP along the way.
          • There are a lot of Double Takedown opportunities so the Reflexes augment early is nice, but some require that you approach from the correct direction or have Cloaking to get into range without being spotted (or setting them up manually, which can be tedious).
          • You need Hacking level 3 on the ship and level 5 for a few locations after. You can delay getting level 4 and level 5 and instead first get Hacking Stealth 3 to have a less stressful time.
          • The Jumping augment is very useful. Get it while on the ship.
          • You can use a firearm on weak walls (preferably a Silenced one) instead of the augment to break through walls. Just keep your eyes open for cracks on walls.
          • Once you reach Quinn you can get up to 3 Praxis Kits (if you have the CASIE augment) and at that point you can pick up the augment for carrying heavy objects.
          Hei Zhen Zhu

          M1 Getting out of the frying pan
          • There is a very long drop in the Aft Cargo Hold (after the CIC). If you do not have the Icarus augment to always land safely, you can drop and try to grab the ladder on the way down; you still get the XP bonus for exploring this route.

          Acceptable Losses

          Rifleman Bank Station


          M2 In the belly of the beast

          Getting Inside Help

          Quinn's Scavenger Hunt

          M3  Choices, choices

          • Before you open the door in the morgue, do your final buy/sell with Quinn. Preferably also get maximum inventory space so you won't have to backtrack to pick up more stuff. This way you will end this mission with whatever final set of gear you want to take with you.
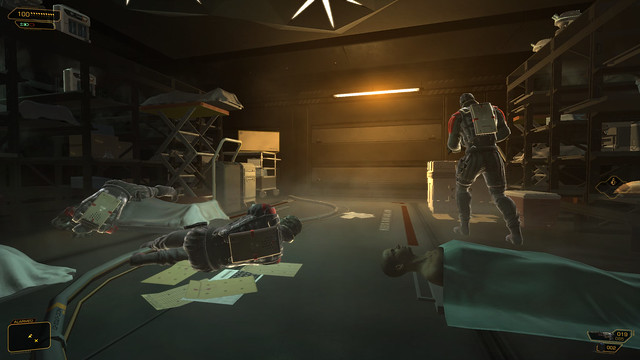
          • As you escape from the underwater base, you will emerge in the Morgue and behind three soldiers. It is possible to use a Double Takedown on the two on the left WITHOUT alerting the one on the right. Some experimentation may be required though. See picture below.
          DXHRDC Missing Link DTD without alerting third guard

          M4 The long way home


            This is a minimal walkthrough for Deus Ex: Human Revolution (Director's Cut), The Missing Link (between Hengsha part 2 and Singapore). We only go over things you may not have considered; a detailed walkthrough is already available from the Deus Ex Wiki.

            General
            Prior to leaving Hengsha, sell everything except your favourite weapons because you're going to lose not only your gear but your augments, including inventory space. You can get your weapons back (but without ammunition) and all your credits, if you have the Director's Cut.
            Or, don't bother because you get all your credits back at some point, and you probably have more than you will ever need.

            Praxis feels very tight in the early part of this mission if you want to try to grab all XP along the way.
            • There are a lot of Double Takedown opportunities so the Reflexes augment early is nice, but some require that you approach from the correct direction or have Cloaking to get into range without being spotted (or setting them up manually, which can be tedious).
            • You need Hacking level 3 on the ship and level 5 for a few locations after. You can delay getting level 4 and level 5 and instead first get Hacking Stealth 3 to have a less stressful time.
            • The Jumping augment is very useful. Get it while on the ship.
            • You can use a firearm on weak walls (preferably a Silenced one) instead of the augment to break through walls. Just keep your eyes open for cracks on walls.
            • Once you reach Quinn you can get up to 3 Praxis Kits (if you have the CASIE augment) and at that point you can pick up the augment for carrying heavy objects.
            Hei Zhen Zhu

            M1 Getting out of the frying pan
            • There is a very long drop in the Aft Cargo Hold (after the CIC). If you do not have the Icarus augment to always land safely, you can drop and try to grab the ladder on the way down; you still get the XP bonus for exploring this route.

            Acceptable Losses

            Rifleman Bank Station


            M2 In the belly of the beast

            Getting Inside Help

            Quinn's Scavenger Hunt

            M3  Choices, choices

            • Before you open the door in the morgue, do your final buy/sell with Quinn. Preferably also get maximum inventory space so you won't have to backtrack to pick up more stuff. This way you will end this mission with whatever final set of gear you want to take with you.
            • As you escape from the underwater base, you will emerge in the Morgue and behind three soldiers. It is possible to use a Double Takedown on the two on the left WITHOUT alerting the one on the right. Some experimentation may be required though. See picture below.
            DXHRDC Missing Link DTD without alerting third guard

            M4 The long way home


              reade more... Résuméabuiyad

              Walkthrough - Deus Ex Human Revolution Director's Cut - Detroit 2, Hengsha 2

              This is a minimal walkthrough for Deus Ex: Human Revolution (Director's Cut), Detriot part 2 and Hengsha part 2, after Adam Jensen leaves Montreal and the PICUS station there. We only go over things you may not have considered; a detailed walkthrough is already available from the Deus Ex Wiki.

              General
              Some safes and computers will be locked again, so you can hack or re-hack them.

              Detroit 2

              M1 - Confronting Sarif

              Acquaintances Forgotten
               

              M2 - Finding Isaias Sandoval
              Taggart must be confronted with the evidence of Sandoval's involvement in the kidnappings, or have the evidence planted on his computer, in order for Sandoval to not attack Jensen and be suicidal instead.
              If you fail to convince Taggart, you can no longer plant the evidence on his computer since you have already tried to expose his connection to it live on PICUS. As the Wiki walkthrough explains, there is slightly more XP to be had by hacking instead of confronting Taggart. However, by now you will probably have all the augments you need so XP no longer becomes critical.

              Smash the State
              To get four locations to search (each gives you 100 XP) you must have the Social Enhancer.

              M3/M1 - Cashing in Old Favors


              Hengsha 2

              A Matter of Discretion, Corporate Warfare
               

              Talion A.D.
              The quest does not properly update after reading the pocket secretary but Zelazny is in the sewers accessed outside the Alice Garden Pods. They probably want you to look around for him instead of getting an automatic map marker for his location.
              Fastest way of taking down Zelazny is with Takedowns. You can handle him and one other almost immediately with a Double Takedown. Eat Cyberboost bars if you have to in order to have energy to execute the additional Takedowns.

              M1/M2 - Find Vasili Sevchenko's GPL Device

              M2/M3 - You Scratch My Back, I'll Scratch Yours
               

              M3/M4 - Stowing Away

                This is a minimal walkthrough for Deus Ex: Human Revolution (Director's Cut), Detriot part 2 and Hengsha part 2, after Adam Jensen leaves Montreal and the PICUS station there. We only go over things you may not have considered; a detailed walkthrough is already available from the Deus Ex Wiki.

                General
                Some safes and computers will be locked again, so you can hack or re-hack them.

                Detroit 2

                M1 - Confronting Sarif

                Acquaintances Forgotten
                 

                M2 - Finding Isaias Sandoval
                Taggart must be confronted with the evidence of Sandoval's involvement in the kidnappings, or have the evidence planted on his computer, in order for Sandoval to not attack Jensen and be suicidal instead.
                If you fail to convince Taggart, you can no longer plant the evidence on his computer since you have already tried to expose his connection to it live on PICUS. As the Wiki walkthrough explains, there is slightly more XP to be had by hacking instead of confronting Taggart. However, by now you will probably have all the augments you need so XP no longer becomes critical.

                Smash the State
                To get four locations to search (each gives you 100 XP) you must have the Social Enhancer.

                M3/M1 - Cashing in Old Favors


                Hengsha 2

                A Matter of Discretion, Corporate Warfare
                 

                Talion A.D.
                The quest does not properly update after reading the pocket secretary but Zelazny is in the sewers accessed outside the Alice Garden Pods. They probably want you to look around for him instead of getting an automatic map marker for his location.
                Fastest way of taking down Zelazny is with Takedowns. You can handle him and one other almost immediately with a Double Takedown. Eat Cyberboost bars if you have to in order to have energy to execute the additional Takedowns.

                M1/M2 - Find Vasili Sevchenko's GPL Device

                M2/M3 - You Scratch My Back, I'll Scratch Yours
                 

                M3/M4 - Stowing Away

                  reade more... Résuméabuiyad

                  Walkthrough - Deus Ex Human Revolution Director's Cut - Montreal

                  This is a minimal walkthrough for Deus Ex: Human Revolution (Director's Cut), Montreal -- the investigation of the PICUS building and meeting Eliza Cassan. We only go over things you may not have considered; a detailed walkthrough is already available from the Deus Ex Wiki.

                  M1 - Confronting Eliza Cassan
                  • Keeping your Ghost bonus while doing Takedowns on all enemies becomes harder now, but still not impossible.
                    • It would be very good to have a Silenced Armour Piercing pistol but not absolutely necessary. They are useful for taking out disabled robots quietly.
                    • Keeping a Stun Gun on you with some ammo also starts being a very good idea, for handling cameras.
                    • Even so, there are generally options to bypass security in a safe and less-stressful way and get to the Security computer to disable cameras and robots first. When doing so, be mindful of going through doors that may be locked from the other direction; doing so automatically unlocks the door, and you miss the XP you would have gotten from hacking.
                  • Before riding down the finucular, have a Stun Gun and at least 2 rounds of ammo.
                    • At the bottom of the Finicular is a storage area and two guards will walk to the center and stay there a while. There is generally no time to handle the camera without setting off some kind of alarm.
                    • You can Double Takedown the guards before they disperse on a patrol routine, but in order to do so safely you need to wait till the camera is facing away, and afterwards Stun Gun the camera before it turns and sees the bodies. You will probably need to stun the camera again to give you time to hide both bodies.
                  • Yelena Fedorova 
                    • They give you lots of ammo (in lockers around the perimeter) to shoot her with, so run-and-gun is theoretically viable as you can heal while she is cloaked and waiting for her special bomb attack to recharge. Or, you can use turrets, just like on Barret.
                    • Before entering this mission, have some way to break down walls (augmentation or guns), and lots of hacking help since you are under a lot of time pressure to hack at least two items. Also helps to have the Icarus augmentation for long falls.
                    • Eliza will give ongoing commentary and hints as to when Yelena is coming for you or when she is waiting to recharge while cloaked. You can use that as hints for how much time you have to hack.
                    • Hack the door. This opens two doors with ramps up. At the top of one ramp is a weak wall. Bust that if you have time as it's a quick escape from Yelena if you need it.
                    • Once upstairs, there is a terminal protected by lasers. Do not simply use your Cloak to get past the lasers as Yelena will come for you anyway and her attacks will probably trigger the lasers. If you haven't reprogrammed the ceiling bots, they will kill you.
                    • Go to the panel on the side of the room. It can take a long time to hack so instead bust the wall and turn off the power to the lasers.
                    • If Yelena is coming, run. Or if you can do it fast enough (you may have close to 90 Nukes and Stop Worms by now), hack the computer and reprogram the turrets. If you really have trouble with time, use Automatic Unlocking Devices, which do not require you to stand around--Use the device, run, and come back later to use the computer.
                    • If Yelena is chasing you and you need time, run toward one of the poison gas pillars and either turn the valve or shoot the glass (or let her shoot the glass). Yelena likes to come close so she will end up in the gas. This will either buy you time to escape (especially if you have the Rebreather augmentation) or hold her in the room while the turrets shoot her some more.
                    • Stay in the room and hide behind the pillars until Yelena is killed by the turrets.
                    • Collect all loot. Turn the power back on for the lasers and hack the terminal. Plant EMP mines on the turrets then turn them back to "Default", making them hostile and triggering the mines to destroy them for a total of 90 XP. Destroying one any other way makes the other one hostile to you and shoot you.

                    This is a minimal walkthrough for Deus Ex: Human Revolution (Director's Cut), Montreal -- the investigation of the PICUS building and meeting Eliza Cassan. We only go over things you may not have considered; a detailed walkthrough is already available from the Deus Ex Wiki.

                    M1 - Confronting Eliza Cassan
                    • Keeping your Ghost bonus while doing Takedowns on all enemies becomes harder now, but still not impossible.
                      • It would be very good to have a Silenced Armour Piercing pistol but not absolutely necessary. They are useful for taking out disabled robots quietly.
                      • Keeping a Stun Gun on you with some ammo also starts being a very good idea, for handling cameras.
                      • Even so, there are generally options to bypass security in a safe and less-stressful way and get to the Security computer to disable cameras and robots first. When doing so, be mindful of going through doors that may be locked from the other direction; doing so automatically unlocks the door, and you miss the XP you would have gotten from hacking.
                    • Before riding down the finucular, have a Stun Gun and at least 2 rounds of ammo.
                      • At the bottom of the Finicular is a storage area and two guards will walk to the center and stay there a while. There is generally no time to handle the camera without setting off some kind of alarm.
                      • You can Double Takedown the guards before they disperse on a patrol routine, but in order to do so safely you need to wait till the camera is facing away, and afterwards Stun Gun the camera before it turns and sees the bodies. You will probably need to stun the camera again to give you time to hide both bodies.
                    • Yelena Fedorova 
                      • They give you lots of ammo (in lockers around the perimeter) to shoot her with, so run-and-gun is theoretically viable as you can heal while she is cloaked and waiting for her special bomb attack to recharge. Or, you can use turrets, just like on Barret.
                      • Before entering this mission, have some way to break down walls (augmentation or guns), and lots of hacking help since you are under a lot of time pressure to hack at least two items. Also helps to have the Icarus augmentation for long falls.
                      • Eliza will give ongoing commentary and hints as to when Yelena is coming for you or when she is waiting to recharge while cloaked. You can use that as hints for how much time you have to hack.
                      • Hack the door. This opens two doors with ramps up. At the top of one ramp is a weak wall. Bust that if you have time as it's a quick escape from Yelena if you need it.
                      • Once upstairs, there is a terminal protected by lasers. Do not simply use your Cloak to get past the lasers as Yelena will come for you anyway and her attacks will probably trigger the lasers. If you haven't reprogrammed the ceiling bots, they will kill you.
                      • Go to the panel on the side of the room. It can take a long time to hack so instead bust the wall and turn off the power to the lasers.
                      • If Yelena is coming, run. Or if you can do it fast enough (you may have close to 90 Nukes and Stop Worms by now), hack the computer and reprogram the turrets. If you really have trouble with time, use Automatic Unlocking Devices, which do not require you to stand around--Use the device, run, and come back later to use the computer.
                      • If Yelena is chasing you and you need time, run toward one of the poison gas pillars and either turn the valve or shoot the glass (or let her shoot the glass). Yelena likes to come close so she will end up in the gas. This will either buy you time to escape (especially if you have the Rebreather augmentation) or hold her in the room while the turrets shoot her some more.
                      • Stay in the room and hide behind the pillars until Yelena is killed by the turrets.
                      • Collect all loot. Turn the power back on for the lasers and hack the terminal. Plant EMP mines on the turrets then turn them back to "Default", making them hostile and triggering the mines to destroy them for a total of 90 XP. Destroying one any other way makes the other one hostile to you and shoot you.

                      reade more... Résuméabuiyad

                      Walkthrough - Deus Ex Human Revolution Director's Cut - Hengsha 1

                      This is a minimal walkthrough for Deus Ex: Human Revolution (Director's Cut), Adam Jensen's first visit to Hengsha. We only go over things you may not have considered; a detailed walkthrough is already available from the Deus Ex Wiki.

                      M1 - Hunting the Hacker
                      • The Hive:
                        • If you can get legitimate access to the basement, you can hack the Bobby Bao's computer in the security room without alarming the guards outside, who can clearly look in. Even if you do not gain legitimate access, you can hack the safe and the security computer without alerting guards.
                        • You can hack and quickly run inside the door to the basement before guards turn hostile. If you then hide, they will de-escalate and return to normal. Some retries may be required here, or use of Cloaking.
                          • You can then throw the garbage can out of the room to systematically draw guards to be disposed of, but Bobby Bao will not speak with you and give you the Bar Tab quest.
                            • To Alarm guards and have them send one to investigate, you must throw the garbage can from the restricted area (guards will be hostile grey on your radar) and not from club area (guards will be friendly green).
                      Rotten Business
                      • Mei has 3000 credits on her in total which you can rob from her if you knock her out. Less if you are paid by her upon completion of her missions.
                      M3/M1 - Searching For Proof
                      • Before giving Van Bruggen the employee tram card, carry a spare weapon. If you give Van Bruggen a weapon he later gives you 2000 credits; which you don't need as you will probably have in excess of 100,000 credits by then.
                      • If you already have the tram card on you, that quest completes immediately, which means you must also get the evidence for the Shanghai Justice quest from Alice Gardens before leaving.
                      Bar Tab
                      • There are three possible outcomes:
                        • Collect the money (400 credits) - Bobby gives you one Praxis Kit.
                          • When you knock out Jaya for the money owed, if you also take her Augmentation, you cannot have this outcome.
                        • Return the Augmentation - Bobby gives you nothing.
                        • Pay Bobby 5000 credits to leave Jaya alone - Bobby gives you one Praxis Kit. 
                          • You can still do this if you knock her out and take her credits and/or augmentation.
                      Shanghai Justice

                      M2 - Gaining Access to Tai Yong Medical
                      • Do not pick up Access Cards (there are two) before hacking the door to Lee Geng Memorial Labs. You can still grab one afterwards to make everyone in that lab area friendly to you.
                      • If any civilians are alerted (they cower or flee from you) you lose the Ghost bonus. So reach the checkpoint first before coming back to deal with any leftover issues such as bots that need to be destroyed.
                      • Definitely get the Cloaking Augment in order to get past the maze of lasers in the Data Core area. You just need to get to the ventilation behind the laser screen to access the Security Room and shut down the lasers from inside that room.
                      M4/M2 - Entering the Dragon's Lair
                      • After meeting Zhao, do NOT immediately race for the ventilation shaft if you want to take out any Belltower soldiers because that makes it harder for you to stealth around any that are in the upper area (upstairs from the art area / lobby). Instead, hide from them and take them out once their patrol routes stabilize.
                        This is a minimal walkthrough for Deus Ex: Human Revolution (Director's Cut), Adam Jensen's first visit to Hengsha. We only go over things you may not have considered; a detailed walkthrough is already available from the Deus Ex Wiki.

                        M1 - Hunting the Hacker
                        • The Hive:
                          • If you can get legitimate access to the basement, you can hack the Bobby Bao's computer in the security room without alarming the guards outside, who can clearly look in. Even if you do not gain legitimate access, you can hack the safe and the security computer without alerting guards.
                          • You can hack and quickly run inside the door to the basement before guards turn hostile. If you then hide, they will de-escalate and return to normal. Some retries may be required here, or use of Cloaking.
                            • You can then throw the garbage can out of the room to systematically draw guards to be disposed of, but Bobby Bao will not speak with you and give you the Bar Tab quest.
                              • To Alarm guards and have them send one to investigate, you must throw the garbage can from the restricted area (guards will be hostile grey on your radar) and not from club area (guards will be friendly green).
                        Rotten Business
                        • Mei has 3000 credits on her in total which you can rob from her if you knock her out. Less if you are paid by her upon completion of her missions.
                        M3/M1 - Searching For Proof
                        • Before giving Van Bruggen the employee tram card, carry a spare weapon. If you give Van Bruggen a weapon he later gives you 2000 credits; which you don't need as you will probably have in excess of 100,000 credits by then.
                        • If you already have the tram card on you, that quest completes immediately, which means you must also get the evidence for the Shanghai Justice quest from Alice Gardens before leaving.
                        Bar Tab
                        • There are three possible outcomes:
                          • Collect the money (400 credits) - Bobby gives you one Praxis Kit.
                            • When you knock out Jaya for the money owed, if you also take her Augmentation, you cannot have this outcome.
                          • Return the Augmentation - Bobby gives you nothing.
                          • Pay Bobby 5000 credits to leave Jaya alone - Bobby gives you one Praxis Kit. 
                            • You can still do this if you knock her out and take her credits and/or augmentation.
                        Shanghai Justice

                        M2 - Gaining Access to Tai Yong Medical
                        • Do not pick up Access Cards (there are two) before hacking the door to Lee Geng Memorial Labs. You can still grab one afterwards to make everyone in that lab area friendly to you.
                        • If any civilians are alerted (they cower or flee from you) you lose the Ghost bonus. So reach the checkpoint first before coming back to deal with any leftover issues such as bots that need to be destroyed.
                        • Definitely get the Cloaking Augment in order to get past the maze of lasers in the Data Core area. You just need to get to the ventilation behind the laser screen to access the Security Room and shut down the lasers from inside that room.
                        M4/M2 - Entering the Dragon's Lair
                        • After meeting Zhao, do NOT immediately race for the ventilation shaft if you want to take out any Belltower soldiers because that makes it harder for you to stealth around any that are in the upper area (upstairs from the art area / lobby). Instead, hide from them and take them out once their patrol routes stabilize.
                          reade more... Résuméabuiyad

                          Walkthrough - Deus Ex Human Revolution Director's Cut - Highland Park

                          This is a minimal walkthrough for Deus Ex: Human Revolution (Director's Cut), from investigating the Abandoned Factory till Adam Jensen leaves for Hengsha. We only go over things you may not have considered; a detailed walkthrough is already available from the Deus Ex Wiki.

                          M9 - The Transmission

                          M10 - Following the Clues in Highland Park

                          • Although there is a rocket launcher, the Boxguard (robot) is most easily destroyed with a single EMP Grenade but alert everyone nearby even if no one saw you throw the grenade. If there is no one around to be alerted and the alarm system if off, you will keep your XP bonuses for Smooth Operator and Ghost.
                          • Turrets made friendly always kill with head shots (Marksman +10 XP) but this is still inferior to Jensen personally doing Takedowns so disable them and handle the guards personally for more XP.
                          • Barrett
                            • Barrett is actually pretty easy since he moves slowly and always toward where he last saw you. He eventually loses sight of you if you hide long enough.
                            • You are basically safe inside the vents or on the second level (Director's Cut) so you can outlast him by hiding and healing.
                            • Or, you can activate the turrets and let them kill him:
                              • Immediately run to the right till you reach the wall then follow the wall forward to get to the ladder.
                              • Go upstairs and hack the computer there to open the doors downstairs.
                              • Go back downstairs and run to the newly unlocked area. Find a vent behind some boxes (there are two vents in the corridor there) and get inside. Hide in the vent till Barrett loses sight of you (radar is yellow and not showing "Alarmed" or "Hostile").
                              • Using the vent, go into the computer room and hack the computer there to activate the two turrets in storage.
                              • Move the turrets out and lure Barrett to them. Just one turret will eventually kill him but two will be faster.
                            • After the battle, remember to deactivate the two turrets again and destroy them for XP.
                            M11 - Whispers of Conspiracy
                            • Once you are back at Sarif Industries, people again for new dialogue and check all offices again for a couple of new items and new persons in some offices. Pritchard leaves his terminal so it can now be hacked.
                              This is a minimal walkthrough for Deus Ex: Human Revolution (Director's Cut), from investigating the Abandoned Factory till Adam Jensen leaves for Hengsha. We only go over things you may not have considered; a detailed walkthrough is already available from the Deus Ex Wiki.

                              M9 - The Transmission

                              M10 - Following the Clues in Highland Park

                              • Although there is a rocket launcher, the Boxguard (robot) is most easily destroyed with a single EMP Grenade but alert everyone nearby even if no one saw you throw the grenade. If there is no one around to be alerted and the alarm system if off, you will keep your XP bonuses for Smooth Operator and Ghost.
                              • Turrets made friendly always kill with head shots (Marksman +10 XP) but this is still inferior to Jensen personally doing Takedowns so disable them and handle the guards personally for more XP.
                              • Barrett
                                • Barrett is actually pretty easy since he moves slowly and always toward where he last saw you. He eventually loses sight of you if you hide long enough.
                                • You are basically safe inside the vents or on the second level (Director's Cut) so you can outlast him by hiding and healing.
                                • Or, you can activate the turrets and let them kill him:
                                  • Immediately run to the right till you reach the wall then follow the wall forward to get to the ladder.
                                  • Go upstairs and hack the computer there to open the doors downstairs.
                                  • Go back downstairs and run to the newly unlocked area. Find a vent behind some boxes (there are two vents in the corridor there) and get inside. Hide in the vent till Barrett loses sight of you (radar is yellow and not showing "Alarmed" or "Hostile").
                                  • Using the vent, go into the computer room and hack the computer there to activate the two turrets in storage.
                                  • Move the turrets out and lure Barrett to them. Just one turret will eventually kill him but two will be faster.
                                • After the battle, remember to deactivate the two turrets again and destroy them for XP.
                                M11 - Whispers of Conspiracy
                                • Once you are back at Sarif Industries, people again for new dialogue and check all offices again for a couple of new items and new persons in some offices. Pritchard leaves his terminal so it can now be hacked.
                                  reade more... Résuméabuiyad

                                  Walkthrough - Deus Ex Human Revolution Director's Cut - Detroit 1

                                  This is a minimal walkthrough for Deus Ex: Human Revolution (Director's Cut), Detriot part 1, from Adam Jensen's return from the Milwaukee Junction Sarif Manufacturing Plant, to finishing all available missions in Detroit at the time, including the plot-critical investigation into the Hacker. We only go over things you may not have considered; a detailed walkthrough is already available from the Deus Ex Wiki.

                                  General
                                  • If you jump on a car, nothing happens. If you throw something at it, the car alarm goes off, but still nothing happens.
                                  • Letitia cannot tell you anything you can't already find out on your own, so save your beer and money. 
                                  • Grayson's bodyguard starts to move inside the gas station store as soon as he sees you (?). If you rush you can do a Takedown on him before he gets inside, and no one will see his body. To make sure, drag it around the left side of the gas station. You can get a shotgun and some shotgun ammo this way.
                                    • Something similar can be done to Seurat's bodyguard.
                                    • Similarly, look for a trio of punks walking out of an alley. The one in the rear can be handled before they cross the street, leaving the remaining two for a Double Takedown. Otherwise you will have to handle all three across the street.
                                  • Punks
                                    • Male characters labelled "Punk" typically have weapons. Great source of additional income.
                                    • Female Punks have no weapons. Characters with no weapons cower and do nothing until they no longer see bodies. So if there are two male Punks and one redhead girl Punk, do takedowns on the guys to get their weapons and possible loot, and leave the girl alone or handle her later.
                                  • Storage locker in Derelict Row code 0187 - The Weapons locker can be opened and the guns looted without moving the heavy crate in front -- Just peek at it between the crates. Jump on top of the heavy crates to get at the weapons once the locker is opened.
                                  • Storage locker at the basketball court - There is a panel on the inside, behind the movables just inside the door. Crouch and hack in order to not touch the laser beams (even though you stand up to hack). A valve on the inside turns off the gas but you cannot get to it fast enough. 
                                  • Convention Centre
                                    • If you can quickly rush past and hide from the person on point (not necessarily the others), the Punks stay friendly (green). They will investigate if they see Jensen (Alarmed) but do not become hostile.
                                    • There is a Traveler 100XP available if you can find the hidden loot in the vent but the Punks give no XP if taken down. You don't need the money from looting them, so it's more convenient to come back later after Montreal for the Traveler XP when the Punks will no longer be there.
                                  • If you do not want to take the Augmentation to break through walls, a good alternative is a Pistol with Armour Piercing and the Silencer. It takes about 10-12 shots but you can take down a wall and not automatically kill someone behind it. Any lethal firearm will do, but without a Silencer, it'll be really noisy and without Armour Piercing it'll require a lot of bullets.
                                    M4 - Tying Up Loose Ends

                                    Paging Adam Jensen, Lesser Evils

                                    One Good Turn Deserves Another

                                    Motherly Ties
                                    • Once you have access to the police department via Haas at reception, you can roam freely, BUT some terminals are deactivated so you lose potential XP.
                                    • If the police are friendly in the building:
                                      • You can throw objects to Alarm them and force them to move but they will not be hostile to you if they didn't see you throw it. If they were sitting at a terminal, they will not go back to sit down.
                                      • If you Takedown a police officer, they all become enemies for a while (grey on radar) and will go into Alarm if they see you or a dead or unconscious body. If they are not Alarmed, wait long enough in hiding and they will turn Green (friendly) again.
                                    • You can takedown all officers, but even if you are never spotted by them, if a civilian spots you, all police OUTSIDE the police building will become hostile.
                                    Cloak & Daggers
                                    • If you can Punch Through Walls, locate the MCB room and shatter the wall first prior to getting the mission from Alexander to knock them all out. This will make it easier to access the gangsters in the rear room without automatically killing them by shattering the wall.
                                    M5/M6 - Investigating the Suicide Terrorist

                                    M5/M6 - Visiting the L.I.M.B. Clinic

                                    M7 - Stopping the Transmission
                                    • There are two gangsters behind a wall that can be shattered. Handle them later to preserve your Ghost bonus as no matter what you will alert them and there is a very good chance of being actually spotted which may cause them to become Hostile.
                                    M8 - Extraction (2)
                                    • You will be taken directly to Highland Park if you board the helicopter. If you have the Voices from the Dark mission, do that first.
                                    Voices from the Dark
                                    • You get this mission after Extraction (2) if you let Zeke Sanders escape at Milwaukee Junction. The information is useful before you get to Highland Park.
                                      This is a minimal walkthrough for Deus Ex: Human Revolution (Director's Cut), Detriot part 1, from Adam Jensen's return from the Milwaukee Junction Sarif Manufacturing Plant, to finishing all available missions in Detroit at the time, including the plot-critical investigation into the Hacker. We only go over things you may not have considered; a detailed walkthrough is already available from the Deus Ex Wiki.

                                      General
                                      • If you jump on a car, nothing happens. If you throw something at it, the car alarm goes off, but still nothing happens.
                                      • Letitia cannot tell you anything you can't already find out on your own, so save your beer and money. 
                                      • Grayson's bodyguard starts to move inside the gas station store as soon as he sees you (?). If you rush you can do a Takedown on him before he gets inside, and no one will see his body. To make sure, drag it around the left side of the gas station. You can get a shotgun and some shotgun ammo this way.
                                        • Something similar can be done to Seurat's bodyguard.
                                        • Similarly, look for a trio of punks walking out of an alley. The one in the rear can be handled before they cross the street, leaving the remaining two for a Double Takedown. Otherwise you will have to handle all three across the street.
                                      • Punks
                                        • Male characters labelled "Punk" typically have weapons. Great source of additional income.
                                        • Female Punks have no weapons. Characters with no weapons cower and do nothing until they no longer see bodies. So if there are two male Punks and one redhead girl Punk, do takedowns on the guys to get their weapons and possible loot, and leave the girl alone or handle her later.
                                      • Storage locker in Derelict Row code 0187 - The Weapons locker can be opened and the guns looted without moving the heavy crate in front -- Just peek at it between the crates. Jump on top of the heavy crates to get at the weapons once the locker is opened.
                                      • Storage locker at the basketball court - There is a panel on the inside, behind the movables just inside the door. Crouch and hack in order to not touch the laser beams (even though you stand up to hack). A valve on the inside turns off the gas but you cannot get to it fast enough. 
                                      • Convention Centre
                                        • If you can quickly rush past and hide from the person on point (not necessarily the others), the Punks stay friendly (green). They will investigate if they see Jensen (Alarmed) but do not become hostile.
                                        • There is a Traveler 100XP available if you can find the hidden loot in the vent but the Punks give no XP if taken down. You don't need the money from looting them, so it's more convenient to come back later after Montreal for the Traveler XP when the Punks will no longer be there.
                                      • If you do not want to take the Augmentation to break through walls, a good alternative is a Pistol with Armour Piercing and the Silencer. It takes about 10-12 shots but you can take down a wall and not automatically kill someone behind it. Any lethal firearm will do, but without a Silencer, it'll be really noisy and without Armour Piercing it'll require a lot of bullets.
                                        M4 - Tying Up Loose Ends

                                        Paging Adam Jensen, Lesser Evils

                                        One Good Turn Deserves Another

                                        Motherly Ties
                                        • Once you have access to the police department via Haas at reception, you can roam freely, BUT some terminals are deactivated so you lose potential XP.
                                        • If the police are friendly in the building:
                                          • You can throw objects to Alarm them and force them to move but they will not be hostile to you if they didn't see you throw it. If they were sitting at a terminal, they will not go back to sit down.
                                          • If you Takedown a police officer, they all become enemies for a while (grey on radar) and will go into Alarm if they see you or a dead or unconscious body. If they are not Alarmed, wait long enough in hiding and they will turn Green (friendly) again.
                                        • You can takedown all officers, but even if you are never spotted by them, if a civilian spots you, all police OUTSIDE the police building will become hostile.
                                        Cloak & Daggers
                                        • If you can Punch Through Walls, locate the MCB room and shatter the wall first prior to getting the mission from Alexander to knock them all out. This will make it easier to access the gangsters in the rear room without automatically killing them by shattering the wall.
                                        M5/M6 - Investigating the Suicide Terrorist

                                        M5/M6 - Visiting the L.I.M.B. Clinic

                                        M7 - Stopping the Transmission
                                        • There are two gangsters behind a wall that can be shattered. Handle them later to preserve your Ghost bonus as no matter what you will alert them and there is a very good chance of being actually spotted which may cause them to become Hostile.
                                        M8 - Extraction (2)
                                        • You will be taken directly to Highland Park if you board the helicopter. If you have the Voices from the Dark mission, do that first.
                                        Voices from the Dark
                                        • You get this mission after Extraction (2) if you let Zeke Sanders escape at Milwaukee Junction. The information is useful before you get to Highland Park.
                                          reade more... Résuméabuiyad

                                          Walkthrough - Deus Ex Human Revolution Director's Cut - Milwaukee Junction

                                          This is a minimal walkthrough for Deus Ex: Human Revolution (Director's Cut), Detriot part 1, from Prologue to the end of the mission at the Milwaukee Junction Sarif Manufacturing Plant.We only go over things you may not have considered; a detailed walkthrough is already available from the Deus Ex Wiki.

                                          Prologue - Welcome to the Revolution
                                          • You cannot inspect your Combat Rifle because you do not have access to the Inventory menu, but it is fully upgraded, including the Target-Seeking System. Since that makes headshots very easy, you should definitely get through this mission with headshots on all enemies for maximum XP.
                                          • It is very tricky but you can sneak past everyone without them spotting you. However, the Ghost (500 XP) bonus is not available anyway.
                                          M1 - Back in the Saddle
                                          • Enter the ground floor woman's washroom to overhear an interesting dialogue. Do this before seeing Pritchard for the first time.
                                          M1 - Securing Sarif's Manufacturing Plant
                                          • For weapon choice, I recommend the Revolver even though you will likely be using non-lethal Takedowns to handle all enemies. This is because its ammunition has a very high resale value per inventory slot.
                                          • You can use Takedowns on SWAT. No XP but you can grab their Combat Rifles. Resale value
                                          • You can stealth this quite easily as the enemies here are scripted like those in Metro. They eventually move into a position where you can do a stealthy melee Takedown and hide the body, thus allowing you to incapacitate everyone for 50 XP each (Man Down 10 XP, Merciful Soul 20 XP, Expedient 20 XP) and still secure the Ghost 500 XP award for not being detected at the end of the Factoring Labs area.
                                          • If enemies are initially clumped, approach and wait for them to finish talking. They will then disperse to start their patrol routes.
                                          • Assembly Labs
                                            • The hostages are in a room with a binary poison gas bomb. For maximum XP, you want to Hack the bomb to get hacking XP. Simply neutralizing the bomb by any other means awards no XP.
                                            • If you go through either door, the bomb countdown starts. Even with this time pressure it is still possible to successfully hack the bomb, but if you don't want that handicap, find your way to the vent in the room.
                                            • Alternatively, use the password you can get from one of the enemies.
                                            • The most expedient way is probably to shoot either or both gas canisters on the bomb.
                                            • Attacking hostages does not make any of them hostile or react.
                                          • Meeting Room and first security cameras
                                            • There are two doors to the corridors surrounding the Meeting Room. The west entrance to the corridors is easier to handle as both the guard and camera are close to a corner from which you can spy on them.
                                            • For the meeting room, the south door is easier as there are crates behind which you can hide from the camera; and hide while listening to the thugs in the meeting room until it is safe to enter when the guards are facing away from each other.
                                          • Factoring Labs
                                            • Not far from the elevator, there is a corridor with a camera, a fragmentation mine on the wall behind it, and a turret further behind that.
                                            • The normal way to do this is:
                                              • Find the floor-level vent to get past them.
                                              • Use the fragmentation grenade on the turret.
                                              • Go back through the vent and sneak past the camera.
                                              • Hack the computer to turn off the camera.
                                              • Sneak at a walking pace to the mine on the wall, disarm it, and take it with you if you like.
                                            • If you want to keep the one grenade you are given and instead use an Augmentation, you can pile boxes in front of the turret to block its LOS so you can get to the security office without being detected (and losing the Ghost XP bonus).
                                            • You can also supposedly keep throwing a trash can against the turret until it explodes, but that takes a long time as it hurts the turret only a bit each time. Firearms will also eventually destroy it.
                                          M2 - Neutralize the Terrorist Leader
                                          • After you deal with Zeke Sanders, you can still go back through the map to get your stuff. The enemies will be gone and replaced by SWAT at various locations, which you can takedown (no XP but you can grab a gun).
                                          M3 - Extraction
                                          • At the end of the Sarif Manufacturing Plant mission, carefully pick what you want to take in terms of resale value per unit of inventory space.
                                            • Full stacks of ammo typically sell for more than weapons.
                                            • Don't worry about selling all your weapons as you can use Takedowns in the next mission to overcome enemies or obtain weapons.
                                            • In the table below, you can see the maximum stack size (first column) and resale value per Inventory Square (second column) for various types of items (third column).
                                              • Nuke and Stop! Worm Software can stack to 99; resale value is 25 credits each.
                                              • Revolver Ammo sells at 63 credits per 5 bullets. Maximum stack is 50 but you won't get that many in this mission.
                                           50      315.0     Revolver Ammo
                                           20      250.0     Tranquilizer Darts 20      150.0     Sniper Rifle Ammo
                                           50      125.0     Combat Rifle Ammo
                                           5      125.0     Cyberboost ProEnergy Bar
                                           1      125.0     Double-Barrel Shotgun 5      125.0     Painkillers
                                           20      125.0     Stun Gun Ammo
                                           1      109.4     Silenced Sniper Rifle
                                           3      102.0     Concussion Mine
                                           50      100.0     Machine Pistol Ammo
                                           2      100.0     Remote Detonated Explosive Device
                                           20      100.0     Shotgun Ammo
                                           1      93.8     Sniper Rifle
                                           1      75.0     Shotgun
                                           50      65.0     Pistol Ammo
                                           1      63.0     Combat Rifle
                                           1      62.5     Tranquilizer Rifle
                                           1      50.0     Revolver
                                           1      46.9     Machine Pistol
                                           1      41.7     Stun Gun
                                           1      38.0     Whiskey
                                           1      30.0     Concussion Grenade
                                           1      30.0     Pistol
                                           1      25.0     Fragmentation Grenade
                                           1      18.0     Wine
                                           1      5.0     Beer

                                            This is a minimal walkthrough for Deus Ex: Human Revolution (Director's Cut), Detriot part 1, from Prologue to the end of the mission at the Milwaukee Junction Sarif Manufacturing Plant.We only go over things you may not have considered; a detailed walkthrough is already available from the Deus Ex Wiki.

                                            Prologue - Welcome to the Revolution
                                            • You cannot inspect your Combat Rifle because you do not have access to the Inventory menu, but it is fully upgraded, including the Target-Seeking System. Since that makes headshots very easy, you should definitely get through this mission with headshots on all enemies for maximum XP.
                                            • It is very tricky but you can sneak past everyone without them spotting you. However, the Ghost (500 XP) bonus is not available anyway.
                                            M1 - Back in the Saddle
                                            • Enter the ground floor woman's washroom to overhear an interesting dialogue. Do this before seeing Pritchard for the first time.
                                            M1 - Securing Sarif's Manufacturing Plant
                                            • For weapon choice, I recommend the Revolver even though you will likely be using non-lethal Takedowns to handle all enemies. This is because its ammunition has a very high resale value per inventory slot.
                                            • You can use Takedowns on SWAT. No XP but you can grab their Combat Rifles. Resale value
                                            • You can stealth this quite easily as the enemies here are scripted like those in Metro. They eventually move into a position where you can do a stealthy melee Takedown and hide the body, thus allowing you to incapacitate everyone for 50 XP each (Man Down 10 XP, Merciful Soul 20 XP, Expedient 20 XP) and still secure the Ghost 500 XP award for not being detected at the end of the Factoring Labs area.
                                            • If enemies are initially clumped, approach and wait for them to finish talking. They will then disperse to start their patrol routes.
                                            • Assembly Labs
                                              • The hostages are in a room with a binary poison gas bomb. For maximum XP, you want to Hack the bomb to get hacking XP. Simply neutralizing the bomb by any other means awards no XP.
                                              • If you go through either door, the bomb countdown starts. Even with this time pressure it is still possible to successfully hack the bomb, but if you don't want that handicap, find your way to the vent in the room.
                                              • Alternatively, use the password you can get from one of the enemies.
                                              • The most expedient way is probably to shoot either or both gas canisters on the bomb.
                                              • Attacking hostages does not make any of them hostile or react.
                                            • Meeting Room and first security cameras
                                              • There are two doors to the corridors surrounding the Meeting Room. The west entrance to the corridors is easier to handle as both the guard and camera are close to a corner from which you can spy on them.
                                              • For the meeting room, the south door is easier as there are crates behind which you can hide from the camera; and hide while listening to the thugs in the meeting room until it is safe to enter when the guards are facing away from each other.
                                            • Factoring Labs
                                              • Not far from the elevator, there is a corridor with a camera, a fragmentation mine on the wall behind it, and a turret further behind that.
                                              • The normal way to do this is:
                                                • Find the floor-level vent to get past them.
                                                • Use the fragmentation grenade on the turret.
                                                • Go back through the vent and sneak past the camera.
                                                • Hack the computer to turn off the camera.
                                                • Sneak at a walking pace to the mine on the wall, disarm it, and take it with you if you like.
                                              • If you want to keep the one grenade you are given and instead use an Augmentation, you can pile boxes in front of the turret to block its LOS so you can get to the security office without being detected (and losing the Ghost XP bonus).
                                              • You can also supposedly keep throwing a trash can against the turret until it explodes, but that takes a long time as it hurts the turret only a bit each time. Firearms will also eventually destroy it.
                                            M2 - Neutralize the Terrorist Leader
                                            • After you deal with Zeke Sanders, you can still go back through the map to get your stuff. The enemies will be gone and replaced by SWAT at various locations, which you can takedown (no XP but you can grab a gun).
                                            M3 - Extraction
                                            • At the end of the Sarif Manufacturing Plant mission, carefully pick what you want to take in terms of resale value per unit of inventory space.
                                              • Full stacks of ammo typically sell for more than weapons.
                                              • Don't worry about selling all your weapons as you can use Takedowns in the next mission to overcome enemies or obtain weapons.
                                              • In the table below, you can see the maximum stack size (first column) and resale value per Inventory Square (second column) for various types of items (third column).
                                                • Nuke and Stop! Worm Software can stack to 99; resale value is 25 credits each.
                                                • Revolver Ammo sells at 63 credits per 5 bullets. Maximum stack is 50 but you won't get that many in this mission.
                                             50      315.0     Revolver Ammo
                                             20      250.0     Tranquilizer Darts 20      150.0     Sniper Rifle Ammo
                                             50      125.0     Combat Rifle Ammo
                                             5      125.0     Cyberboost ProEnergy Bar
                                             1      125.0     Double-Barrel Shotgun 5      125.0     Painkillers
                                             20      125.0     Stun Gun Ammo
                                             1      109.4     Silenced Sniper Rifle
                                             3      102.0     Concussion Mine
                                             50      100.0     Machine Pistol Ammo
                                             2      100.0     Remote Detonated Explosive Device
                                             20      100.0     Shotgun Ammo
                                             1      93.8     Sniper Rifle
                                             1      75.0     Shotgun
                                             50      65.0     Pistol Ammo
                                             1      63.0     Combat Rifle
                                             1      62.5     Tranquilizer Rifle
                                             1      50.0     Revolver
                                             1      46.9     Machine Pistol
                                             1      41.7     Stun Gun
                                             1      38.0     Whiskey
                                             1      30.0     Concussion Grenade
                                             1      30.0     Pistol
                                             1      25.0     Fragmentation Grenade
                                             1      18.0     Wine
                                             1      5.0     Beer

                                              reade more... Résuméabuiyad

                                              Walkthrough - Deus Ex Human Revolution Director's Cut - General Tips

                                              These are general tips for Deus Ex: Human Revolution (Director's Cut).We only go over things you may not have considered; a detailed walkthrough is already available from the Deus Ex Wiki.
                                              • Move all boxes in case something is underneath it. You will immediately know as the item will then be outlined for you behind the translucent-while-carried box.
                                              • Larger items that restore more battery or health per unit are actually LESS space efficient in inventory.
                                              • After you use a non-lethal Takedown on someone, you can still kill them with a firearm while they are unconscious. The game will register the kill but not give any more XP.
                                              • You can Takedown civilians and police and other people who are not initially hostile, and then loot them. Typically no XP and no loot unless they are combatants.
                                              • Punch Through Walls also helps you find weak walls by outlining them, but most firearms can also destroy weak walls (and make a lot of noise, possibly alerting enemies). Armour Piercing pistol rounds and heavy weapons can do so quickly but all gunfire can alert enemies (making them Hostile instead of just Alarmed). However, using firearms will not automatically kill enemies immediately behind the wall.
                                              • For maximum "story", I recommend you take the Social Enhancer early. Typically you'll get extra dialogue when you encounter certain conversations (but not Zeke). Usually you get a shortcut or small reward, but taking the goal of taking this is to expand conversation, unlock what else you can do, and deepen your game experience. It is not necessary and obviously not optimal to take it early.
                                              • The Deus Ex wiki recommends the Quicksilver Reflex Booster as early as possible to squeeze maximum XP out of taking down enemies with Double Takedowns.
                                                • We suggest you don't make a big deal out of this since there are a lot of unnecessary augmentations so XP isn't as tight as you think. By the end of Detroit or early Hengsha you will probably have all the critical Augments (i.e., those that can earn you more XP by accessing places you can't reach or letting you do things you can't otherwise). Shortly after, you will have the rest of the useful ones.
                                                • Setting up double takedowns just to get Double Takedowns can be tedious. Spend your real time enjoying the game instead.
                                              • Double Takedown cannot involve someone sitting down. They must first stand up in order to be taken down at the same time as someone else nearby.
                                              • In some cases you do not have to move the extra-heavy items (such as fridges) in order to get the items underneath. Crouch to spot the items and take them. In some cases you do not even have to visually see the items (e.g., the hypostim under the fridge in Tindall's apartment) -- just hover your crosshair near where it should be and you will be given the option to pick it up.
                                              • Selling Stuff
                                                • When you pick up a gun of a type you already have, you get only the ammunition and the gun vanishes. Therefore, once you have access to merchants, sell a gun first before picking up another of the same type. Be careful not to sell any upgraded versions you own.
                                                • This can get tedious, so you can instead track how many guns of what type you pick up. Then, when you next go to a merchant, use the third-party Debug Menu > Shop > Pickup Library > Weapon menu to add the items into your inventory and sell them. 
                                                • Once you have a good amount of credits, you can stop doing this since it is unlikely you will buy so much stuff from merchants, much less use that much during a mission.
                                                  • There is so much loot in the game that you really don't need to optimize getting credits.
                                                  • Just make sure you can buy all the Praxis Kits available. Use hand-to-hand combat to handle enemies and thereby avoid having to buy guns or ammo.
                                              • Watch for shortcuts to hacking a terminal AND getting all rewards.
                                                • Typically a hack trace is initiated from the red nodes which cannot be accessed. But *sometimes* there is a route to that node, and you CAN capture it.
                                                • If you do, you immediately succeed and unlock all storage nodes as well. See the videos below for an examples of the same computer being hacked.

                                              • If you are reloading a game (e.g., Quickload) to re-try a hack, you may notice that a node that triggered detection will always trigger detection again no matter what the percentage chance. In order to re-randomize the detection chances, move around and do something else first, like pick up a box, open a door, etcetera.
                                              • Watch this video for a cheesy way to easily win all boss fights, except you can just laser the final boss immediately.
                                              These are general tips for Deus Ex: Human Revolution (Director's Cut).We only go over things you may not have considered; a detailed walkthrough is already available from the Deus Ex Wiki.
                                              • Move all boxes in case something is underneath it. You will immediately know as the item will then be outlined for you behind the translucent-while-carried box.
                                              • Larger items that restore more battery or health per unit are actually LESS space efficient in inventory.
                                              • After you use a non-lethal Takedown on someone, you can still kill them with a firearm while they are unconscious. The game will register the kill but not give any more XP.
                                              • You can Takedown civilians and police and other people who are not initially hostile, and then loot them. Typically no XP and no loot unless they are combatants.
                                              • Punch Through Walls also helps you find weak walls by outlining them, but most firearms can also destroy weak walls (and make a lot of noise, possibly alerting enemies). Armour Piercing pistol rounds and heavy weapons can do so quickly but all gunfire can alert enemies (making them Hostile instead of just Alarmed). However, using firearms will not automatically kill enemies immediately behind the wall.
                                              • For maximum "story", I recommend you take the Social Enhancer early. Typically you'll get extra dialogue when you encounter certain conversations (but not Zeke). Usually you get a shortcut or small reward, but taking the goal of taking this is to expand conversation, unlock what else you can do, and deepen your game experience. It is not necessary and obviously not optimal to take it early.
                                              • The Deus Ex wiki recommends the Quicksilver Reflex Booster as early as possible to squeeze maximum XP out of taking down enemies with Double Takedowns.
                                                • We suggest you don't make a big deal out of this since there are a lot of unnecessary augmentations so XP isn't as tight as you think. By the end of Detroit or early Hengsha you will probably have all the critical Augments (i.e., those that can earn you more XP by accessing places you can't reach or letting you do things you can't otherwise). Shortly after, you will have the rest of the useful ones.
                                                • Setting up double takedowns just to get Double Takedowns can be tedious. Spend your real time enjoying the game instead.
                                              • Double Takedown cannot involve someone sitting down. They must first stand up in order to be taken down at the same time as someone else nearby.
                                              • In some cases you do not have to move the extra-heavy items (such as fridges) in order to get the items underneath. Crouch to spot the items and take them. In some cases you do not even have to visually see the items (e.g., the hypostim under the fridge in Tindall's apartment) -- just hover your crosshair near where it should be and you will be given the option to pick it up.
                                              • Selling Stuff
                                                • When you pick up a gun of a type you already have, you get only the ammunition and the gun vanishes. Therefore, once you have access to merchants, sell a gun first before picking up another of the same type. Be careful not to sell any upgraded versions you own.
                                                • This can get tedious, so you can instead track how many guns of what type you pick up. Then, when you next go to a merchant, use the third-party Debug Menu > Shop > Pickup Library > Weapon menu to add the items into your inventory and sell them. 
                                                • Once you have a good amount of credits, you can stop doing this since it is unlikely you will buy so much stuff from merchants, much less use that much during a mission.
                                                  • There is so much loot in the game that you really don't need to optimize getting credits.
                                                  • Just make sure you can buy all the Praxis Kits available. Use hand-to-hand combat to handle enemies and thereby avoid having to buy guns or ammo.
                                              • Watch for shortcuts to hacking a terminal AND getting all rewards.
                                                • Typically a hack trace is initiated from the red nodes which cannot be accessed. But *sometimes* there is a route to that node, and you CAN capture it.
                                                • If you do, you immediately succeed and unlock all storage nodes as well. See the videos below for an examples of the same computer being hacked.

                                              • If you are reloading a game (e.g., Quickload) to re-try a hack, you may notice that a node that triggered detection will always trigger detection again no matter what the percentage chance. In order to re-randomize the detection chances, move around and do something else first, like pick up a box, open a door, etcetera.
                                              • Watch this video for a cheesy way to easily win all boss fights, except you can just laser the final boss immediately.
                                              reade more... Résuméabuiyad

                                              Walkthrough Index - Deus Ex Human Revolution Director's Cut

                                              This is an index of all our Deus Ex: Human Revolution (Director's Cut) walkthrough posts.

                                              There is already an extensive walkthrough at the Deus Ex Wiki so we will only be touching on specific things you may not have thought to try, and our own thoughts on various aspects of the game.

                                              There is also a Debug Menu mod

                                              General Tips

                                              Detroit (part 1)
                                              • Prologue - Welcome to the Revolution
                                              • M1 - Back in the Saddle
                                              • Milwaukee Junction
                                                • M1 - Securing Sarif's Manufacturing Plant
                                                • M2 - Neutralize the Terrorist Leader
                                                • M3 - Extraction
                                              • Detroit 1
                                                • M4 - Tying Up Loose Ends
                                                • M5/M6 - Investigating the Suicide Terrorist
                                                • M5/M6 - Visiting the L.I.M.B. Clinic
                                                • Paging Adam Jensen
                                                • Lesser Evils
                                                • One Good Turn Deserves Another
                                                • Motherly Ties
                                                • Cloak & Daggers
                                                • M7 - Stopping the Transmission
                                                • Voices in the Dark
                                                • M8 - Extraction (2)
                                                • M9 - The Transmission
                                              • Highland Park
                                                • M10 - Following the Clues in Highland Park
                                                • M11 - Whispers of Conspiracy
                                              Hengsha (part 1)
                                              • M1 - Hunting the Hacker
                                              • Rotten Business
                                              • M2 - Gaining Access to Tai Yong Medical
                                              • Bar Tab
                                              • M3/M1 - Searching For Proof
                                              • Shanghai Justice
                                              • M4/M2 - Entering the Dragon's Lair
                                              Montreal
                                              • M1 - Confronting Eliza Cassan

                                              Detroit (part 2)
                                              • M1 - Confronting Sarif
                                              • Acquaintances Forgotten
                                              • M2 - Finding Isaias Sandoval
                                              • Smash the State
                                              • M3/M1 - Cashing in Old Favors
                                                Hengsha (part 2)
                                                • A Matter of Discretion
                                                • Corporate Warfare
                                                • Talion A.D.
                                                • M1/M2 - Find Vasili Sevchenko's GPL Device
                                                • M2/M3 - You Scratch My Back, I'll Scratch Yours (Old Noodle Factory)
                                                • M3/M4 - Stowing Away
                                                The Missing Link
                                                • Hei Zhen Zhu
                                                • Rifleman Banks Station

                                                Singapore
                                                • M1 - Rescuing Megan and Her Team
                                                Panchaea
                                                • M1 - Shutting Down Darrow's Signal 
                                                This is an index of all our Deus Ex: Human Revolution (Director's Cut) walkthrough posts.

                                                There is already an extensive walkthrough at the Deus Ex Wiki so we will only be touching on specific things you may not have thought to try, and our own thoughts on various aspects of the game.

                                                There is also a Debug Menu mod

                                                General Tips

                                                Detroit (part 1)
                                                • Prologue - Welcome to the Revolution
                                                • M1 - Back in the Saddle
                                                • Milwaukee Junction
                                                  • M1 - Securing Sarif's Manufacturing Plant
                                                  • M2 - Neutralize the Terrorist Leader
                                                  • M3 - Extraction
                                                • Detroit 1
                                                  • M4 - Tying Up Loose Ends
                                                  • M5/M6 - Investigating the Suicide Terrorist
                                                  • M5/M6 - Visiting the L.I.M.B. Clinic
                                                  • Paging Adam Jensen
                                                  • Lesser Evils
                                                  • One Good Turn Deserves Another
                                                  • Motherly Ties
                                                  • Cloak & Daggers
                                                  • M7 - Stopping the Transmission
                                                  • Voices in the Dark
                                                  • M8 - Extraction (2)
                                                  • M9 - The Transmission
                                                • Highland Park
                                                  • M10 - Following the Clues in Highland Park
                                                  • M11 - Whispers of Conspiracy
                                                Hengsha (part 1)
                                                • M1 - Hunting the Hacker
                                                • Rotten Business
                                                • M2 - Gaining Access to Tai Yong Medical
                                                • Bar Tab
                                                • M3/M1 - Searching For Proof
                                                • Shanghai Justice
                                                • M4/M2 - Entering the Dragon's Lair
                                                Montreal
                                                • M1 - Confronting Eliza Cassan

                                                Detroit (part 2)
                                                • M1 - Confronting Sarif
                                                • Acquaintances Forgotten
                                                • M2 - Finding Isaias Sandoval
                                                • Smash the State
                                                • M3/M1 - Cashing in Old Favors
                                                  Hengsha (part 2)
                                                  • A Matter of Discretion
                                                  • Corporate Warfare
                                                  • Talion A.D.
                                                  • M1/M2 - Find Vasili Sevchenko's GPL Device
                                                  • M2/M3 - You Scratch My Back, I'll Scratch Yours (Old Noodle Factory)
                                                  • M3/M4 - Stowing Away
                                                  The Missing Link
                                                  • Hei Zhen Zhu
                                                  • Rifleman Banks Station

                                                  Singapore
                                                  • M1 - Rescuing Megan and Her Team
                                                  Panchaea
                                                  • M1 - Shutting Down Darrow's Signal 
                                                  reade more... Résuméabuiyad