Pages

Showing posts with label Wasteland 2. Show all posts

Wasteland 2 Director's Cut - Rail Nomads Camp

Wasteland 2 Director's Cut - Rail Nomads Camp

Play Wasteland 2 risk-free with money-back guarantee from Good Old Games.

A great place for maps and general information for Arizona is game-maps.com. Here, we provide additional information about the various locations, and/or specific to the Director's Cut.

Rail Nomads Camp is not hard to get to but the challenges there starting around level 4 and going up to around level 7.
  • Perception 5-6 is required to spot some buried caches (with nothing important in them); to help you get that score, you can complete Quarax's quest for the video game cartridge and get the Clay Wizard Figurine for +2 Perception when equipped.
  • In some cases, even if you do not succeed in Perception on something, you can still manually use a skill from your hotbar on it. For example, you can know the generator is rigged to an alarm because there is an alarm right above it on the wall. So you can manually target your Alarm Disarming skill and disable the alarm.
Watch out for timed quests. You get one right away when you first meet someone in this map. You don't have a lot of time to succeed at Brute Force on the pillar on the right to kick it into the water as a lifeline.
Another instance occurs when you (hopefully) spot a bomb in the playground. If you don't disarm it before the nearby conversation ends, someone will walk over, trigger it, and get blown up.

Gorkinovich
Honest Jon

  • The CD-i for Quarex is here but you can also turn it in to Mercaptain at the Ranger Citadel for a more interesting reward of a Requisition.

Samuel
  • Samuel, the Snake Squeezin's man mentioned by Ace in his log book, will reveal information only if you have Ace's Log Book, Smart Ass 6, or Hard Ass 4. If you get far enough in dialogue with Angela Deth in your party, she will kill him afterwards.
    • Angela kills Samuel in a cutscene and apparently nothing can prevent this.
    • You can temporarily dismiss her, but if you leave the area or reload a game, she will disappear from the game and you cannot get her back.
    • If you abort conversation he leaves the bar for the Hobo Jungle and exits the map at the north end of that area. You can still talk to him if you catch up with him before he leaves the map. Otherwise he disappears from the game.
  • You can ask him about Hell Razor before OR after you talk to him about Ace. His responses are different.
Town Hall
  • After you make peace between the two tribes (if you want to) you can loot the place without triggering hostility. You can also go in before that but access is limited and you can't be spotted in certain areas without making everyone go hostile.
  • Lots of high-level Alarm Disarming, Demolitions, and Open Lock skills checks.


Wasteland 2 Director's Cut - Rail Nomads Camp

Play Wasteland 2 risk-free with money-back guarantee from Good Old Games.

A great place for maps and general information for Arizona is game-maps.com. Here, we provide additional information about the various locations, and/or specific to the Director's Cut.

Rail Nomads Camp is not hard to get to but the challenges there starting around level 4 and going up to around level 7.
  • Perception 5-6 is required to spot some buried caches (with nothing important in them); to help you get that score, you can complete Quarax's quest for the video game cartridge and get the Clay Wizard Figurine for +2 Perception when equipped.
  • In some cases, even if you do not succeed in Perception on something, you can still manually use a skill from your hotbar on it. For example, you can know the generator is rigged to an alarm because there is an alarm right above it on the wall. So you can manually target your Alarm Disarming skill and disable the alarm.
Watch out for timed quests. You get one right away when you first meet someone in this map. You don't have a lot of time to succeed at Brute Force on the pillar on the right to kick it into the water as a lifeline.
Another instance occurs when you (hopefully) spot a bomb in the playground. If you don't disarm it before the nearby conversation ends, someone will walk over, trigger it, and get blown up.

Gorkinovich
Honest Jon

  • The CD-i for Quarex is here but you can also turn it in to Mercaptain at the Ranger Citadel for a more interesting reward of a Requisition.

Samuel
  • Samuel, the Snake Squeezin's man mentioned by Ace in his log book, will reveal information only if you have Ace's Log Book, Smart Ass 6, or Hard Ass 4. If you get far enough in dialogue with Angela Deth in your party, she will kill him afterwards.
    • Angela kills Samuel in a cutscene and apparently nothing can prevent this.
    • You can temporarily dismiss her, but if you leave the area or reload a game, she will disappear from the game and you cannot get her back.
    • If you abort conversation he leaves the bar for the Hobo Jungle and exits the map at the north end of that area. You can still talk to him if you catch up with him before he leaves the map. Otherwise he disappears from the game.
  • You can ask him about Hell Razor before OR after you talk to him about Ace. His responses are different.
Town Hall
  • After you make peace between the two tribes (if you want to) you can loot the place without triggering hostility. You can also go in before that but access is limited and you can't be spotted in certain areas without making everyone go hostile.
  • Lots of high-level Alarm Disarming, Demolitions, and Open Lock skills checks.


reade more... Résuméabuiyad

Wasteland 2 Director's Cut - Highpool

Wasteland 2 Director's Cut - Highpool

Play Wasteland 2 risk-free with money-back guarantee from Good Old Games.

A great place for maps and general information for Arizona is game-maps.com. Here, we provide additional information about the various locations, and/or specific to the Director's Cut.

There are two versions of Highpool: If you choose to rescue the Ag Center and let Highpool be destroyed; or if you choose to rescue Highpool and instead let the Ag Center be destroyed.
The choice is not triggered until team Echo One moves far enough south from Ranger Citadel, whereupon they receive a distress call from both locations. This is independent of whether they are following the main quest and have the Repeater Units to install at the radar dishes. There is also a time limit before both locations are destroyed; a second warning distress call warns of this.

Compared to the Ag Centre, it's more straightforward. Perception needs to be 4 to find all the landmines, or 3 (which can be provided by Vulture's Cry, the recruitable NPC) to find most items.
We go through the rescue mission version of Highpool first. The destroyed version of Highpool is very straightforward.

General

World Map - Rail Raiders
  • If you go east from Ag Centre to HighPool, you will avoid the radiation that is to the north of HighPool but you will instead encounter dangerous Rail Raiders who are hard for a number of reasons:
    • If you are relying on Angela Deth's Outdoorsman skill, you have a 50% chance of evading them (which you really don't want to) but you also have a lousy starting position on the map with a lot of pipes.
    • They are quite hard to hit.
    • They shoot well and carry good weapons -- weapons which can be yours, along with ammuntion and, frequently, medical supplies to help you recover from a battle with them.
  • You do want to engage them for the weapon upgrades they can provide, but hopefully not just at level 2 and with weak combat skills. Remember that you are not on a timer until you have triggered the distress calls from HighPool and Ag Center so if you like you can explore and grind the map a bit, although fighting weak raiders and animals is not likely to keep your ammunition and medical supplies replenished unless you use no-ammo-needed melee.
Roofs
  • Watch for opportunities to get to high ground (roofs) to improve your aim and force raiders into the open as they come for you.
    • If raider gunners insist on hiding behind cover, back off from the roof edge so you are out of their line of sight, forcing them to come out.
    • If the raiders are too far away, sneak someone close and behind cover until you get your attention, then pull them back.
  • When you first enter, there is a ridge on the right. Go up to get a good look. You'll notice most of the raiders are farther off and out of sight range.
    • The closest is a melee raider looking the wrong way. Go around behind him to the water tower, then east to the building which has a ladder up the side. Go to the roof where there are two ammunition boxes, and prepare your positions.
    • Still on this roof, move north to another group of raiders.
  • If it's a bigger roof, be sure to get closer to the enemy or they might find a way up the roof as well, neutralizing your high ground advantage.
Below the Dam
This is the initial area all the way up to the dam wall. To get atop the wall you need the lift lowered.
  • Alarmed Chest - Not sure what the alarm summons since when you get to the area you'll probably have already alerted the raiders.
  • Mines
    • Two landmines near the southern corner of the lettuce field need Perception 4 to spot. Some buried treasure also needs Perception 4 (or 3?). Perception 2 will spot many things including booby traps on some containers/searchable items, but not all.
  • Townie near Alexey - If you don't speak with him before ending the siege, he vanishes and you lose the opportunity to get dialogue XP. Kiss Ass 2 or Hard Ass 2 required.
    • Jesse-Belle
      • The three thugs in the house can be intimidated by Hard Ass 4; you might be lucky and find a Ranger Star somewhere for a Hard Ass +1 bonus in which case Angela Deth can do it with her Hard Ass 3 + 1 bonus from the Star.
      • If you intimidate them they leave and you get about 50 XP each plus XP for the person who passed the dialogue check. It is not clear if they reappear elsewhere later.
      • If you kill them you get 90 for each team member plus 30 per kill to the person who landed the killing blow. Typically weak loot.
      • If you delay too long and the safe is opened, you cannot get the note to initiate Jesse-Belle's quest. If you end the siege prior to getting the quest, she is found killed by the Wreckers.
      • After she gives you the quest, conversation will initially end. Talk to her again to get clues to her father's whereabouts, although that doesn't really help so much as a thorough search of HighPool.
    • Mortar
      • If you fire it, it doesn't appear to actually cause any harm or casualties whether you adjust the aim successfully with Demolitions or not.
      • You can also fire it after the siege for different radio chatter.
    Atop the Dam
    This is the area you are taken to when you radio to get elevated up, after killing Jackhammer and the last of the Wreckers.
    Once you get up here, your priorities are:
    • Talk to Sean Bergin. This automatically starts unless you deliberately try to evade talking to him.
      • After you recruit Vulture's Cry, his dialogue about them replaces his initial dialog which he will not initiate. You can manually enter some topics but he won't respond to all of them and you won't get the full dialog.
      • In terms of XP, the only thing you would really be missiing is a Hard Ass 2 check about "McNamara".
    • Recruit Vulture's Cry so she can start collecting group XP; also her Perception 3 helps to find all hidden items except 2 landmines in the fields (Perception 4 needed).
    • Then put out the fire on Mark's house because that has a time limit, after which the house completely burns down.
    Other notes:
    • Chickens - Animal Whisper them for BAWK! (Luck +1)
    • Graves
      • Depending on which grave you dig, you can avoid the Townies going hostile for one or two graves.
      • If you have the BB Gun in inventory you will immediately make Sean Bergin hostile when he spots it.
      • The bone in Rex's grave won't help you with the barking dog nearby.
      • Digging up Vicstrom's grave immediately makes everyone hostile.
      • During the vote (once you've repaired the valves in the Underground area), when everyone is away to vote, the graves are not watched and you can dig them all up without making anyone hostile.
    • Mark Stachowiak's burning house
      • After you reattach the valve, the easiest solution in terms of Skill Points is to use the Mechanical Repair skill. Otherwise you can use Hard Ass 4, Kiss Ass 2, or Smart Ass 4.
    • Sean Bergin
      • If for whatever reason you want to avoid speaking with Sean Bergin when you first get to the top of the dam, exit your characters 1 at a time. There should be just enough distance to avoid triggering dialog with him. If any character doesn't hug the edge of the cart and drifts closer to him, conversation will start.
      • Hard Ass 2 to ask about Red Scorpion McNamara.
    • Vulture's Cry
      • Ask her about the juvies to get XP (no Skills involved) but her speech changes.
      • Talk to Sean Bergin and use Kiss Ass 1 for XP after breaking her out.
      • Her Perception 3 will find a lot of hidden items at HighPool.
      • If you develop her Outdoorsman skill you can avoid a lot of combat for an easy way to get XP for her as well as to explore the western part of Arizona all the way up to Rail Nomads Camp.
      Underground
      The HIghpool Underground map is really straightforward.
      • Cockroaches - If you have at least one or two persons with melee skills you may want to conserve ammunition and clear this area with melee since there is a doctor in town -- there's no fear of being out in the wilderness far from healing and having to use your own first aid supplies.
      • Kathy Lawson - Until you talk to Kathy Lawson, the water system isn't in danger of blowing. You can therefore leave first to take care of the Wreckers Stronghold and come back.
      • Secret Tunnel - You need Perception 3 to uncover it near the statue Atop the Dam.
        • Skorpion Key - Opens the trunk that has a mine nearby and a booby trap on it (also bypasses the booby trap) but gives no XP.
        • Safe - Derringer is Jesse-Belle's dowry.
        • Toaster - Keep going into the tunnel with debris. Watch for the mine just around the corner,
      Highpool Destroyed
      If you came after first going to the Ag Centre, Highpool is destroyed. Find Sean Bergin in Jesse-Belle's house to get the Wrecking Crew's location. Otherwise, very straightforward map. The Double XP gate is also here.


      Wasteland 2 Director's Cut - Highpool

      Play Wasteland 2 risk-free with money-back guarantee from Good Old Games.

      A great place for maps and general information for Arizona is game-maps.com. Here, we provide additional information about the various locations, and/or specific to the Director's Cut.

      There are two versions of Highpool: If you choose to rescue the Ag Center and let Highpool be destroyed; or if you choose to rescue Highpool and instead let the Ag Center be destroyed.
      The choice is not triggered until team Echo One moves far enough south from Ranger Citadel, whereupon they receive a distress call from both locations. This is independent of whether they are following the main quest and have the Repeater Units to install at the radar dishes. There is also a time limit before both locations are destroyed; a second warning distress call warns of this.

      Compared to the Ag Centre, it's more straightforward. Perception needs to be 4 to find all the landmines, or 3 (which can be provided by Vulture's Cry, the recruitable NPC) to find most items.
      We go through the rescue mission version of Highpool first. The destroyed version of Highpool is very straightforward.

      General

      World Map - Rail Raiders
      • If you go east from Ag Centre to HighPool, you will avoid the radiation that is to the north of HighPool but you will instead encounter dangerous Rail Raiders who are hard for a number of reasons:
        • If you are relying on Angela Deth's Outdoorsman skill, you have a 50% chance of evading them (which you really don't want to) but you also have a lousy starting position on the map with a lot of pipes.
        • They are quite hard to hit.
        • They shoot well and carry good weapons -- weapons which can be yours, along with ammuntion and, frequently, medical supplies to help you recover from a battle with them.
      • You do want to engage them for the weapon upgrades they can provide, but hopefully not just at level 2 and with weak combat skills. Remember that you are not on a timer until you have triggered the distress calls from HighPool and Ag Center so if you like you can explore and grind the map a bit, although fighting weak raiders and animals is not likely to keep your ammunition and medical supplies replenished unless you use no-ammo-needed melee.
      Roofs
      • Watch for opportunities to get to high ground (roofs) to improve your aim and force raiders into the open as they come for you.
        • If raider gunners insist on hiding behind cover, back off from the roof edge so you are out of their line of sight, forcing them to come out.
        • If the raiders are too far away, sneak someone close and behind cover until you get your attention, then pull them back.
      • When you first enter, there is a ridge on the right. Go up to get a good look. You'll notice most of the raiders are farther off and out of sight range.
        • The closest is a melee raider looking the wrong way. Go around behind him to the water tower, then east to the building which has a ladder up the side. Go to the roof where there are two ammunition boxes, and prepare your positions.
        • Still on this roof, move north to another group of raiders.
      • If it's a bigger roof, be sure to get closer to the enemy or they might find a way up the roof as well, neutralizing your high ground advantage.
      Below the Dam
      This is the initial area all the way up to the dam wall. To get atop the wall you need the lift lowered.
      • Alarmed Chest - Not sure what the alarm summons since when you get to the area you'll probably have already alerted the raiders.
      • Mines
        • Two landmines near the southern corner of the lettuce field need Perception 4 to spot. Some buried treasure also needs Perception 4 (or 3?). Perception 2 will spot many things including booby traps on some containers/searchable items, but not all.
      • Townie near Alexey - If you don't speak with him before ending the siege, he vanishes and you lose the opportunity to get dialogue XP. Kiss Ass 2 or Hard Ass 2 required.
        • Jesse-Belle
          • The three thugs in the house can be intimidated by Hard Ass 4; you might be lucky and find a Ranger Star somewhere for a Hard Ass +1 bonus in which case Angela Deth can do it with her Hard Ass 3 + 1 bonus from the Star.
          • If you intimidate them they leave and you get about 50 XP each plus XP for the person who passed the dialogue check. It is not clear if they reappear elsewhere later.
          • If you kill them you get 90 for each team member plus 30 per kill to the person who landed the killing blow. Typically weak loot.
          • If you delay too long and the safe is opened, you cannot get the note to initiate Jesse-Belle's quest. If you end the siege prior to getting the quest, she is found killed by the Wreckers.
          • After she gives you the quest, conversation will initially end. Talk to her again to get clues to her father's whereabouts, although that doesn't really help so much as a thorough search of HighPool.
        • Mortar
          • If you fire it, it doesn't appear to actually cause any harm or casualties whether you adjust the aim successfully with Demolitions or not.
          • You can also fire it after the siege for different radio chatter.
        Atop the Dam
        This is the area you are taken to when you radio to get elevated up, after killing Jackhammer and the last of the Wreckers.
        Once you get up here, your priorities are:
        • Talk to Sean Bergin. This automatically starts unless you deliberately try to evade talking to him.
          • After you recruit Vulture's Cry, his dialogue about them replaces his initial dialog which he will not initiate. You can manually enter some topics but he won't respond to all of them and you won't get the full dialog.
          • In terms of XP, the only thing you would really be missiing is a Hard Ass 2 check about "McNamara".
        • Recruit Vulture's Cry so she can start collecting group XP; also her Perception 3 helps to find all hidden items except 2 landmines in the fields (Perception 4 needed).
        • Then put out the fire on Mark's house because that has a time limit, after which the house completely burns down.
        Other notes:
        • Chickens - Animal Whisper them for BAWK! (Luck +1)
        • Graves
          • Depending on which grave you dig, you can avoid the Townies going hostile for one or two graves.
          • If you have the BB Gun in inventory you will immediately make Sean Bergin hostile when he spots it.
          • The bone in Rex's grave won't help you with the barking dog nearby.
          • Digging up Vicstrom's grave immediately makes everyone hostile.
          • During the vote (once you've repaired the valves in the Underground area), when everyone is away to vote, the graves are not watched and you can dig them all up without making anyone hostile.
        • Mark Stachowiak's burning house
          • After you reattach the valve, the easiest solution in terms of Skill Points is to use the Mechanical Repair skill. Otherwise you can use Hard Ass 4, Kiss Ass 2, or Smart Ass 4.
        • Sean Bergin
          • If for whatever reason you want to avoid speaking with Sean Bergin when you first get to the top of the dam, exit your characters 1 at a time. There should be just enough distance to avoid triggering dialog with him. If any character doesn't hug the edge of the cart and drifts closer to him, conversation will start.
          • Hard Ass 2 to ask about Red Scorpion McNamara.
        • Vulture's Cry
          • Ask her about the juvies to get XP (no Skills involved) but her speech changes.
          • Talk to Sean Bergin and use Kiss Ass 1 for XP after breaking her out.
          • Her Perception 3 will find a lot of hidden items at HighPool.
          • If you develop her Outdoorsman skill you can avoid a lot of combat for an easy way to get XP for her as well as to explore the western part of Arizona all the way up to Rail Nomads Camp.
          Underground
          The HIghpool Underground map is really straightforward.
          • Cockroaches - If you have at least one or two persons with melee skills you may want to conserve ammunition and clear this area with melee since there is a doctor in town -- there's no fear of being out in the wilderness far from healing and having to use your own first aid supplies.
          • Kathy Lawson - Until you talk to Kathy Lawson, the water system isn't in danger of blowing. You can therefore leave first to take care of the Wreckers Stronghold and come back.
          • Secret Tunnel - You need Perception 3 to uncover it near the statue Atop the Dam.
            • Skorpion Key - Opens the trunk that has a mine nearby and a booby trap on it (also bypasses the booby trap) but gives no XP.
            • Safe - Derringer is Jesse-Belle's dowry.
            • Toaster - Keep going into the tunnel with debris. Watch for the mine just around the corner,
          Highpool Destroyed
          If you came after first going to the Ag Centre, Highpool is destroyed. Find Sean Bergin in Jesse-Belle's house to get the Wrecking Crew's location. Otherwise, very straightforward map. The Double XP gate is also here.


          reade more... Résuméabuiyad

          Wasteland 2 Director's Cut - Ag Center

          Wasteland 2 Director's Cut - Ag Center (rescue mission)
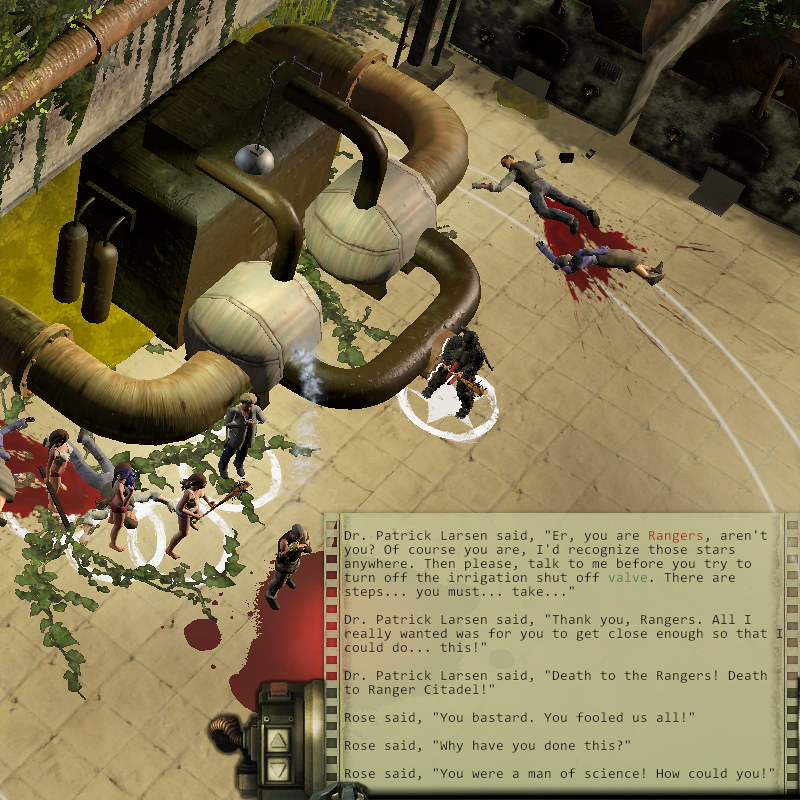
          -- Including how to get initiative over Dr. Larsen!

          Play Wasteland 2 risk-free with money-back guarantee from Good Old Games.

          Gamepressure is a good place for maps for the Ag Center amd the Ag Center Central Complex but it doesn't have a lot of notes on the area and
          A great place for maps and general information for Arizona is . Here, we provide additional information about the various locations, and/or specific to the Director's Cut.

          There are two versions of the Ag(riculture) Center: If you choose to rescue it and let Highpool be destroyed; or if you choose to rescue Highpool and instead let the Ag Center be destroyed.
          The choice is not triggered until team Echo One moves far enough south from Ranger Citadel, whereupon they receive a distress call from both locations. This is independent of whether they are following the main quest and have the Repeater Units to install at the radar dishes. There is also a time limit before both locations are destroyed; a second warning distress call warns of this.

          We talk about the more complicated Rescue first but a lot of the notes (e.g., about the pods) will still apply.

          Active skill checks here are quite high, with typically level 4 challenges. Some are very high but typically there is an alternate route, though you will miss the XP if you do not go back to take the challenge.
          Some trinkets may be randomly available that will raise your skill by 1 point, which may be just enough to attempt a challenge at the minimum (10+Attribute)% chance of success. To attempt to complete all challenges, raise your skills to level 2 before starting, and save some skill points to strategically raise a skill to 3 if necessary. If you absolutely want to get all XP, you need Smart Ass 4 and Surgeon 4 when talking to the boss Larsen.

          Wasteland 2 DC - getting initiative over Larsen

          General

          Disarming the Plants
          • Exploding Pods explode harmlessly, impassable vines can be cut, and people trapped in vines are automatically freed when both East and West Field main tasks are completed.
            • Each of the persons trapped in vines ends up in the infirmary on a bed. You can use the Surgeon skill on them again there.
          • Prior to this, completing East Field only or West Field only will give you the same benefits in that area only.
          Exploding Pods
          • There is a safe distance you can approach which causes the pods to start pulsing. At that maximum distance a pod will explode but not catch you in the blast.
          • If you flee quickly before a pod explodes, it will calm down and not explode.
          • In combat
            • If you are within a pod's trigger radius it will go through its regular build-up-and-explode sequence even if you are just waiting to just more of your Action Points and have not ended your turn.
              • Therefore, if an enemy is close by you can move closer, let the pod explode and hurt the enemy, then move in to attack the now hurt enemy unit.
              • If you cause it to explode, you get XP for whatever the blast kills.
            • If you cause a pod to explode outside of combat, even if the blast harms someone combat will not initiate.
          • After the mutagen is stopped from spreading from within the complex, all exploding pods harmlessly and immediately explode when you come within the trigger radius.
            • BUT if you damage them while in combat, they explode normally, and will inflict damage and Infection as well. If allowed to explode because you are close by, they explode harmlessly in or out of combat.
            • Some pods are close to containers so you may want to avoid them until you can get them to explode harmlessly since that will damage contents. If you get "glass cans" or "glass shards", then the container was probably damaged and you're basically left with debris.
            Mutant Animal Encounters
            • The time it takes them to notice the players is quite long, so you can sometimes slip past them even though you are quite close. In this way you can avoid combat to position in a tactically better location first.
            Rescue Missions
            • Sometimes people will be surrounded by mutant animals, and everyone is waiting for you to get close to initiate a cutscene, whereupon the animals attack until you get their attention.
            • If you are having trouble saving these hostages, don't approach too closely. Instead, shoot one of the monsters from a distance to initiate combat and draw them all to you. You'll miss the cutscene, but you can always do this from reloading the game.
            Rescue - Central Complex

            Kathy
            • If you ask her early about the radar dish you need (topic "Signal") you get to use Kiss Ass 2 for some XP. Otherwise if you ask later she is obviously not upset but you don't get any XP either.
            Matt
            • Matt stops trading from the time you give Kathy 10 Exploding Pod Fragments. He resumes trading once you give her the Fungicide from the underground mushroom area. He's the only trader at the early stages of the Ag Center rescue, so before you give Kathy the fragments, you may want to:
              • Sell junk to Matt first.
              • Ask Rose to join as a packmule.
              • Get the fungicide from the mushroom farm downstairs, which is required to complete her cure for Matt, which restores him as a merchant.
            • He will eventually give you access to his room and safe as a reward for helping the Ag Centre. If you break in first and wear his Ranger Star (labelled with his name), he will remark on that but apparently not do anything.
              Rose
              • Can be recruited early if you Brute Force down her door. Otherwise you will have to wait until you give Kathy 10 Exploding Pod Fragments, at which time she enters Rose's lab with Matt and Matt stops trading.
              • She has the control codes for the airlocks but whether she is in your party or gives them to you, you can manually open the airlocks with Computing Science or Safecracking by choosing the skill from a hotkey and manually targeting the airlock.
              Room next to Winston
              • The is a pod near a safe and no way to reach it without the safe being blown open by the exploding pod, unless you have already finished the quest tasks in the East and West Fields. At that point you can use Safecracking on the safe and get its contents.
              Rescue - Central Basement
              Room next to Winston
              • The is a pod near a safe and no way to reach it without the safe being blown open by the exploding pod, unless you have already finished the quest tasks in the East and West Fields. At that point you cannot actually interact with the safe and get its contents unless you smash it.
              Mushroom Farm
              • One Exploding Pod is at the entrance to the supplies and there are explosives buried in the ground. If you want to disarm the explosives for XP you need to turn off the mutagen first, rendering the pods harmless.
              Rescue - West Field
              Sue
              • Even if you discovered he has been spreading mutant seeds via pigeon by following the pigeon shit/pigeon coop topics, you can still get dialogue XP by asking about the suitcase under his bed. This will lead to the same dialogue again.
              Honeydew Lewis
              • If you Kiss Ass 2 you can ask him to join you in killing the rabbits.
                • If you do not immediately use the skill option conversation will move on and you won't get to ask again.
                • If he joins, conversation immediately exits and you cannot talk to him until you have killed all the rabbits. Then he leaves and goes to a melon patch where you can resume your conversation.
                • If you leave the area before the rabbits are killed, Lewis will not follow and will disappear from West Field.
              Ventilation System
              • The mechanism to fix the pump has an Exploding Pod nearby with containers inside its blast radius. If you go and get it, the pod will detonate and damage the contents. Instead, just to the Ventilation System building and look for the computer against one of the walls. You will need to manually target the Computer skill on it to hack.
              Rescue - East Field
              Cattle Pen
              • If you attack any rabbit quickly enough, they all disengage from the cattle to attack you.
              • Each cattle that remains can be Animal Whispered to follow for the CATTLE DRIVE perk (+1 Coordination), but more than two and you start automatically releasing existing animals.
              • You can tip a cow with the Brute Force skill. Once tipped you cannot Animal Whisper them but you can release them from following you and then tip them for XP.
              • Perception 2 is needed to spot the booby traps in cow dung.
                Gorilla Suit - You can find a hat, shirt, and pants that let you dress up as a gorilla.

                Wasteland 2 DC - Larsen has a booby trapped weapon

                Larsen
                • You cannot shoot Larsen first without it being counted against you as shooting non-combatants.
                • Smart Ass 4 and Surgeon 4 can be used to get XP in dialogue but is not necessary.
                • No matter what, he exits dialogue and goes first even if your initiative is higher. He can shoot 4 times with his gun (toned down from previous versions where he could shoot 6 times and had 200 CON).
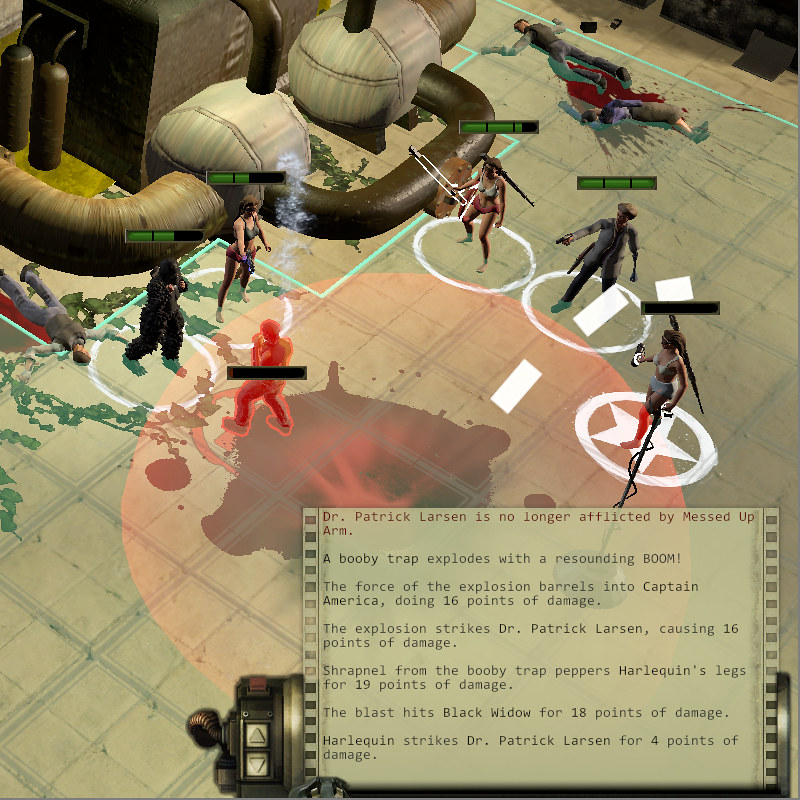
                • If you manage to Precision Shot his arm until he gets the Ruined Weapons effect, the combat log will show that a booby trap explodes for about 15 damage, and he will lose his gun (even though there will be a gun in his inventory after he dies).
                • When Larsen dies, his "Atomic Heart" explodes for about 8 damage in a wide radius. You can try to run out but the game determines that you were in the blast radius and will still damage you.
                • If you are having trouble:
                  • Position all characters behind him before initiating conversation. Have one character go to turn off the valve -- do not talk to him. Using the valve will force conversation with Larsen. Use the "Goodbye" option in conversation as soon as possible.
                  • When conversation exits, Larsen will stand up and now be hostile, BUT he is facing the wrong way and therefore is not yet immediately aware of any characters. You then get first strike, so make it count -- e.g., Try to have everyone shoot him all at the same time. Even if your characters have an impossible 10 in all Attributes and all Skills, he will go first when combat formally starts.
                  • Once combat starts, try to position your characters so that there is an open side and you can drop and explosive, such as a pipe bomb, not on him but NEAR him to include him in the blast radius but exclude nearby allies who are probably bleeding to death after his point blank range shots (see picture below for sample pipe bomb placement).
                • If you have Animal Whisperer pets nearby be careful they don't get caught in the blast. You have maybe a second after Larsen dies to move everyone out of the blast radius.
                Destroyed
                The Destroyed Ag Center (exterior map, interior map) is much more straightforward as all you can really get to is the Satellite Dish to check it.
                Kathy Lawson tells you of the infected settlements so pick up the cure and go there. You cannot apparently disinfect Ag Center itself.

                Larsen
                • Tighter space so harder, especially for keeping Animal Whisperer pets alive. Send everyone to the entry and have an armored person talk to him.
                • You actually have a slight chance of attacking before combat actually starts. As soon as dialogue finishes, click him to attack. If everyone has a gun (except maybe the person talking to him) they might all get a shot off and that could kill him outright before he even gets to attack.
                • If you get to move the person closest to him (and whom he likely shot first), there's a good chance he'll choose a different target, thus spreading out the damage and allowing your team to survive without anyone going down.
                Infected Settlements
                In both the Rescue mission and the investigation of the Destroyed Ag Center, there is the follow-up mission to bring a cure to the locations Sue inadvertently infected. For the Destroyed Ag Center, you are told of them by Kathy Lawson, and when you are close you will get a call from Ranger Citadel and the location appears.
                The settlements are all basically the same, except flies are weaker if you Rescued the Ag Center.
                • Infected Farm NW of Ag Center (map)
                  • Try to rush away from the cows, hugging the side of the map away from the infected monsters. That should draw the monsters away from the cows during the battle, if you want to save them for the CATTLE DRIVE (+1 Coordination) perk from using Animal Whisperer.
                • Infected Settlement at the pass NE of Ag Center (map)
                  • Go to the highest building near the crane -- a small square house with a chest on the roof. From that vantage you can shoot better, are harder to be spit at by flies, and none of the infected critters know how to climb ladders so they can't follow you. You may need one person to lure the Pod People around so that they won't explode too close to you, though. Also, any Animal Whisperer animals can't climb up either so be careful they don't get caught in a Pod Person explosion.
                  • Safe is Lock level 5 or you can get a key from the Sheriff.
                • Infected Pump Station in radiation zone south of Ag Center (map)

                      Wasteland 2 Director's Cut - Ag Center (rescue mission)
                      -- Including how to get initiative over Dr. Larsen!

                      Play Wasteland 2 risk-free with money-back guarantee from Good Old Games.

                      Gamepressure is a good place for maps for the Ag Center amd the Ag Center Central Complex but it doesn't have a lot of notes on the area and
                      A great place for maps and general information for Arizona is . Here, we provide additional information about the various locations, and/or specific to the Director's Cut.

                      There are two versions of the Ag(riculture) Center: If you choose to rescue it and let Highpool be destroyed; or if you choose to rescue Highpool and instead let the Ag Center be destroyed.
                      The choice is not triggered until team Echo One moves far enough south from Ranger Citadel, whereupon they receive a distress call from both locations. This is independent of whether they are following the main quest and have the Repeater Units to install at the radar dishes. There is also a time limit before both locations are destroyed; a second warning distress call warns of this.

                      We talk about the more complicated Rescue first but a lot of the notes (e.g., about the pods) will still apply.

                      Active skill checks here are quite high, with typically level 4 challenges. Some are very high but typically there is an alternate route, though you will miss the XP if you do not go back to take the challenge.
                      Some trinkets may be randomly available that will raise your skill by 1 point, which may be just enough to attempt a challenge at the minimum (10+Attribute)% chance of success. To attempt to complete all challenges, raise your skills to level 2 before starting, and save some skill points to strategically raise a skill to 3 if necessary. If you absolutely want to get all XP, you need Smart Ass 4 and Surgeon 4 when talking to the boss Larsen.

                      Wasteland 2 DC - getting initiative over Larsen

                      General

                      Disarming the Plants
                      • Exploding Pods explode harmlessly, impassable vines can be cut, and people trapped in vines are automatically freed when both East and West Field main tasks are completed.
                        • Each of the persons trapped in vines ends up in the infirmary on a bed. You can use the Surgeon skill on them again there.
                      • Prior to this, completing East Field only or West Field only will give you the same benefits in that area only.
                      Exploding Pods
                      • There is a safe distance you can approach which causes the pods to start pulsing. At that maximum distance a pod will explode but not catch you in the blast.
                      • If you flee quickly before a pod explodes, it will calm down and not explode.
                      • In combat
                        • If you are within a pod's trigger radius it will go through its regular build-up-and-explode sequence even if you are just waiting to just more of your Action Points and have not ended your turn.
                          • Therefore, if an enemy is close by you can move closer, let the pod explode and hurt the enemy, then move in to attack the now hurt enemy unit.
                          • If you cause it to explode, you get XP for whatever the blast kills.
                        • If you cause a pod to explode outside of combat, even if the blast harms someone combat will not initiate.
                      • After the mutagen is stopped from spreading from within the complex, all exploding pods harmlessly and immediately explode when you come within the trigger radius.
                        • BUT if you damage them while in combat, they explode normally, and will inflict damage and Infection as well. If allowed to explode because you are close by, they explode harmlessly in or out of combat.
                        • Some pods are close to containers so you may want to avoid them until you can get them to explode harmlessly since that will damage contents. If you get "glass cans" or "glass shards", then the container was probably damaged and you're basically left with debris.
                        Mutant Animal Encounters
                        • The time it takes them to notice the players is quite long, so you can sometimes slip past them even though you are quite close. In this way you can avoid combat to position in a tactically better location first.
                        Rescue Missions
                        • Sometimes people will be surrounded by mutant animals, and everyone is waiting for you to get close to initiate a cutscene, whereupon the animals attack until you get their attention.
                        • If you are having trouble saving these hostages, don't approach too closely. Instead, shoot one of the monsters from a distance to initiate combat and draw them all to you. You'll miss the cutscene, but you can always do this from reloading the game.
                        Rescue - Central Complex

                        Kathy
                        • If you ask her early about the radar dish you need (topic "Signal") you get to use Kiss Ass 2 for some XP. Otherwise if you ask later she is obviously not upset but you don't get any XP either.
                        Matt
                        • Matt stops trading from the time you give Kathy 10 Exploding Pod Fragments. He resumes trading once you give her the Fungicide from the underground mushroom area. He's the only trader at the early stages of the Ag Center rescue, so before you give Kathy the fragments, you may want to:
                          • Sell junk to Matt first.
                          • Ask Rose to join as a packmule.
                          • Get the fungicide from the mushroom farm downstairs, which is required to complete her cure for Matt, which restores him as a merchant.
                        • He will eventually give you access to his room and safe as a reward for helping the Ag Centre. If you break in first and wear his Ranger Star (labelled with his name), he will remark on that but apparently not do anything.
                          Rose
                          • Can be recruited early if you Brute Force down her door. Otherwise you will have to wait until you give Kathy 10 Exploding Pod Fragments, at which time she enters Rose's lab with Matt and Matt stops trading.
                          • She has the control codes for the airlocks but whether she is in your party or gives them to you, you can manually open the airlocks with Computing Science or Safecracking by choosing the skill from a hotkey and manually targeting the airlock.
                          Room next to Winston
                          • The is a pod near a safe and no way to reach it without the safe being blown open by the exploding pod, unless you have already finished the quest tasks in the East and West Fields. At that point you can use Safecracking on the safe and get its contents.
                          Rescue - Central Basement
                          Room next to Winston
                          • The is a pod near a safe and no way to reach it without the safe being blown open by the exploding pod, unless you have already finished the quest tasks in the East and West Fields. At that point you cannot actually interact with the safe and get its contents unless you smash it.
                          Mushroom Farm
                          • One Exploding Pod is at the entrance to the supplies and there are explosives buried in the ground. If you want to disarm the explosives for XP you need to turn off the mutagen first, rendering the pods harmless.
                          Rescue - West Field
                          Sue
                          • Even if you discovered he has been spreading mutant seeds via pigeon by following the pigeon shit/pigeon coop topics, you can still get dialogue XP by asking about the suitcase under his bed. This will lead to the same dialogue again.
                          Honeydew Lewis
                          • If you Kiss Ass 2 you can ask him to join you in killing the rabbits.
                            • If you do not immediately use the skill option conversation will move on and you won't get to ask again.
                            • If he joins, conversation immediately exits and you cannot talk to him until you have killed all the rabbits. Then he leaves and goes to a melon patch where you can resume your conversation.
                            • If you leave the area before the rabbits are killed, Lewis will not follow and will disappear from West Field.
                          Ventilation System
                          • The mechanism to fix the pump has an Exploding Pod nearby with containers inside its blast radius. If you go and get it, the pod will detonate and damage the contents. Instead, just to the Ventilation System building and look for the computer against one of the walls. You will need to manually target the Computer skill on it to hack.
                          Rescue - East Field
                          Cattle Pen
                          • If you attack any rabbit quickly enough, they all disengage from the cattle to attack you.
                          • Each cattle that remains can be Animal Whispered to follow for the CATTLE DRIVE perk (+1 Coordination), but more than two and you start automatically releasing existing animals.
                          • You can tip a cow with the Brute Force skill. Once tipped you cannot Animal Whisper them but you can release them from following you and then tip them for XP.
                          • Perception 2 is needed to spot the booby traps in cow dung.
                            Gorilla Suit - You can find a hat, shirt, and pants that let you dress up as a gorilla.

                            Wasteland 2 DC - Larsen has a booby trapped weapon

                            Larsen
                            • You cannot shoot Larsen first without it being counted against you as shooting non-combatants.
                            • Smart Ass 4 and Surgeon 4 can be used to get XP in dialogue but is not necessary.
                            • No matter what, he exits dialogue and goes first even if your initiative is higher. He can shoot 4 times with his gun (toned down from previous versions where he could shoot 6 times and had 200 CON).
                            • If you manage to Precision Shot his arm until he gets the Ruined Weapons effect, the combat log will show that a booby trap explodes for about 15 damage, and he will lose his gun (even though there will be a gun in his inventory after he dies).
                            • When Larsen dies, his "Atomic Heart" explodes for about 8 damage in a wide radius. You can try to run out but the game determines that you were in the blast radius and will still damage you.
                            • If you are having trouble:
                              • Position all characters behind him before initiating conversation. Have one character go to turn off the valve -- do not talk to him. Using the valve will force conversation with Larsen. Use the "Goodbye" option in conversation as soon as possible.
                              • When conversation exits, Larsen will stand up and now be hostile, BUT he is facing the wrong way and therefore is not yet immediately aware of any characters. You then get first strike, so make it count -- e.g., Try to have everyone shoot him all at the same time. Even if your characters have an impossible 10 in all Attributes and all Skills, he will go first when combat formally starts.
                              • Once combat starts, try to position your characters so that there is an open side and you can drop and explosive, such as a pipe bomb, not on him but NEAR him to include him in the blast radius but exclude nearby allies who are probably bleeding to death after his point blank range shots (see picture below for sample pipe bomb placement).
                            • If you have Animal Whisperer pets nearby be careful they don't get caught in the blast. You have maybe a second after Larsen dies to move everyone out of the blast radius.
                            Destroyed
                            The Destroyed Ag Center (exterior map, interior map) is much more straightforward as all you can really get to is the Satellite Dish to check it.
                            Kathy Lawson tells you of the infected settlements so pick up the cure and go there. You cannot apparently disinfect Ag Center itself.

                            Larsen
                            • Tighter space so harder, especially for keeping Animal Whisperer pets alive. Send everyone to the entry and have an armored person talk to him.
                            • You actually have a slight chance of attacking before combat actually starts. As soon as dialogue finishes, click him to attack. If everyone has a gun (except maybe the person talking to him) they might all get a shot off and that could kill him outright before he even gets to attack.
                            • If you get to move the person closest to him (and whom he likely shot first), there's a good chance he'll choose a different target, thus spreading out the damage and allowing your team to survive without anyone going down.
                            Infected Settlements
                            In both the Rescue mission and the investigation of the Destroyed Ag Center, there is the follow-up mission to bring a cure to the locations Sue inadvertently infected. For the Destroyed Ag Center, you are told of them by Kathy Lawson, and when you are close you will get a call from Ranger Citadel and the location appears.
                            The settlements are all basically the same, except flies are weaker if you Rescued the Ag Center.
                            • Infected Farm NW of Ag Center (map)
                              • Try to rush away from the cows, hugging the side of the map away from the infected monsters. That should draw the monsters away from the cows during the battle, if you want to save them for the CATTLE DRIVE (+1 Coordination) perk from using Animal Whisperer.
                            • Infected Settlement at the pass NE of Ag Center (map)
                              • Go to the highest building near the crane -- a small square house with a chest on the roof. From that vantage you can shoot better, are harder to be spit at by flies, and none of the infected critters know how to climb ladders so they can't follow you. You may need one person to lure the Pod People around so that they won't explode too close to you, though. Also, any Animal Whisperer animals can't climb up either so be careful they don't get caught in a Pod Person explosion.
                              • Safe is Lock level 5 or you can get a key from the Sheriff.
                            • Infected Pump Station in radiation zone south of Ag Center (map)

                                  reade more... Résuméabuiyad

                                  Wasteland 2 Director's Cut Walkthrough Index

                                   Wasteland 2 Director's Cut Walkthrough Index

                                  Play Wasteland 2 risk-free with money-back guarantee from Good Old Games.

                                  This post indexes all our walkthroughs, tips, and cheats for Wasteland 2 Director's Cut.

                                  General Information Articles
                                  Location Notes
                                  Whenever you come across a Shrine, remember that you can get the bonus only once -- not once per character. That is, if you have new NPCs in your party, you cannot revisit a shrine and get the bonus just for those new NPCs. Therefore, you may want to consider just when to visit a Shrine, possibly saving it for permanent NPCs.
                                  General Tips
                                  • If you have the Akita Figurine (+1 Animal Whisperer) you can pass it around and let different characters pick up an animal with a low-level Animal Whisperer challenge, such as the goat at Ranger Citadel or the chickens at Highpool. They do not need any levels of Animal Whisperer to keep the animal and the associated bonus.
                                  • Sometimes a gate can both be Lockpicked open and Brute Forced. Once you lockpick it, you can sometimes click the gate to close it,whereupon you can Brute Force it open for more skill XP.
                                   Wasteland 2 Director's Cut Walkthrough Index

                                  Play Wasteland 2 risk-free with money-back guarantee from Good Old Games.

                                  This post indexes all our walkthroughs, tips, and cheats for Wasteland 2 Director's Cut.

                                  General Information Articles
                                  Location Notes
                                  Whenever you come across a Shrine, remember that you can get the bonus only once -- not once per character. That is, if you have new NPCs in your party, you cannot revisit a shrine and get the bonus just for those new NPCs. Therefore, you may want to consider just when to visit a Shrine, possibly saving it for permanent NPCs.
                                  General Tips
                                  • If you have the Akita Figurine (+1 Animal Whisperer) you can pass it around and let different characters pick up an animal with a low-level Animal Whisperer challenge, such as the goat at Ranger Citadel or the chickens at Highpool. They do not need any levels of Animal Whisperer to keep the animal and the associated bonus.
                                  • Sometimes a gate can both be Lockpicked open and Brute Forced. Once you lockpick it, you can sometimes click the gate to close it,whereupon you can Brute Force it open for more skill XP.
                                  reade more... Résuméabuiyad

                                  Wasteland 2 Director's Cut - Ranger Citadel (exterior)

                                  Wasteland 2 Director's Cut - Ranger Citadel (exterior)

                                  Play Wasteland 2 risk-free with money-back guarantee from Good Old Games.

                                  A great place for maps and general information for Arizona is game-maps.com. Here, we provide additional information about the various locations, and/or specific to the Director's Cut.

                                  Opening Cutscene
                                  • You do not need any dialogue skills here although you are given the options. The skill requirement is set to 0, so even if you have no dialogue skills you can get XP from speaking with Vargas.
                                  Aberforth
                                  • Use Animal Whisperer 1 to tame Aberforth and not be attacked when you pick up the can. Dialogue will not reflect this, however.
                                  • Aberforth gives DEVIL EYES for +1 Awareness.
                                  • Aberforth is passive in combat and typically dies only if hit by stray fire or if it is caught in a blast. And like other animal followers, it is immune to most environmental effects.
                                  Angela Deth
                                  • If you speak with Vargas while she is in your party and prior to bringing back evidence from investigating Ace's death, you can betray her intention to Vargas, causing her to leave your party and leave the map. The topic "Snake" comes up but you have to manually type it into the dialogue box to pursue the topic.
                                  Ranger Brass Knucks
                                  • The fenced area near him is accessible.
                                  Spkye Alpha, Slick, and Mumbles
                                    • When you return to the Ranger Citadel after recruiting them, if Vargas is addressing the new recruits they will be with them. You cannot really interact with any of the recruits and after Vargas dismisses them they leave the map.
                                    • Spyke's two dogs will also be there, and will stay there once the recruits disperse.
                                      • You can therefore Animal Whisper one or both for the PUPPIES (+1 Charisma) perk. Two dogs will not give you the perk twice.
                                      • They do run into melee combat and can die easily or be a drain on Field Medic kits trying to keep them alive. Therefore it is probably better to leave them be, and use Animal Whisperer only if you need the Charisma boost.

                                    Wasteland 2 Director's Cut - Ranger Citadel (exterior)

                                    Play Wasteland 2 risk-free with money-back guarantee from Good Old Games.

                                    A great place for maps and general information for Arizona is game-maps.com. Here, we provide additional information about the various locations, and/or specific to the Director's Cut.

                                    Opening Cutscene
                                    • You do not need any dialogue skills here although you are given the options. The skill requirement is set to 0, so even if you have no dialogue skills you can get XP from speaking with Vargas.
                                    Aberforth
                                    • Use Animal Whisperer 1 to tame Aberforth and not be attacked when you pick up the can. Dialogue will not reflect this, however.
                                    • Aberforth gives DEVIL EYES for +1 Awareness.
                                    • Aberforth is passive in combat and typically dies only if hit by stray fire or if it is caught in a blast. And like other animal followers, it is immune to most environmental effects.
                                    Angela Deth
                                    • If you speak with Vargas while she is in your party and prior to bringing back evidence from investigating Ace's death, you can betray her intention to Vargas, causing her to leave your party and leave the map. The topic "Snake" comes up but you have to manually type it into the dialogue box to pursue the topic.
                                    Ranger Brass Knucks
                                    • The fenced area near him is accessible.
                                    Spkye Alpha, Slick, and Mumbles
                                      • When you return to the Ranger Citadel after recruiting them, if Vargas is addressing the new recruits they will be with them. You cannot really interact with any of the recruits and after Vargas dismisses them they leave the map.
                                      • Spyke's two dogs will also be there, and will stay there once the recruits disperse.
                                        • You can therefore Animal Whisper one or both for the PUPPIES (+1 Charisma) perk. Two dogs will not give you the perk twice.
                                        • They do run into melee combat and can die easily or be a drain on Field Medic kits trying to keep them alive. Therefore it is probably better to leave them be, and use Animal Whisperer only if you need the Charisma boost.

                                      reade more... Résuméabuiyad

                                      Wasteland 2 Director's Cut - Radio Tower

                                      Wasteland 2 Director's Cut - Radio Tower

                                      Play Wasteland 2 risk-free with money-back guarantee from Good Old Games.

                                      A great place for maps and general information for Arizona is guides.gamepressure.com. Here, we provide additional information about the various locations, and/or specific to the Director's Cut.

                                      Spyke Alpha, Slick, and Mumbles
                                      • Best solution is to recruit them using Kiss Ass 1: You will receive the most dialogue XP plus more later on in the Ranger Citadel for having recruited them.
                                      • Killing the raiders south-east of their compound does not make them hostile. It also lets you circle around Spyke to talk to Mumbles or Slick.
                                        • Whoever you  talk to determines the outcome for the gang and the dialogue of the other two members is locked out.
                                        • You get different dialogue with all three gang members. Mumbles and Slick also gives you fewer dialogue alternatives.
                                      • If you speak with Slick or Mumbles and the gang remains in place, you can Animal Whisper the dogs but they will not follow the party nor leave. To get them to follow you must recruit the gang and then find them with their dogs later at the Ranger Citadel courtyard.
                                      Raiders south-east of Spyke Alpha
                                      • If for whatever reason you are having trouble with them, there are two things you can do:
                                        • Make peace with Spyke and they will be neutral. That lets you attack first.
                                        • Go further south-east where there is a narrow passage (barred with a gate) leading up to an overlook. From that height advantage you get a bonus to hit and they get a penalty to hit.
                                      Mutant Frog in Cave
                                      • The Mutant Frog here hits hard and is pretty much guaranteed to incapacitate a character on higher difficulties with a single attack. To give yourself the best chance, spread out first (its sight range is apparently pretty low) and have everyone use a gun and shoot it. Retreat from it to shoot some more -- the further it is forced to move, the fewer attacks it will have per turn.
                                      • If you are still having trouble, to the northeast there is a cave with a shrine. Before entering the cave, there is a hidden cache revealed by Perception 1 at the dead end, near the cactus. That cache always contains a pipe bomb.


                                        Wasteland 2 Director's Cut - Radio Tower

                                        Play Wasteland 2 risk-free with money-back guarantee from Good Old Games.

                                        A great place for maps and general information for Arizona is guides.gamepressure.com. Here, we provide additional information about the various locations, and/or specific to the Director's Cut.

                                        Spyke Alpha, Slick, and Mumbles
                                        • Best solution is to recruit them using Kiss Ass 1: You will receive the most dialogue XP plus more later on in the Ranger Citadel for having recruited them.
                                        • Killing the raiders south-east of their compound does not make them hostile. It also lets you circle around Spyke to talk to Mumbles or Slick.
                                          • Whoever you  talk to determines the outcome for the gang and the dialogue of the other two members is locked out.
                                          • You get different dialogue with all three gang members. Mumbles and Slick also gives you fewer dialogue alternatives.
                                        • If you speak with Slick or Mumbles and the gang remains in place, you can Animal Whisper the dogs but they will not follow the party nor leave. To get them to follow you must recruit the gang and then find them with their dogs later at the Ranger Citadel courtyard.
                                        Raiders south-east of Spyke Alpha
                                        • If for whatever reason you are having trouble with them, there are two things you can do:
                                          • Make peace with Spyke and they will be neutral. That lets you attack first.
                                          • Go further south-east where there is a narrow passage (barred with a gate) leading up to an overlook. From that height advantage you get a bonus to hit and they get a penalty to hit.
                                        Mutant Frog in Cave
                                        • The Mutant Frog here hits hard and is pretty much guaranteed to incapacitate a character on higher difficulties with a single attack. To give yourself the best chance, spread out first (its sight range is apparently pretty low) and have everyone use a gun and shoot it. Retreat from it to shoot some more -- the further it is forced to move, the fewer attacks it will have per turn.
                                        • If you are still having trouble, to the northeast there is a cave with a shrine. Before entering the cave, there is a hidden cache revealed by Perception 1 at the dead end, near the cactus. That cache always contains a pipe bomb.


                                          reade more... Résuméabuiyad

                                          Wasteland 2 Director's Cut - Team Building

                                           
                                          Wasteland 2 Director's Cut Location Notes: Team Building

                                          Play Wasteland 2 risk-free with money-back guarantee from Good Old Games.
                                          We build our team with the goal of getting all dialogue and skill encounters in the game. Therefore, we dropped certain skills (Barter, Leadership) because there were no role-playing events related to them.

                                          In the early game, melee skills are strong because once you are in melee, you get many chances to attack, so even level 1 skill in Bladed or Blunt Weapons can be very useful. Trading blows with enemy melee or Handgunners is still risky, but once you are a higher level and have more CON, then against easy raider encounters you can basically use melee to clear them and that way get resources without using your own (and run back to a town for free healing, which you can safely do if your party Outdoorsman skill is high enough).
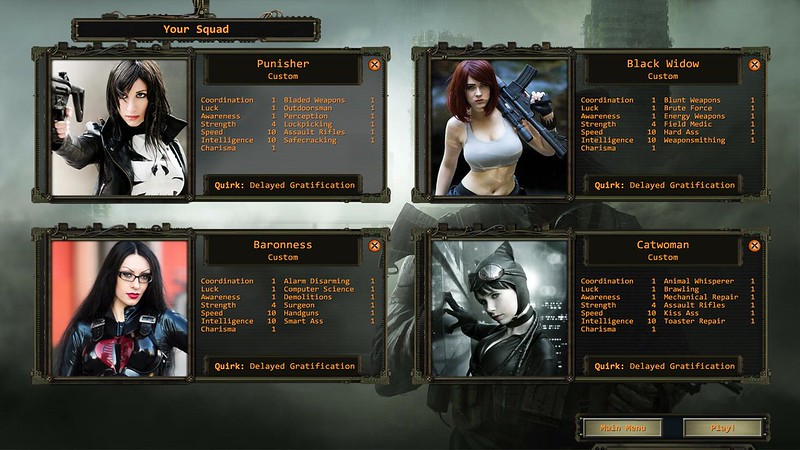
                                            The initial team was:

                                            Perception / Sniper
                                            • This character takes point when moving around the map because they have the Perception skill to spot dangers early.
                                            • Takes the first shot, initiating combat. Hopefully the Sniper skill will let them kill the enemy mid-range to long-range gunner, forcing remaining members to close the gap under fire.
                                            • Because Sniper Rifles are single-shot weapons in the short distances of this game they are generally good only as first-strike weapons, after which mid-range weapons and short-range or melee combat takes over. In which case you may just want to go with Assault Rifles for a more rounded character.
                                            • With all builds here, Handguns is superior to melee because you get both range and point blank range bonuses but it will be very ammunition intensive unless you have enough scrap to buy a lot of ammunition.
                                            • Skills
                                              • Handguns 1 OR Bladed Weapons 1
                                              • Sniper Rifles 1 OR Assault Rifle 1
                                              • Perception 1, Outdoorsman 1
                                                • Angela Deth has the Outdoorsman skill so you can delay taking it; if you rescue Highpool, Vulture's Cry also has this skill and you could maximize hers.
                                              • Lockpicking 1, Safecracking 1
                                            Hard Ass / Melee
                                            • Hard Ass has a combat perk and Brute Force has a melee weapon perk (see our list of Wasteland 2 Director's Cut perks sorted by skill), so this is the only melee weapon character. Also has the Field Medic to aim for the Stimpak perk to help them survive melee.
                                            • Skills
                                              • Blunt Weapons 1, Brute Force 1, Hard Ass 1
                                                • She is also our main melee combatant. In the early game when a lot of enemies do not have conductive armour and therefore energy weapons are not useful except when the target only has very few CON left, she advances into melee. In the late game, her melee is reinforced by the Stimpack perk from First Aid and other perks from Brute Force and Hard Ass.
                                              • Energy Weapons 1
                                                • Energy Weapons are weak at the start but stronger later on when enemies have conductive armor. So in the early game, she fulfills the melee role but can still use Energy Weapons against targets with very low HP left.
                                              • Field Medic
                                              • Weaponsmithing 1
                                                • Angela Deth has this skill so you could delay taking it and invest in a weapon skill instead; and then have Angela Deth maximize her Weaponsmithing.
                                            Smart Ass / Loot
                                            • Due to skill distribution, the only character without only one weapon proficiency. If you can keep her at mid-range, Assault Rifle is a good all-rounder. Otherwise, try a Handgun with a scope to give her utility from mid to short range.
                                            • Skills
                                              • Assault Rifles 1 OR Handguns 1
                                              • Smart Ass 1
                                              • Alarm Disarming 1, Computer Science 1, Demolitions 1
                                              • Surgeon 1
                                            Kiss Ass
                                            • Skills
                                              • Animal Whisperer 1, Kiss Ass 1
                                              • Assault Rifles 1
                                              • Handguns 1 OR Brawling 1
                                              • Mechanical Repair 1, Toaster Repair 1
                                            Wasteland 2 Director's Cut - team build

                                            Attributes
                                            Attributes were ruthlessly specialized. We aimed to improve Strength (for more CON) as we acquire levels (CON gains from Strength are retroactive). In the meantime we maximized Speed for Initiative and Evasion, and Intelligence for Skill Points as we are a skill-focussed party.
                                            Attributes are as follows:
                                            • Coordination 1, Luck 1, Awareness 1, Charisma 1
                                            • Strength 4
                                            • Speed 10, Intelligence 10
                                            An alternate build could have Coordination 4 Strength 1 and develop Coordination, to get a lot of Action Points.

                                            For the Trait, because we won't get Leadership we could take took Raised in a Circus for the +5% Evasion bonus, which helps us maximize Evasion. However, in practice this wasn't as useful as being competent in combat and taking down the enemy quickly, so in the end we went with Delayed Gratification (-1 skill points from levels 2-10, +1 skill points from level 11+).

                                            Early Game Skill Checks
                                            If you want to maximize your XP and game experience by succeeding in as many skill checks as possible, you'll need to consider what to do after the Radio Tower as in the early game you don't have many skill resources.
                                            • The Radio tower has a few easy skill checks but you will have to go back to that location later anyway.
                                            • Ag Center has a wide variety of skills, but only a few require high-level skills (though you might end up with a miserable chance of success and a lot of reloads). Also, some opportunities to make skills checks disappear if you progress too far in the mission; for example, you can break into Rose's lab and recruit her early, or you can wait for the door to be open for you later.
                                            • Highpool is a shorter mission with fewer checks but the skill requirements are higher. Fortunately, a lot of the checks can be delayed.
                                            • If you don't so far enough to get the initial Highpool SOS then you are not under any time pressure to choose. Theoretically, you could grind for levels to increase your skills before going to either Ag Center or Highpool.
                                              • You won't get a doctor to heal you for free -- you need to finish either Ag Center or Highpool to get this.
                                              • Therefore you need to find or buy medical resources unless you are lucky enough to avoid severe injury until you can level up (whereupon you are healed for free unless you are dying).
                                              • You will steadily run out of ammunition unless you have a lot of melee in your party, in which case you can grind the easier encounters that typically don't drop gear or ammunition.
                                              • You can also buy the radiation suit from the Citadel early and look for caches to the north. This will get you at least two suits of armor, though you might have to run from most encounters at a low 25% chance of success. If you can handle this you also have a good likelihood of encountering Rail raiders who can drop fairly good weapon loot.
                                            • You could use Veterans -- If your party dies they get exported and available for a new game. You lose your gear but keep your levelling.
                                              • A quick way to do this is to find the nuclear warhead in the Ranger Citadel museum and press the button.

                                            You can also get easy XP and Skill Points from Shrines in this area, though that is better done when you have a full roster (including NPCs) as you can only visit Shrines once for the bonus, and team members who weren't with you when you visited cannot get the benefit later.

                                             
                                            Wasteland 2 Director's Cut Location Notes: Team Building

                                            Play Wasteland 2 risk-free with money-back guarantee from Good Old Games.
                                            We build our team with the goal of getting all dialogue and skill encounters in the game. Therefore, we dropped certain skills (Barter, Leadership) because there were no role-playing events related to them.

                                            In the early game, melee skills are strong because once you are in melee, you get many chances to attack, so even level 1 skill in Bladed or Blunt Weapons can be very useful. Trading blows with enemy melee or Handgunners is still risky, but once you are a higher level and have more CON, then against easy raider encounters you can basically use melee to clear them and that way get resources without using your own (and run back to a town for free healing, which you can safely do if your party Outdoorsman skill is high enough).
                                              The initial team was:

                                              Perception / Sniper
                                              • This character takes point when moving around the map because they have the Perception skill to spot dangers early.
                                              • Takes the first shot, initiating combat. Hopefully the Sniper skill will let them kill the enemy mid-range to long-range gunner, forcing remaining members to close the gap under fire.
                                              • Because Sniper Rifles are single-shot weapons in the short distances of this game they are generally good only as first-strike weapons, after which mid-range weapons and short-range or melee combat takes over. In which case you may just want to go with Assault Rifles for a more rounded character.
                                              • With all builds here, Handguns is superior to melee because you get both range and point blank range bonuses but it will be very ammunition intensive unless you have enough scrap to buy a lot of ammunition.
                                              • Skills
                                                • Handguns 1 OR Bladed Weapons 1
                                                • Sniper Rifles 1 OR Assault Rifle 1
                                                • Perception 1, Outdoorsman 1
                                                  • Angela Deth has the Outdoorsman skill so you can delay taking it; if you rescue Highpool, Vulture's Cry also has this skill and you could maximize hers.
                                                • Lockpicking 1, Safecracking 1
                                              Hard Ass / Melee
                                              • Hard Ass has a combat perk and Brute Force has a melee weapon perk (see our list of Wasteland 2 Director's Cut perks sorted by skill), so this is the only melee weapon character. Also has the Field Medic to aim for the Stimpak perk to help them survive melee.
                                              • Skills
                                                • Blunt Weapons 1, Brute Force 1, Hard Ass 1
                                                  • She is also our main melee combatant. In the early game when a lot of enemies do not have conductive armour and therefore energy weapons are not useful except when the target only has very few CON left, she advances into melee. In the late game, her melee is reinforced by the Stimpack perk from First Aid and other perks from Brute Force and Hard Ass.
                                                • Energy Weapons 1
                                                  • Energy Weapons are weak at the start but stronger later on when enemies have conductive armor. So in the early game, she fulfills the melee role but can still use Energy Weapons against targets with very low HP left.
                                                • Field Medic
                                                • Weaponsmithing 1
                                                  • Angela Deth has this skill so you could delay taking it and invest in a weapon skill instead; and then have Angela Deth maximize her Weaponsmithing.
                                              Smart Ass / Loot
                                              • Due to skill distribution, the only character without only one weapon proficiency. If you can keep her at mid-range, Assault Rifle is a good all-rounder. Otherwise, try a Handgun with a scope to give her utility from mid to short range.
                                              • Skills
                                                • Assault Rifles 1 OR Handguns 1
                                                • Smart Ass 1
                                                • Alarm Disarming 1, Computer Science 1, Demolitions 1
                                                • Surgeon 1
                                              Kiss Ass
                                              • Skills
                                                • Animal Whisperer 1, Kiss Ass 1
                                                • Assault Rifles 1
                                                • Handguns 1 OR Brawling 1
                                                • Mechanical Repair 1, Toaster Repair 1
                                              Wasteland 2 Director's Cut - team build

                                              Attributes
                                              Attributes were ruthlessly specialized. We aimed to improve Strength (for more CON) as we acquire levels (CON gains from Strength are retroactive). In the meantime we maximized Speed for Initiative and Evasion, and Intelligence for Skill Points as we are a skill-focussed party.
                                              Attributes are as follows:
                                              • Coordination 1, Luck 1, Awareness 1, Charisma 1
                                              • Strength 4
                                              • Speed 10, Intelligence 10
                                              An alternate build could have Coordination 4 Strength 1 and develop Coordination, to get a lot of Action Points.

                                              For the Trait, because we won't get Leadership we could take took Raised in a Circus for the +5% Evasion bonus, which helps us maximize Evasion. However, in practice this wasn't as useful as being competent in combat and taking down the enemy quickly, so in the end we went with Delayed Gratification (-1 skill points from levels 2-10, +1 skill points from level 11+).

                                              Early Game Skill Checks
                                              If you want to maximize your XP and game experience by succeeding in as many skill checks as possible, you'll need to consider what to do after the Radio Tower as in the early game you don't have many skill resources.
                                              • The Radio tower has a few easy skill checks but you will have to go back to that location later anyway.
                                              • Ag Center has a wide variety of skills, but only a few require high-level skills (though you might end up with a miserable chance of success and a lot of reloads). Also, some opportunities to make skills checks disappear if you progress too far in the mission; for example, you can break into Rose's lab and recruit her early, or you can wait for the door to be open for you later.
                                              • Highpool is a shorter mission with fewer checks but the skill requirements are higher. Fortunately, a lot of the checks can be delayed.
                                              • If you don't so far enough to get the initial Highpool SOS then you are not under any time pressure to choose. Theoretically, you could grind for levels to increase your skills before going to either Ag Center or Highpool.
                                                • You won't get a doctor to heal you for free -- you need to finish either Ag Center or Highpool to get this.
                                                • Therefore you need to find or buy medical resources unless you are lucky enough to avoid severe injury until you can level up (whereupon you are healed for free unless you are dying).
                                                • You will steadily run out of ammunition unless you have a lot of melee in your party, in which case you can grind the easier encounters that typically don't drop gear or ammunition.
                                                • You can also buy the radiation suit from the Citadel early and look for caches to the north. This will get you at least two suits of armor, though you might have to run from most encounters at a low 25% chance of success. If you can handle this you also have a good likelihood of encountering Rail raiders who can drop fairly good weapon loot.
                                              • You could use Veterans -- If your party dies they get exported and available for a new game. You lose your gear but keep your levelling.
                                                • A quick way to do this is to find the nuclear warhead in the Ranger Citadel museum and press the button.

                                              You can also get easy XP and Skill Points from Shrines in this area, though that is better done when you have a full roster (including NPCs) as you can only visit Shrines once for the bonus, and team members who weren't with you when you visited cannot get the benefit later.

                                              reade more... Résuméabuiyad

                                              Wasteland 2 Director's Cut - Character Hacking and Respec

                                              Wasteland 2 Director's Cut: Character Hacking and Respec

                                              Play Wasteland 2 risk-free with money-back guarantee from Good Old Games.

                                              To edit your character's Attributes and Skills you can simply open a text file and edit it.

                                              Savegames are typically stored in ...\Documents\My Games\Wasteland2DC\Save Games\

                                              This directory will have subdirectories that are named based on the name you gave your savegame.
                                              Open the directory and you will find two files, a .bin and a .xml
                                              Open the .xml in a text editor and examine it to find the skills and attributes for each character. Start by searching for your character's name.

                                              Below is an sample section of the file comprising one character's entry. In larger font are attributes and associated values. Skill entries follow after.
                                              • For attributes, valid values are 1-10. Any value above 10 is treated as 10 in-game and flagged in red (but apparently harmless).
                                              • For skills, the values represent the number of Skill Points put into the skill -- NOT the skill level.
                                              Just edit the numbers and save the file as a text file (but of course do not change the file name).
                                              You can get away with less editing and do it in-game later by tweaking the <available...> entries, giving you Attribute Points, Skill Points, and Trait Points to spend in game.

                                              BONUS TIP: The .char files for custom rangers in the ...\Documents\My Games\Wasteland2DC\Characters directory are also plain text files with a similar structure. You could assign a character 10's in every Attribute and Skill (including the two hidden skills) and start with "perfect 10" characters to rapidly explore the Wasteland or replay the game to try different things.

                                              <pc><name><@>Lady Thor{F}</name><displayName><@>Lady Thor{F}</displayName><portraitName>cosplay Thor</portraitName><position><x>121.9337</x><y>6.401434</y><z>29.14721</z></position><rotationY>348.8566</rotationY><gender>2</gender><religion>None</religion><smokes>None</smokes><ethnicity>Russian</ethnicity><biography></biography><skinColor>0</skinColor><age>20</age><level>1</level><xp>0</xp><curHp>35</curHp><size>4</size><noOfKills>0</noOfKills><damageDone>0</damageDone><availableAttributePoints>0</availableAttributePoints><availableSkillPoints>0</availableSkillPoints><availableTraitPoints>0</availableTraitPoints><isSelected>True</isSelected><isHostage>False</isHostage><perceptionOn>False</perceptionOn><crouch>False</crouch><hasCommittedPoints>False</hasCommittedPoints><isCNPC>False</isCNPC><luckyHitpoints>0</luckyHitpoints><defaultEquipment><item /><item><resourceName>Fem_Robb_Hair_B</resourceName><ammoResourceName></ammoResourceName><slot>-1</slot><ammoCount>-1</ammoCount><firingModeIndex>0</firingModeIndex><isJammed>False</isJammed><quantity>1</quantity><junk>False</junk><fav>False</fav><isOriginalProperty>False</isOriginalProperty><inventoryGridX>-1</inventoryGridX><inventoryGridY>-1</inventoryGridY></item><item><resourceName>Fem_Topekan_Head_B</resourceName><ammoResourceName></ammoResourceName><slot>-1</slot><ammoCount>-1</ammoCount><firingModeIndex>0</firingModeIndex><isJammed>False</isJammed><quantity>1</quantity><junk>False</junk><fav>False</fav><isOriginalProperty>False</isOriginalProperty><inventoryGridX>-1</inventoryGridX><inventoryGridY>-1</inventoryGridY></item><item /><item><resourceName>Fem_UndWear_Torso_C</resourceName><ammoResourceName></ammoResourceName><slot>-1</slot><ammoCount>-1</ammoCount><firingModeIndex>0</firingModeIndex><isJammed>False</isJammed><quantity>1</quantity><junk>False</junk><fav>False</fav><isOriginalProperty>False</isOriginalProperty><inventoryGridX>-1</inventoryGridX><inventoryGridY>-1</inventoryGridY></item><item /><item><resourceName>Fem_UndWear_Legs_I</resourceName><ammoResourceName></ammoResourceName><slot>-1</slot><ammoCount>-1</ammoCount><firingModeIndex>0</firingModeIndex><isJammed>False</isJammed><quantity>1</quantity><junk>False</junk><fav>False</fav><isOriginalProperty>False</isOriginalProperty><inventoryGridX>-1</inventoryGridX><inventoryGridY>-1</inventoryGridY></item><item><resourceName>Fists</resourceName><ammoResourceName></ammoResourceName><slot>-1</slot><ammoCount>-1</ammoCount><firingModeIndex>0</firingModeIndex><isJammed>False</isJammed><quantity>1</quantity><junk>False</junk><fav>False</fav><isOriginalProperty>False</isOriginalProperty><inventoryGridX>-1</inventoryGridX><inventoryGridY>-1</inventoryGridY></item><item /><item><resourceName>Fists</resourceName><ammoResourceName></ammoResourceName><slot>-1</slot><ammoCount>-1</ammoCount><firingModeIndex>0</firingModeIndex><isJammed>False</isJammed><quantity>1</quantity><junk>False</junk><fav>False</fav><isOriginalProperty>False</isOriginalProperty><inventoryGridX>-1</inventoryGridX><inventoryGridY>-1</inventoryGridY></item><item /><item /><item /><item /><item /><item /><item /><item /></defaultEquipment><equipment><item /><item /><item /><item /><item><resourceName>Wearable_Topekan_Torso_B</resourceName><ammoResourceName></ammoResourceName><slot>4</slot><ammoCount>-1</ammoCount><firingModeIndex>0</firingModeIndex><isJammed>False</isJammed><quantity>1</quantity><junk>False</junk><fav>False</fav><isOriginalProperty>False</isOriginalProperty><inventoryGridX>-1</inventoryGridX><inventoryGridY>-1</inventoryGridY></item><item /><item><resourceName>Wearable_Topekan_Legs_A</resourceName><ammoResourceName></ammoResourceName><slot>6</slot><ammoCount>-1</ammoCount><firingModeIndex>0</firingModeIndex><isJammed>False</isJammed><quantity>1</quantity><junk>False</junk><fav>False</fav><isOriginalProperty>False</isOriginalProperty><inventoryGridX>-1</inventoryGridX><inventoryGridY>-1</inventoryGridY></item><item><resourceName>Blunt_Tier_1_1</resourceName><ammoResourceName></ammoResourceName><slot>7</slot><ammoCount>-1</ammoCount><firingModeIndex>0</firingModeIndex><isJammed>False</isJammed><quantity>1</quantity><junk>False</junk><fav>False</fav><isOriginalProperty>False</isOriginalProperty><inventoryGridX>-1</inventoryGridX><inventoryGridY>-1</inventoryGridY></item><item /><item><resourceName>Energy_Tier_1_1</resourceName><ammoResourceName>Ammo_EnergyCell</ammoResourceName><slot>9</slot><ammoCount>6</ammoCount><firingModeIndex>0</firingModeIndex><isJammed>False</isJammed><quantity>1</quantity><junk>False</junk><fav>False</fav><isOriginalProperty>False</isOriginalProperty><inventoryGridX>-1</inventoryGridX><inventoryGridY>-1</inventoryGridY></item><item /><item /><item /><item /><item /><item /><item /><item /></equipment><inventory><item><resourceName>Ammo_EnergyCell</resourceName><ammoResourceName></ammoResourceName><slot>-1</slot><ammoCount>-1</ammoCount><firingModeIndex>0</firingModeIndex><isJammed>False</isJammed><quantity>18</quantity><junk>False</junk><fav>False</fav><isOriginalProperty>False</isOriginalProperty><inventoryGridX>-1</inventoryGridX><inventoryGridY>-1</inventoryGridY></item><item><resourceName>Usable_PainRelievers_1</resourceName><ammoResourceName></ammoResourceName><slot>-1</slot><ammoCount>-1</ammoCount><firingModeIndex>0</firingModeIndex><isJammed>False</isJammed><quantity>2</quantity><junk>False</junk><fav>False</fav><isOriginalProperty>False</isOriginalProperty><inventoryGridX>-1</inventoryGridX><inventoryGridY>-1</inventoryGridY></item><item><resourceName>UsableShovel</resourceName><ammoResourceName></ammoResourceName><slot>-1</slot><ammoCount>-1</ammoCount><firingModeIndex>0</firingModeIndex><isJammed>False</isJammed><quantity>1</quantity><junk>False</junk><fav>False</fav><isOriginalProperty>False</isOriginalProperty><inventoryGridX>-1</inventoryGridX><inventoryGridY>-1</inventoryGridY></item></inventory><hotkeys><hotkey><skillOrItemName>perception</skillOrItemName><isItem>False</isItem></hotkey><hotkey><skillOrItemName>outdoorsman</skillOrItemName><isItem>False</isItem></hotkey><hotkey><skillOrItemName>mechanicalRepair</skillOrItemName><isItem>False</isItem></hotkey><hotkey><skillOrItemName>toasterRepair</skillOrItemName><isItem>False</isItem></hotkey><hotkey><skillOrItemName>Usable_PainRelievers_1</skillOrItemName><isItem>True</isItem></hotkey><hotkey><skillOrItemName>UsableShovel</skillOrItemName><isItem>True</isItem></hotkey><hotkey><skillOrItemName></skillOrItemName><isItem>False</isItem></hotkey><hotkey><skillOrItemName></skillOrItemName><isItem>False</isItem></hotkey></hotkeys><statusEffects><statusEffect><name>Status_Trait_CircusFreak</name><startTime>246436</startTime><nextHitpointChange>0</nextHitpointChange><elapsedTime>89608</elapsedTime><lastUpdate>336044</lastUpdate></statusEffect></statusEffects><attributes><pair><key>coordination</key><value>3</value></pair><pair><key>luck</key><value>3</value></pair><pair><key>awareness</key><value>3</value></pair><pair><key>strength</key><value>3</value></pair><pair><key>speed</key><value>5</value></pair><pair><key>intelligence</key><value>10</value></pair><pair><key>charisma</key><value>1</value></pair></attributes><skillXps><pair><key>alarmDisarm</key><value>0</value></pair><pair><key>animalWhisperer</key><value>0</value></pair><pair><key>atWeapons</key><value>0</value></pair><pair><key>barter</key><value>0</value></pair><pair><key>bladedWeapons</key><value>0</value></pair><pair><key>bluntWeapons</key><value>2</value></pair><pair><key>brawling</key><value>0</value></pair><pair><key>bruteForce</key><value>0</value></pair><pair><key>calvinBackerSkill</key><value>0</value></pair><pair><key>combatShooting</key><value>0</value></pair><pair><key>computerTech</key><value>0</value></pair><pair><key>demolitions</key><value>0</value></pair><pair><key>doctor</key><value>0</value></pair><pair><key>energyWeapons</key><value>2</value></pair><pair><key>fieldMedic</key><value>0</value></pair><pair><key>handgun</key><value>0</value></pair><pair><key>intimidate</key><value>0</value></pair><pair><key>leadership</key><value>0</value></pair><pair><key>manipulate</key><value>0</value></pair><pair><key>mechanicalRepair</key><value>2</value></pair><pair><key>outdoorsman</key><value>2</value></pair><pair><key>perception</key><value>2</value></pair><pair><key>pickLock</key><value>0</value></pair><pair><key>rifle</key><value>0</value></pair><pair><key>safecrack</key><value>0</value></pair><pair><key>shotgun</key><value>0</value></pair><pair><key>smg</key><value>0</value></pair><pair><key>sniperRifle</key><value>0</value></pair><pair><key>spotLie</key><value>0</value></pair><pair><key>toasterRepair</key><value>2</value></pair><pair><key>weaponSmith</key><value>0</value></pair></skillXps><traits><pair><key>Trait_RaisedInTheCircus</key><value>1</value></pair></traits></pc>

                                                Wasteland 2 Director's Cut: Character Hacking and Respec

                                                Play Wasteland 2 risk-free with money-back guarantee from Good Old Games.

                                                To edit your character's Attributes and Skills you can simply open a text file and edit it.

                                                Savegames are typically stored in ...\Documents\My Games\Wasteland2DC\Save Games\

                                                This directory will have subdirectories that are named based on the name you gave your savegame.
                                                Open the directory and you will find two files, a .bin and a .xml
                                                Open the .xml in a text editor and examine it to find the skills and attributes for each character. Start by searching for your character's name.

                                                Below is an sample section of the file comprising one character's entry. In larger font are attributes and associated values. Skill entries follow after.
                                                • For attributes, valid values are 1-10. Any value above 10 is treated as 10 in-game and flagged in red (but apparently harmless).
                                                • For skills, the values represent the number of Skill Points put into the skill -- NOT the skill level.
                                                Just edit the numbers and save the file as a text file (but of course do not change the file name).
                                                You can get away with less editing and do it in-game later by tweaking the <available...> entries, giving you Attribute Points, Skill Points, and Trait Points to spend in game.

                                                BONUS TIP: The .char files for custom rangers in the ...\Documents\My Games\Wasteland2DC\Characters directory are also plain text files with a similar structure. You could assign a character 10's in every Attribute and Skill (including the two hidden skills) and start with "perfect 10" characters to rapidly explore the Wasteland or replay the game to try different things.

                                                <pc><name><@>Lady Thor{F}</name><displayName><@>Lady Thor{F}</displayName><portraitName>cosplay Thor</portraitName><position><x>121.9337</x><y>6.401434</y><z>29.14721</z></position><rotationY>348.8566</rotationY><gender>2</gender><religion>None</religion><smokes>None</smokes><ethnicity>Russian</ethnicity><biography></biography><skinColor>0</skinColor><age>20</age><level>1</level><xp>0</xp><curHp>35</curHp><size>4</size><noOfKills>0</noOfKills><damageDone>0</damageDone><availableAttributePoints>0</availableAttributePoints><availableSkillPoints>0</availableSkillPoints><availableTraitPoints>0</availableTraitPoints><isSelected>True</isSelected><isHostage>False</isHostage><perceptionOn>False</perceptionOn><crouch>False</crouch><hasCommittedPoints>False</hasCommittedPoints><isCNPC>False</isCNPC><luckyHitpoints>0</luckyHitpoints><defaultEquipment><item /><item><resourceName>Fem_Robb_Hair_B</resourceName><ammoResourceName></ammoResourceName><slot>-1</slot><ammoCount>-1</ammoCount><firingModeIndex>0</firingModeIndex><isJammed>False</isJammed><quantity>1</quantity><junk>False</junk><fav>False</fav><isOriginalProperty>False</isOriginalProperty><inventoryGridX>-1</inventoryGridX><inventoryGridY>-1</inventoryGridY></item><item><resourceName>Fem_Topekan_Head_B</resourceName><ammoResourceName></ammoResourceName><slot>-1</slot><ammoCount>-1</ammoCount><firingModeIndex>0</firingModeIndex><isJammed>False</isJammed><quantity>1</quantity><junk>False</junk><fav>False</fav><isOriginalProperty>False</isOriginalProperty><inventoryGridX>-1</inventoryGridX><inventoryGridY>-1</inventoryGridY></item><item /><item><resourceName>Fem_UndWear_Torso_C</resourceName><ammoResourceName></ammoResourceName><slot>-1</slot><ammoCount>-1</ammoCount><firingModeIndex>0</firingModeIndex><isJammed>False</isJammed><quantity>1</quantity><junk>False</junk><fav>False</fav><isOriginalProperty>False</isOriginalProperty><inventoryGridX>-1</inventoryGridX><inventoryGridY>-1</inventoryGridY></item><item /><item><resourceName>Fem_UndWear_Legs_I</resourceName><ammoResourceName></ammoResourceName><slot>-1</slot><ammoCount>-1</ammoCount><firingModeIndex>0</firingModeIndex><isJammed>False</isJammed><quantity>1</quantity><junk>False</junk><fav>False</fav><isOriginalProperty>False</isOriginalProperty><inventoryGridX>-1</inventoryGridX><inventoryGridY>-1</inventoryGridY></item><item><resourceName>Fists</resourceName><ammoResourceName></ammoResourceName><slot>-1</slot><ammoCount>-1</ammoCount><firingModeIndex>0</firingModeIndex><isJammed>False</isJammed><quantity>1</quantity><junk>False</junk><fav>False</fav><isOriginalProperty>False</isOriginalProperty><inventoryGridX>-1</inventoryGridX><inventoryGridY>-1</inventoryGridY></item><item /><item><resourceName>Fists</resourceName><ammoResourceName></ammoResourceName><slot>-1</slot><ammoCount>-1</ammoCount><firingModeIndex>0</firingModeIndex><isJammed>False</isJammed><quantity>1</quantity><junk>False</junk><fav>False</fav><isOriginalProperty>False</isOriginalProperty><inventoryGridX>-1</inventoryGridX><inventoryGridY>-1</inventoryGridY></item><item /><item /><item /><item /><item /><item /><item /><item /></defaultEquipment><equipment><item /><item /><item /><item /><item><resourceName>Wearable_Topekan_Torso_B</resourceName><ammoResourceName></ammoResourceName><slot>4</slot><ammoCount>-1</ammoCount><firingModeIndex>0</firingModeIndex><isJammed>False</isJammed><quantity>1</quantity><junk>False</junk><fav>False</fav><isOriginalProperty>False</isOriginalProperty><inventoryGridX>-1</inventoryGridX><inventoryGridY>-1</inventoryGridY></item><item /><item><resourceName>Wearable_Topekan_Legs_A</resourceName><ammoResourceName></ammoResourceName><slot>6</slot><ammoCount>-1</ammoCount><firingModeIndex>0</firingModeIndex><isJammed>False</isJammed><quantity>1</quantity><junk>False</junk><fav>False</fav><isOriginalProperty>False</isOriginalProperty><inventoryGridX>-1</inventoryGridX><inventoryGridY>-1</inventoryGridY></item><item><resourceName>Blunt_Tier_1_1</resourceName><ammoResourceName></ammoResourceName><slot>7</slot><ammoCount>-1</ammoCount><firingModeIndex>0</firingModeIndex><isJammed>False</isJammed><quantity>1</quantity><junk>False</junk><fav>False</fav><isOriginalProperty>False</isOriginalProperty><inventoryGridX>-1</inventoryGridX><inventoryGridY>-1</inventoryGridY></item><item /><item><resourceName>Energy_Tier_1_1</resourceName><ammoResourceName>Ammo_EnergyCell</ammoResourceName><slot>9</slot><ammoCount>6</ammoCount><firingModeIndex>0</firingModeIndex><isJammed>False</isJammed><quantity>1</quantity><junk>False</junk><fav>False</fav><isOriginalProperty>False</isOriginalProperty><inventoryGridX>-1</inventoryGridX><inventoryGridY>-1</inventoryGridY></item><item /><item /><item /><item /><item /><item /><item /><item /></equipment><inventory><item><resourceName>Ammo_EnergyCell</resourceName><ammoResourceName></ammoResourceName><slot>-1</slot><ammoCount>-1</ammoCount><firingModeIndex>0</firingModeIndex><isJammed>False</isJammed><quantity>18</quantity><junk>False</junk><fav>False</fav><isOriginalProperty>False</isOriginalProperty><inventoryGridX>-1</inventoryGridX><inventoryGridY>-1</inventoryGridY></item><item><resourceName>Usable_PainRelievers_1</resourceName><ammoResourceName></ammoResourceName><slot>-1</slot><ammoCount>-1</ammoCount><firingModeIndex>0</firingModeIndex><isJammed>False</isJammed><quantity>2</quantity><junk>False</junk><fav>False</fav><isOriginalProperty>False</isOriginalProperty><inventoryGridX>-1</inventoryGridX><inventoryGridY>-1</inventoryGridY></item><item><resourceName>UsableShovel</resourceName><ammoResourceName></ammoResourceName><slot>-1</slot><ammoCount>-1</ammoCount><firingModeIndex>0</firingModeIndex><isJammed>False</isJammed><quantity>1</quantity><junk>False</junk><fav>False</fav><isOriginalProperty>False</isOriginalProperty><inventoryGridX>-1</inventoryGridX><inventoryGridY>-1</inventoryGridY></item></inventory><hotkeys><hotkey><skillOrItemName>perception</skillOrItemName><isItem>False</isItem></hotkey><hotkey><skillOrItemName>outdoorsman</skillOrItemName><isItem>False</isItem></hotkey><hotkey><skillOrItemName>mechanicalRepair</skillOrItemName><isItem>False</isItem></hotkey><hotkey><skillOrItemName>toasterRepair</skillOrItemName><isItem>False</isItem></hotkey><hotkey><skillOrItemName>Usable_PainRelievers_1</skillOrItemName><isItem>True</isItem></hotkey><hotkey><skillOrItemName>UsableShovel</skillOrItemName><isItem>True</isItem></hotkey><hotkey><skillOrItemName></skillOrItemName><isItem>False</isItem></hotkey><hotkey><skillOrItemName></skillOrItemName><isItem>False</isItem></hotkey></hotkeys><statusEffects><statusEffect><name>Status_Trait_CircusFreak</name><startTime>246436</startTime><nextHitpointChange>0</nextHitpointChange><elapsedTime>89608</elapsedTime><lastUpdate>336044</lastUpdate></statusEffect></statusEffects><attributes><pair><key>coordination</key><value>3</value></pair><pair><key>luck</key><value>3</value></pair><pair><key>awareness</key><value>3</value></pair><pair><key>strength</key><value>3</value></pair><pair><key>speed</key><value>5</value></pair><pair><key>intelligence</key><value>10</value></pair><pair><key>charisma</key><value>1</value></pair></attributes><skillXps><pair><key>alarmDisarm</key><value>0</value></pair><pair><key>animalWhisperer</key><value>0</value></pair><pair><key>atWeapons</key><value>0</value></pair><pair><key>barter</key><value>0</value></pair><pair><key>bladedWeapons</key><value>0</value></pair><pair><key>bluntWeapons</key><value>2</value></pair><pair><key>brawling</key><value>0</value></pair><pair><key>bruteForce</key><value>0</value></pair><pair><key>calvinBackerSkill</key><value>0</value></pair><pair><key>combatShooting</key><value>0</value></pair><pair><key>computerTech</key><value>0</value></pair><pair><key>demolitions</key><value>0</value></pair><pair><key>doctor</key><value>0</value></pair><pair><key>energyWeapons</key><value>2</value></pair><pair><key>fieldMedic</key><value>0</value></pair><pair><key>handgun</key><value>0</value></pair><pair><key>intimidate</key><value>0</value></pair><pair><key>leadership</key><value>0</value></pair><pair><key>manipulate</key><value>0</value></pair><pair><key>mechanicalRepair</key><value>2</value></pair><pair><key>outdoorsman</key><value>2</value></pair><pair><key>perception</key><value>2</value></pair><pair><key>pickLock</key><value>0</value></pair><pair><key>rifle</key><value>0</value></pair><pair><key>safecrack</key><value>0</value></pair><pair><key>shotgun</key><value>0</value></pair><pair><key>smg</key><value>0</value></pair><pair><key>sniperRifle</key><value>0</value></pair><pair><key>spotLie</key><value>0</value></pair><pair><key>toasterRepair</key><value>2</value></pair><pair><key>weaponSmith</key><value>0</value></pair></skillXps><traits><pair><key>Trait_RaisedInTheCircus</key><value>1</value></pair></traits></pc>

                                                  reade more... Résuméabuiyad

                                                  Wasteland 2 Director's Cut - Perk Trees (sorted by Skill and Prerequisites)

                                                   
                                                  Wasteland 2 Director's Cut Perk Trees (sorted by Skill and Prerequisites)

                                                  Play Wasteland 2 risk-free with money-back guarantee from Good Old Games.


                                                  This page sorts the Perks into categories by Skill to help you plan how deeply you want to specialize in a Skill. Requirements are in square brackets.

                                                  NO SKILL
                                                  • Hardened - +1 base Armor
                                                  • Healthy - +1 CON per character level (retroactive)
                                                  • Hit the Deck! - -25% damage from Explosives
                                                  • Hoarder - +20% Max Carry Weight
                                                  • Limber - Crouching and Standing Up costs -1 AP
                                                  • Powder Packer - +10% Chance of finding bonus Ammo when looting (party-wide)
                                                  • Tormentor - +10% damage to enemies in cover
                                                  • Turtle - +10% Evasion bonus from cover
                                                  • Weathered - -15% damage taken from Critical Hits
                                                  ALARM DISARMING
                                                  • [Alarm Disarming 2, Computer Science 2] Cyber Scrounger - Gain Energy Cells when using Computer Science and Alarm Disarming
                                                  • [3] Ghost - No longer trigger Ambushes
                                                  • [6, Ghost] Quick Reflexes - +3% Evasion
                                                  ANIMAL WHISPERER
                                                  • [3] Camel - -10% Water Consumption on World Map, stacks with multiple squad members
                                                  • [6] Big Game Hunter - +20% damage vs. Animals
                                                  ASSAULT RIFLES
                                                  • [4] Full Metal Jacket - +1 Armor Penetration when using Assault Rifles
                                                  • [6] Melee Shooting - -35% close range penalty when using Assault Rifles
                                                  • [8] Gunner - -5% Chance to Hit penalty on Burst Fire attacks
                                                  BARTER
                                                  • [3] Pawner - +20% more Scrap from selling junk items
                                                  • [7] Loose Change - +15% chance of finding bonus Scrap when looting containers (party-wide)
                                                  BLADED WEAPONS
                                                  • [5] Glancing Strike (Bladed) - Gain Bladed Attacks of Opportunity against enemies when they move past you in combat, dealing 50% normal damage
                                                  • [7, Glancing Strike (Bladed)] Opportune Strike (Bladed) - Bladed Attacks of Opportunity deal 75% normal damage
                                                  • [9, Opportune Strike (Bladed)] Strategic Strike (Bladed) - Bladed Attacks of Opportunity deal full damage
                                                  • [3] Self Defense - +1 Armor at close range with Bladed Weapons
                                                  • [6] Samurai - +1 Armor Penetration when using Bladed Weapons
                                                  • [8] Adrenaline Rush - +2 AP when below 25% MAXCON
                                                  BLUNT WEAPONS
                                                  • [5] Glancing Strike (Blunt) - Gain Blunt Attacks of Opportunity against enemies when they move past you in combat, dealing 50% normal damage
                                                  • [7, Glancing Strike (Blunt)] Opportune Strike - Blunt Attacks of Opportunity deal 75% normal damage
                                                  • [9, Opportune Strike (Blunt)] Strategic Strike (Blunt) - Blunt Attacks of Opportunity deal full damage
                                                  • [4] Charge! - +0.5 Combat Speed bonus on first turn of combat
                                                  • [6] Shoulder the Load - -25% Combat Speed penalty when wearing Heavy Armor
                                                  • [8] Slayer - +10% chance your Blunt attacks use no Action Points
                                                  BRAWLING
                                                  • [4] Free-For-All - +10% chance to inflict random Precision Strike status effects on enemies when attacking with Brawling
                                                  • [5] Glancing Strike (Brawling) - Gain Brawling Attacks of Opportunity against enemies when they move past you in combat, dealing 50% normal damage
                                                  • [7, Glancing Strike (Brawling)] Opportune Strike (Brawling) - Brawling Attacks of Opportunity deal 75% normal damage
                                                  • [9, Opportune Strike (Brawling)] Strategic Strike (Brawling) - Brawling Attacks of Opportunity deal full damage
                                                  • [8] Rush 'N Attack - On first turn of combat, your first Brawling attack costs no Action Points
                                                  BRUTE FORCE
                                                  • [5] Applied Force - +5% chance to Stun enemies when using melee weapons
                                                  • [7, Applied Force] Stunning Force - +10% chance to Stun enemies when using melee weapons
                                                  • [9, Stunning Force] Staggering Force - +15% chance to Stun enemies when using melee weapons
                                                  COMPUTER SCIENCE
                                                  • [Alarm Disarming 2, Computer Science 2] Cyber Scrounger - Gain Energy Cells when using Computer Science and Alarm Disarming
                                                  • [5] Roboticist - +20% damage vs. robots and synths
                                                  • [8] Overclocker - Hacked enemy robots automatically gain Overclocked buff
                                                  DEMOLITIONS
                                                  • [2] Long Arm - +15% maximum range when throwing Grenade type weapons
                                                  • [4] Improvised Explosives - +15% chance to recover a Grenade type weapon when disarming booby traps and mines
                                                  • [6] Bomberman - +20% larger Area of Effect when using Explosives
                                                  ENERGY WEAPONS
                                                  • [3] Overcharge - +10% damage using Energy Weapons against non-Conductive Armor
                                                  • [5, Overcharge] Overload - +20% damage using Energy Weapons against non-Conductive Armor
                                                  • [7, Overload] Atomize - +30% damage using Energy Weapons against non-Conductive Armor
                                                  • [3] Solar Powered - +15% chance your Energy Weapon attacks use no ammo
                                                  FIELD MEDIC
                                                  • [3] On the Mend - +10% effectiveness from healing items
                                                  • [7] Stimpacks - +2% CON automatically healed per turn when in combat
                                                  HANDGUNS
                                                  • [4] Zeroed - +2% stacking Critical Chance bonus when repeatedly attacking a target with Handguns. Bonus lost when switching to another target
                                                  • [5] Bandit - 4% free attack chance with Handguns
                                                  • [7, Bandit] Gunslinger - +4% free attack chance with Handguns
                                                  • [9, Gunslinger] Desperado - +4% free attack chance with Handguns
                                                  HARD ASS
                                                  • [1] Intimidating - +2 Hard Ass
                                                  • [7] Bloodthirsty - +1 Action Point when killing an enemy
                                                  HEAVY WEAPONS
                                                  • [5] Battering Fire - +1% chance of inflicting Precision Strike effects per bullet when using normal Heavy Weapon attacks
                                                  • [7, Battering Fire] Overwhelming Fire - +3% chance of inflicting Precision Strike effects per bullet when using normal Heavy Weapon attacks
                                                  • [9, Overwhelming Fire] Devastating - +5% chance of inflicting Precision Strike effects per bullet when using normal Heavy Weapon attacks
                                                  • [10] Bullet-Ridden - -1 Armor inflicted on enemies when attacking them with Heavy Weapons
                                                  KISS ASS
                                                  • [1] Affable - +2 Kiss Ass
                                                  • [7] Silver-Tongued - +5% discount on all purchases
                                                  LEADERSHIP
                                                  • [3] Taunt - -3% Chance to Hit for enemies within Leadership range
                                                  • [5, Taunt] Enrage - -5% Chance to Hit for enemies within Leadership range
                                                  • [8, Enrage] Infuriate - -7% Chanceto Hit for enemies within Leadership range
                                                  LOCKPICKING
                                                  • [10 Lockpicking, 10 Safecracking] Master Thief - No Critical Failures when using Lockpicking or Safecracking
                                                  MECHANICAL REPAIR
                                                  • [3] Handyman - No Critical Failures when using Mechanical Repair
                                                  • [6] Armor Maintenance - -20% damage suffered from Energy Weapons
                                                  OUTDOORSMAN
                                                  • [3] Scout - +25% Vision Range on World Map, applies to Hidden Caches
                                                  • [5, Scout] Explorer - +50% Vision Range on World Map, applies to Hidden Caches and Mysterious Shrines
                                                  • [7, Explorer] World Traveler - All hidden caches and shrines revealed.
                                                  PERCEPTION
                                                  • [3] Tactical Positioning - +25% damage dealt to enemies from behind when using melee or ranged weapons
                                                  • [6] Dowsing - +25% chance of finding bonus Scrap when digging up holes (party-wide)
                                                  SAFECRACKING
                                                  • [10 Lockpicking, 10 Safecracking] Master Thief - No Critical Failures when using Lockpicking or Safecracking
                                                  SHOTGUNS
                                                  • [2] Careful Hunter - -25% chance of Friendly Fire when using Shotguns
                                                  • [5, Careful Hunter] Precise Hunter - -50% chance of Friendly Fire when using Shotguns
                                                  • [8, Precise Hunter] Master Hunter - No Friendly Fire when using Shotguns
                                                  • [6] Obliterator - Attacking cover with Shotguns always completely destroys it
                                                  SMART ASS
                                                  • [1] Know-it-All - +2 Smart Ass
                                                  • [5] Radiant Personality - 2x Charisma effectiveness when recruiting followers
                                                  SNIPER RIFLES
                                                  • [5] Focused Shooter - -15% Under Pressure penalty
                                                  • [7, Focused Shooter] Confident Shooter - -30% Under Pressure penalty
                                                  • [9, Confident Shooter] Zen Shooter - -45% Under Pressure penalty
                                                  • [10] Deadeye - -1 Action Point cost when firing Sniper Rifles if you haven't moved during your combat turn
                                                  • [3] Watchman - No Chance to Hit penalty when using Ambush
                                                  SUBMACHINE GUNS
                                                  • [4] Fast Reload - -1 Action Point cost to reload with Submachine Guns
                                                  • [6] Whack-a-Mole - +15% Chance to Hit against enemies who are in cover
                                                  SURGEON
                                                  • [3] Trained Physician - -25% post-revival status effect duration
                                                  • [9, Trained Physician] Expert Physician - -50% post-revival status effect duration
                                                  • [6] Smooth Operator - +20 CON healed when reviving downed squad members
                                                  TOASTER REPAIR
                                                  • [2] Junk Diver - Upon finding a junk item, 50% chance of finding another junk item
                                                  • [6] Toaster Expert - 50% chance to find bonus loot when using Toaster Repair (party-wide)
                                                  WEAPONSMITHING
                                                  • [2] Tinkerer - +1 Action Point when wearing Light Armor
                                                  • [5] Deconstructor - +25% more Weapon Parts gained when breaking down weapons with Weaponsmithing
                                                  • [8] Reinforced Plating - +1 Armor when wearing Heavy Armor
                                                   
                                                  Wasteland 2 Director's Cut Perk Trees (sorted by Skill and Prerequisites)

                                                  Play Wasteland 2 risk-free with money-back guarantee from Good Old Games.


                                                  This page sorts the Perks into categories by Skill to help you plan how deeply you want to specialize in a Skill. Requirements are in square brackets.

                                                  NO SKILL
                                                  • Hardened - +1 base Armor
                                                  • Healthy - +1 CON per character level (retroactive)
                                                  • Hit the Deck! - -25% damage from Explosives
                                                  • Hoarder - +20% Max Carry Weight
                                                  • Limber - Crouching and Standing Up costs -1 AP
                                                  • Powder Packer - +10% Chance of finding bonus Ammo when looting (party-wide)
                                                  • Tormentor - +10% damage to enemies in cover
                                                  • Turtle - +10% Evasion bonus from cover
                                                  • Weathered - -15% damage taken from Critical Hits
                                                  ALARM DISARMING
                                                  • [Alarm Disarming 2, Computer Science 2] Cyber Scrounger - Gain Energy Cells when using Computer Science and Alarm Disarming
                                                  • [3] Ghost - No longer trigger Ambushes
                                                  • [6, Ghost] Quick Reflexes - +3% Evasion
                                                  ANIMAL WHISPERER
                                                  • [3] Camel - -10% Water Consumption on World Map, stacks with multiple squad members
                                                  • [6] Big Game Hunter - +20% damage vs. Animals
                                                  ASSAULT RIFLES
                                                  • [4] Full Metal Jacket - +1 Armor Penetration when using Assault Rifles
                                                  • [6] Melee Shooting - -35% close range penalty when using Assault Rifles
                                                  • [8] Gunner - -5% Chance to Hit penalty on Burst Fire attacks
                                                  BARTER
                                                  • [3] Pawner - +20% more Scrap from selling junk items
                                                  • [7] Loose Change - +15% chance of finding bonus Scrap when looting containers (party-wide)
                                                  BLADED WEAPONS
                                                  • [5] Glancing Strike (Bladed) - Gain Bladed Attacks of Opportunity against enemies when they move past you in combat, dealing 50% normal damage
                                                  • [7, Glancing Strike (Bladed)] Opportune Strike (Bladed) - Bladed Attacks of Opportunity deal 75% normal damage
                                                  • [9, Opportune Strike (Bladed)] Strategic Strike (Bladed) - Bladed Attacks of Opportunity deal full damage
                                                  • [3] Self Defense - +1 Armor at close range with Bladed Weapons
                                                  • [6] Samurai - +1 Armor Penetration when using Bladed Weapons
                                                  • [8] Adrenaline Rush - +2 AP when below 25% MAXCON
                                                  BLUNT WEAPONS
                                                  • [5] Glancing Strike (Blunt) - Gain Blunt Attacks of Opportunity against enemies when they move past you in combat, dealing 50% normal damage
                                                  • [7, Glancing Strike (Blunt)] Opportune Strike - Blunt Attacks of Opportunity deal 75% normal damage
                                                  • [9, Opportune Strike (Blunt)] Strategic Strike (Blunt) - Blunt Attacks of Opportunity deal full damage
                                                  • [4] Charge! - +0.5 Combat Speed bonus on first turn of combat
                                                  • [6] Shoulder the Load - -25% Combat Speed penalty when wearing Heavy Armor
                                                  • [8] Slayer - +10% chance your Blunt attacks use no Action Points
                                                  BRAWLING
                                                  • [4] Free-For-All - +10% chance to inflict random Precision Strike status effects on enemies when attacking with Brawling
                                                  • [5] Glancing Strike (Brawling) - Gain Brawling Attacks of Opportunity against enemies when they move past you in combat, dealing 50% normal damage
                                                  • [7, Glancing Strike (Brawling)] Opportune Strike (Brawling) - Brawling Attacks of Opportunity deal 75% normal damage
                                                  • [9, Opportune Strike (Brawling)] Strategic Strike (Brawling) - Brawling Attacks of Opportunity deal full damage
                                                  • [8] Rush 'N Attack - On first turn of combat, your first Brawling attack costs no Action Points
                                                  BRUTE FORCE
                                                  • [5] Applied Force - +5% chance to Stun enemies when using melee weapons
                                                  • [7, Applied Force] Stunning Force - +10% chance to Stun enemies when using melee weapons
                                                  • [9, Stunning Force] Staggering Force - +15% chance to Stun enemies when using melee weapons
                                                  COMPUTER SCIENCE
                                                  • [Alarm Disarming 2, Computer Science 2] Cyber Scrounger - Gain Energy Cells when using Computer Science and Alarm Disarming
                                                  • [5] Roboticist - +20% damage vs. robots and synths
                                                  • [8] Overclocker - Hacked enemy robots automatically gain Overclocked buff
                                                  DEMOLITIONS
                                                  • [2] Long Arm - +15% maximum range when throwing Grenade type weapons
                                                  • [4] Improvised Explosives - +15% chance to recover a Grenade type weapon when disarming booby traps and mines
                                                  • [6] Bomberman - +20% larger Area of Effect when using Explosives
                                                  ENERGY WEAPONS
                                                  • [3] Overcharge - +10% damage using Energy Weapons against non-Conductive Armor
                                                  • [5, Overcharge] Overload - +20% damage using Energy Weapons against non-Conductive Armor
                                                  • [7, Overload] Atomize - +30% damage using Energy Weapons against non-Conductive Armor
                                                  • [3] Solar Powered - +15% chance your Energy Weapon attacks use no ammo
                                                  FIELD MEDIC
                                                  • [3] On the Mend - +10% effectiveness from healing items
                                                  • [7] Stimpacks - +2% CON automatically healed per turn when in combat
                                                  HANDGUNS
                                                  • [4] Zeroed - +2% stacking Critical Chance bonus when repeatedly attacking a target with Handguns. Bonus lost when switching to another target
                                                  • [5] Bandit - 4% free attack chance with Handguns
                                                  • [7, Bandit] Gunslinger - +4% free attack chance with Handguns
                                                  • [9, Gunslinger] Desperado - +4% free attack chance with Handguns
                                                  HARD ASS
                                                  • [1] Intimidating - +2 Hard Ass
                                                  • [7] Bloodthirsty - +1 Action Point when killing an enemy
                                                  HEAVY WEAPONS
                                                  • [5] Battering Fire - +1% chance of inflicting Precision Strike effects per bullet when using normal Heavy Weapon attacks
                                                  • [7, Battering Fire] Overwhelming Fire - +3% chance of inflicting Precision Strike effects per bullet when using normal Heavy Weapon attacks
                                                  • [9, Overwhelming Fire] Devastating - +5% chance of inflicting Precision Strike effects per bullet when using normal Heavy Weapon attacks
                                                  • [10] Bullet-Ridden - -1 Armor inflicted on enemies when attacking them with Heavy Weapons
                                                  KISS ASS
                                                  • [1] Affable - +2 Kiss Ass
                                                  • [7] Silver-Tongued - +5% discount on all purchases
                                                  LEADERSHIP
                                                  • [3] Taunt - -3% Chance to Hit for enemies within Leadership range
                                                  • [5, Taunt] Enrage - -5% Chance to Hit for enemies within Leadership range
                                                  • [8, Enrage] Infuriate - -7% Chanceto Hit for enemies within Leadership range
                                                  LOCKPICKING
                                                  • [10 Lockpicking, 10 Safecracking] Master Thief - No Critical Failures when using Lockpicking or Safecracking
                                                  MECHANICAL REPAIR
                                                  • [3] Handyman - No Critical Failures when using Mechanical Repair
                                                  • [6] Armor Maintenance - -20% damage suffered from Energy Weapons
                                                  OUTDOORSMAN
                                                  • [3] Scout - +25% Vision Range on World Map, applies to Hidden Caches
                                                  • [5, Scout] Explorer - +50% Vision Range on World Map, applies to Hidden Caches and Mysterious Shrines
                                                  • [7, Explorer] World Traveler - All hidden caches and shrines revealed.
                                                  PERCEPTION
                                                  • [3] Tactical Positioning - +25% damage dealt to enemies from behind when using melee or ranged weapons
                                                  • [6] Dowsing - +25% chance of finding bonus Scrap when digging up holes (party-wide)
                                                  SAFECRACKING
                                                  • [10 Lockpicking, 10 Safecracking] Master Thief - No Critical Failures when using Lockpicking or Safecracking
                                                  SHOTGUNS
                                                  • [2] Careful Hunter - -25% chance of Friendly Fire when using Shotguns
                                                  • [5, Careful Hunter] Precise Hunter - -50% chance of Friendly Fire when using Shotguns
                                                  • [8, Precise Hunter] Master Hunter - No Friendly Fire when using Shotguns
                                                  • [6] Obliterator - Attacking cover with Shotguns always completely destroys it
                                                  SMART ASS
                                                  • [1] Know-it-All - +2 Smart Ass
                                                  • [5] Radiant Personality - 2x Charisma effectiveness when recruiting followers
                                                  SNIPER RIFLES
                                                  • [5] Focused Shooter - -15% Under Pressure penalty
                                                  • [7, Focused Shooter] Confident Shooter - -30% Under Pressure penalty
                                                  • [9, Confident Shooter] Zen Shooter - -45% Under Pressure penalty
                                                  • [10] Deadeye - -1 Action Point cost when firing Sniper Rifles if you haven't moved during your combat turn
                                                  • [3] Watchman - No Chance to Hit penalty when using Ambush
                                                  SUBMACHINE GUNS
                                                  • [4] Fast Reload - -1 Action Point cost to reload with Submachine Guns
                                                  • [6] Whack-a-Mole - +15% Chance to Hit against enemies who are in cover
                                                  SURGEON
                                                  • [3] Trained Physician - -25% post-revival status effect duration
                                                  • [9, Trained Physician] Expert Physician - -50% post-revival status effect duration
                                                  • [6] Smooth Operator - +20 CON healed when reviving downed squad members
                                                  TOASTER REPAIR
                                                  • [2] Junk Diver - Upon finding a junk item, 50% chance of finding another junk item
                                                  • [6] Toaster Expert - 50% chance to find bonus loot when using Toaster Repair (party-wide)
                                                  WEAPONSMITHING
                                                  • [2] Tinkerer - +1 Action Point when wearing Light Armor
                                                  • [5] Deconstructor - +25% more Weapon Parts gained when breaking down weapons with Weaponsmithing
                                                  • [8] Reinforced Plating - +1 Armor when wearing Heavy Armor
                                                  reade more... Résuméabuiyad