Pages

Wasteland 2 Director's Cut - Ranger Citadel (exterior)

Wasteland 2 Director's Cut - Ranger Citadel (exterior)

Play Wasteland 2 risk-free with money-back guarantee from Good Old Games.

A great place for maps and general information for Arizona is game-maps.com. Here, we provide additional information about the various locations, and/or specific to the Director's Cut.

Opening Cutscene
  • You do not need any dialogue skills here although you are given the options. The skill requirement is set to 0, so even if you have no dialogue skills you can get XP from speaking with Vargas.
Aberforth
  • Use Animal Whisperer 1 to tame Aberforth and not be attacked when you pick up the can. Dialogue will not reflect this, however.
  • Aberforth gives DEVIL EYES for +1 Awareness.
  • Aberforth is passive in combat and typically dies only if hit by stray fire or if it is caught in a blast. And like other animal followers, it is immune to most environmental effects.
Angela Deth
  • If you speak with Vargas while she is in your party and prior to bringing back evidence from investigating Ace's death, you can betray her intention to Vargas, causing her to leave your party and leave the map. The topic "Snake" comes up but you have to manually type it into the dialogue box to pursue the topic.
Ranger Brass Knucks
  • The fenced area near him is accessible.
Spkye Alpha, Slick, and Mumbles
    • When you return to the Ranger Citadel after recruiting them, if Vargas is addressing the new recruits they will be with them. You cannot really interact with any of the recruits and after Vargas dismisses them they leave the map.
    • Spyke's two dogs will also be there, and will stay there once the recruits disperse.
      • You can therefore Animal Whisper one or both for the PUPPIES (+1 Charisma) perk. Two dogs will not give you the perk twice.
      • They do run into melee combat and can die easily or be a drain on Field Medic kits trying to keep them alive. Therefore it is probably better to leave them be, and use Animal Whisperer only if you need the Charisma boost.

    Wasteland 2 Director's Cut - Ranger Citadel (exterior)

    Play Wasteland 2 risk-free with money-back guarantee from Good Old Games.

    A great place for maps and general information for Arizona is game-maps.com. Here, we provide additional information about the various locations, and/or specific to the Director's Cut.

    Opening Cutscene
    • You do not need any dialogue skills here although you are given the options. The skill requirement is set to 0, so even if you have no dialogue skills you can get XP from speaking with Vargas.
    Aberforth
    • Use Animal Whisperer 1 to tame Aberforth and not be attacked when you pick up the can. Dialogue will not reflect this, however.
    • Aberforth gives DEVIL EYES for +1 Awareness.
    • Aberforth is passive in combat and typically dies only if hit by stray fire or if it is caught in a blast. And like other animal followers, it is immune to most environmental effects.
    Angela Deth
    • If you speak with Vargas while she is in your party and prior to bringing back evidence from investigating Ace's death, you can betray her intention to Vargas, causing her to leave your party and leave the map. The topic "Snake" comes up but you have to manually type it into the dialogue box to pursue the topic.
    Ranger Brass Knucks
    • The fenced area near him is accessible.
    Spkye Alpha, Slick, and Mumbles
      • When you return to the Ranger Citadel after recruiting them, if Vargas is addressing the new recruits they will be with them. You cannot really interact with any of the recruits and after Vargas dismisses them they leave the map.
      • Spyke's two dogs will also be there, and will stay there once the recruits disperse.
        • You can therefore Animal Whisper one or both for the PUPPIES (+1 Charisma) perk. Two dogs will not give you the perk twice.
        • They do run into melee combat and can die easily or be a drain on Field Medic kits trying to keep them alive. Therefore it is probably better to leave them be, and use Animal Whisperer only if you need the Charisma boost.
      reade more... Résuméabuiyad

      Wasteland 2 Director's Cut - Radio Tower

      Wasteland 2 Director's Cut - Radio Tower

      Play Wasteland 2 risk-free with money-back guarantee from Good Old Games.

      A great place for maps and general information for Arizona is guides.gamepressure.com. Here, we provide additional information about the various locations, and/or specific to the Director's Cut.

      Spyke Alpha, Slick, and Mumbles
      • Best solution is to recruit them using Kiss Ass 1: You will receive the most dialogue XP plus more later on in the Ranger Citadel for having recruited them.
      • Killing the raiders south-east of their compound does not make them hostile. It also lets you circle around Spyke to talk to Mumbles or Slick.
        • Whoever you  talk to determines the outcome for the gang and the dialogue of the other two members is locked out.
        • You get different dialogue with all three gang members. Mumbles and Slick also gives you fewer dialogue alternatives.
      • If you speak with Slick or Mumbles and the gang remains in place, you can Animal Whisper the dogs but they will not follow the party nor leave. To get them to follow you must recruit the gang and then find them with their dogs later at the Ranger Citadel courtyard.
      Raiders south-east of Spyke Alpha
      • If for whatever reason you are having trouble with them, there are two things you can do:
        • Make peace with Spyke and they will be neutral. That lets you attack first.
        • Go further south-east where there is a narrow passage (barred with a gate) leading up to an overlook. From that height advantage you get a bonus to hit and they get a penalty to hit.
      Mutant Frog in Cave
      • The Mutant Frog here hits hard and is pretty much guaranteed to incapacitate a character on higher difficulties with a single attack. To give yourself the best chance, spread out first (its sight range is apparently pretty low) and have everyone use a gun and shoot it. Retreat from it to shoot some more -- the further it is forced to move, the fewer attacks it will have per turn.
      • If you are still having trouble, to the northeast there is a cave with a shrine. Before entering the cave, there is a hidden cache revealed by Perception 1 at the dead end, near the cactus. That cache always contains a pipe bomb.


        Wasteland 2 Director's Cut - Radio Tower

        Play Wasteland 2 risk-free with money-back guarantee from Good Old Games.

        A great place for maps and general information for Arizona is guides.gamepressure.com. Here, we provide additional information about the various locations, and/or specific to the Director's Cut.

        Spyke Alpha, Slick, and Mumbles
        • Best solution is to recruit them using Kiss Ass 1: You will receive the most dialogue XP plus more later on in the Ranger Citadel for having recruited them.
        • Killing the raiders south-east of their compound does not make them hostile. It also lets you circle around Spyke to talk to Mumbles or Slick.
          • Whoever you  talk to determines the outcome for the gang and the dialogue of the other two members is locked out.
          • You get different dialogue with all three gang members. Mumbles and Slick also gives you fewer dialogue alternatives.
        • If you speak with Slick or Mumbles and the gang remains in place, you can Animal Whisper the dogs but they will not follow the party nor leave. To get them to follow you must recruit the gang and then find them with their dogs later at the Ranger Citadel courtyard.
        Raiders south-east of Spyke Alpha
        • If for whatever reason you are having trouble with them, there are two things you can do:
          • Make peace with Spyke and they will be neutral. That lets you attack first.
          • Go further south-east where there is a narrow passage (barred with a gate) leading up to an overlook. From that height advantage you get a bonus to hit and they get a penalty to hit.
        Mutant Frog in Cave
        • The Mutant Frog here hits hard and is pretty much guaranteed to incapacitate a character on higher difficulties with a single attack. To give yourself the best chance, spread out first (its sight range is apparently pretty low) and have everyone use a gun and shoot it. Retreat from it to shoot some more -- the further it is forced to move, the fewer attacks it will have per turn.
        • If you are still having trouble, to the northeast there is a cave with a shrine. Before entering the cave, there is a hidden cache revealed by Perception 1 at the dead end, near the cactus. That cache always contains a pipe bomb.


          reade more... Résuméabuiyad

          The Best MARVEL and Superhero Games

          As you may know, I have been playing MARVEL Avengers Academy, and although I was initially greatly in favour of the game, their recent events -- or more to the point, how they structured their events -- has been so bad that I've been forced to re-evaluate TinyCo's Avengers Academy.

          Marvel Ultimate Alliance
          On the Avengers Academy Facebook page, the topic naturally came up about where else someone could get a Marvel superheroes experience, and one I highly recommend is Marvel Ultimate Alliance.

          The main reason is the sheer number of playable MARVEL characters in that game. Also, you get to fight a number of villains in a variety of story locations and mini-missions for various heroes. On top of that, you can earn different costumes for different heroes.

          We had a series of posts about Marvel Ultimate Alliance, and you can see a number of posts detailing the cutscenes, artwork, and character costumes in Marvel Ultimate Alliance.

          And one of the reasons it's called "Ultimate Alliance" is because from the list of heroes, you can mix and match into your own strike teams, some of which have special bonuses. And those teams can earn bonuses by staying together -- sort of like putting together your own Avengers portfolio of heroes and sending them out on missions regularly.

          Needless to say the powers of the heroes (and villains) are faithful to the Marvel comic universe, and so you really have an iconic experience of the Marvel universe.

          It's obviously an older game, but nevertheless highly recommended for the content and replayability (by trying different teams), all for a single low price.

          X-Men Legends II: Rise of Apocalypse
          X-Men Legends II is a sort of precursor to the Marvel Ultimate Alliance experience, and it's a bit older, but has similar attributes, including the winning trait of there being many heroes and being able to put together your own dream team.
          If you like Marvel Ultimate Alliance, you'll like X-Men Legends II as well.

          Look before you buy: We have cutscenes and artwork from the game, as well as a guide/walkthrough for X-Men Legends II: Rise of Apocalypse.

          Freedom Force and Freedom Force vs. The Third Reich
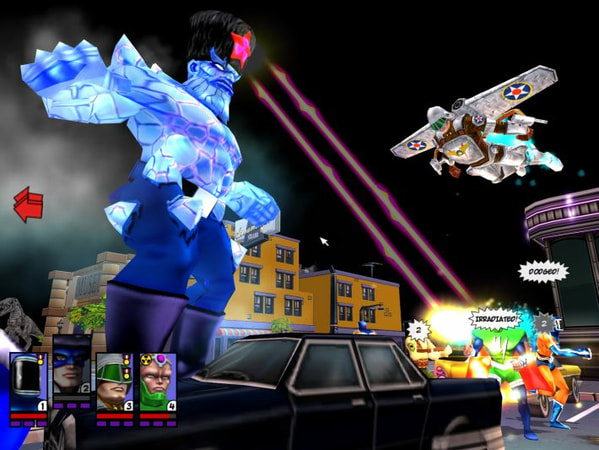
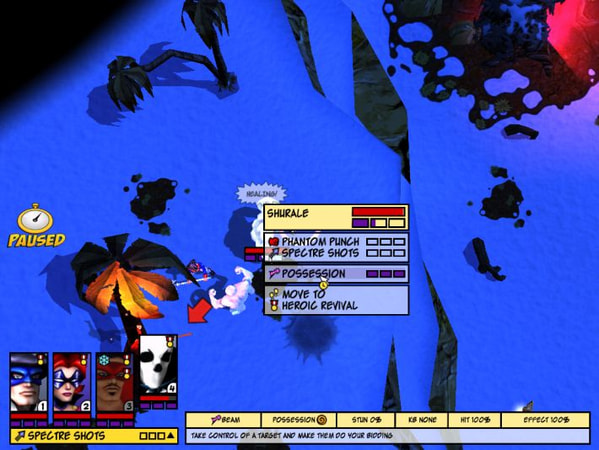
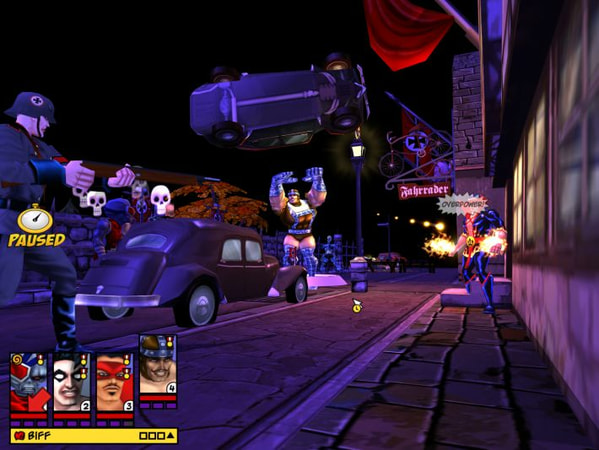
          They aren't Marvel, but worthy of mention are the 4-colour comic book style Freedom Force games, which very much gives you a comic book feel:
          • UI feedback for powers and damage comes in text bubbles just like you might see in a comic book.
          • You can grab things like cars and telephone poles to swing and throw.
          • The story involves rescuing civilians and you get bonuses for limiting collateral damage.
          The real gem of this game, however, is the ability to CREATE YOUR OWN HERO. The powers are extremely customizable, making for an endless variety of builds. Also, they cleverly limited certain powers (such as self-healing) so you don't get builds that are too easy and in that way exploit the engine.
          Freedom Force versus The Third Reich

          Freedom Force versus The Third Reich

          Freedom Force versus The Third Reich

          Instead of getting Freedom Force from Amazon, I highly recommend instead getting it from GOG.com, which offers a money-back guarantee -- especially important for an older game.
          As you may know, I have been playing MARVEL Avengers Academy, and although I was initially greatly in favour of the game, their recent events -- or more to the point, how they structured their events -- has been so bad that I've been forced to re-evaluate TinyCo's Avengers Academy.

          Marvel Ultimate Alliance
          On the Avengers Academy Facebook page, the topic naturally came up about where else someone could get a Marvel superheroes experience, and one I highly recommend is Marvel Ultimate Alliance.

          The main reason is the sheer number of playable MARVEL characters in that game. Also, you get to fight a number of villains in a variety of story locations and mini-missions for various heroes. On top of that, you can earn different costumes for different heroes.

          We had a series of posts about Marvel Ultimate Alliance, and you can see a number of posts detailing the cutscenes, artwork, and character costumes in Marvel Ultimate Alliance.

          And one of the reasons it's called "Ultimate Alliance" is because from the list of heroes, you can mix and match into your own strike teams, some of which have special bonuses. And those teams can earn bonuses by staying together -- sort of like putting together your own Avengers portfolio of heroes and sending them out on missions regularly.

          Needless to say the powers of the heroes (and villains) are faithful to the Marvel comic universe, and so you really have an iconic experience of the Marvel universe.

          It's obviously an older game, but nevertheless highly recommended for the content and replayability (by trying different teams), all for a single low price.

          X-Men Legends II: Rise of Apocalypse
          X-Men Legends II is a sort of precursor to the Marvel Ultimate Alliance experience, and it's a bit older, but has similar attributes, including the winning trait of there being many heroes and being able to put together your own dream team.
          If you like Marvel Ultimate Alliance, you'll like X-Men Legends II as well.

          Look before you buy: We have cutscenes and artwork from the game, as well as a guide/walkthrough for X-Men Legends II: Rise of Apocalypse.

          Freedom Force and Freedom Force vs. The Third Reich
          They aren't Marvel, but worthy of mention are the 4-colour comic book style Freedom Force games, which very much gives you a comic book feel:
          • UI feedback for powers and damage comes in text bubbles just like you might see in a comic book.
          • You can grab things like cars and telephone poles to swing and throw.
          • The story involves rescuing civilians and you get bonuses for limiting collateral damage.
          The real gem of this game, however, is the ability to CREATE YOUR OWN HERO. The powers are extremely customizable, making for an endless variety of builds. Also, they cleverly limited certain powers (such as self-healing) so you don't get builds that are too easy and in that way exploit the engine.
          Freedom Force versus The Third Reich

          Freedom Force versus The Third Reich

          Freedom Force versus The Third Reich

          Instead of getting Freedom Force from Amazon, I highly recommend instead getting it from GOG.com, which offers a money-back guarantee -- especially important for an older game.
          reade more... Résuméabuiyad

          Wasteland 2 Director's Cut - Team Building

           
          Wasteland 2 Director's Cut Location Notes: Team Building

          Play Wasteland 2 risk-free with money-back guarantee from Good Old Games.
          We build our team with the goal of getting all dialogue and skill encounters in the game. Therefore, we dropped certain skills (Barter, Leadership) because there were no role-playing events related to them.

          In the early game, melee skills are strong because once you are in melee, you get many chances to attack, so even level 1 skill in Bladed or Blunt Weapons can be very useful. Trading blows with enemy melee or Handgunners is still risky, but once you are a higher level and have more CON, then against easy raider encounters you can basically use melee to clear them and that way get resources without using your own (and run back to a town for free healing, which you can safely do if your party Outdoorsman skill is high enough).
            The initial team was:

            Perception / Sniper
            • This character takes point when moving around the map because they have the Perception skill to spot dangers early.
            • Takes the first shot, initiating combat. Hopefully the Sniper skill will let them kill the enemy mid-range to long-range gunner, forcing remaining members to close the gap under fire.
            • Because Sniper Rifles are single-shot weapons in the short distances of this game they are generally good only as first-strike weapons, after which mid-range weapons and short-range or melee combat takes over. In which case you may just want to go with Assault Rifles for a more rounded character.
            • With all builds here, Handguns is superior to melee because you get both range and point blank range bonuses but it will be very ammunition intensive unless you have enough scrap to buy a lot of ammunition.
            • Skills
              • Handguns 1 OR Bladed Weapons 1
              • Sniper Rifles 1 OR Assault Rifle 1
              • Perception 1, Outdoorsman 1
                • Angela Deth has the Outdoorsman skill so you can delay taking it; if you rescue Highpool, Vulture's Cry also has this skill and you could maximize hers.
              • Lockpicking 1, Safecracking 1
            Hard Ass / Melee
            • Hard Ass has a combat perk and Brute Force has a melee weapon perk (see our list of Wasteland 2 Director's Cut perks sorted by skill), so this is the only melee weapon character. Also has the Field Medic to aim for the Stimpak perk to help them survive melee.
            • Skills
              • Blunt Weapons 1, Brute Force 1, Hard Ass 1
                • She is also our main melee combatant. In the early game when a lot of enemies do not have conductive armour and therefore energy weapons are not useful except when the target only has very few CON left, she advances into melee. In the late game, her melee is reinforced by the Stimpack perk from First Aid and other perks from Brute Force and Hard Ass.
              • Energy Weapons 1
                • Energy Weapons are weak at the start but stronger later on when enemies have conductive armor. So in the early game, she fulfills the melee role but can still use Energy Weapons against targets with very low HP left.
              • Field Medic
              • Weaponsmithing 1
                • Angela Deth has this skill so you could delay taking it and invest in a weapon skill instead; and then have Angela Deth maximize her Weaponsmithing.
            Smart Ass / Loot
            • Due to skill distribution, the only character without only one weapon proficiency. If you can keep her at mid-range, Assault Rifle is a good all-rounder. Otherwise, try a Handgun with a scope to give her utility from mid to short range.
            • Skills
              • Assault Rifles 1 OR Handguns 1
              • Smart Ass 1
              • Alarm Disarming 1, Computer Science 1, Demolitions 1
              • Surgeon 1
            Kiss Ass
            • Skills
              • Animal Whisperer 1, Kiss Ass 1
              • Assault Rifles 1
              • Handguns 1 OR Brawling 1
              • Mechanical Repair 1, Toaster Repair 1
            Wasteland 2 Director's Cut - team build

            Attributes
            Attributes were ruthlessly specialized. We aimed to improve Strength (for more CON) as we acquire levels (CON gains from Strength are retroactive). In the meantime we maximized Speed for Initiative and Evasion, and Intelligence for Skill Points as we are a skill-focussed party.
            Attributes are as follows:
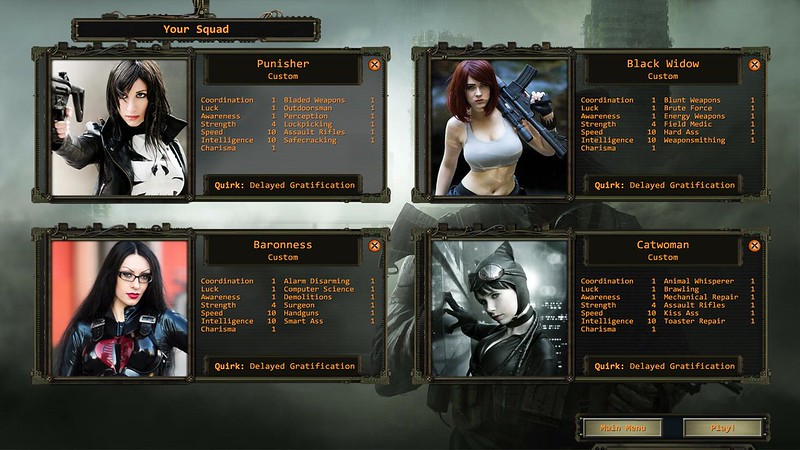
            • Coordination 1, Luck 1, Awareness 1, Charisma 1
            • Strength 4
            • Speed 10, Intelligence 10
            An alternate build could have Coordination 4 Strength 1 and develop Coordination, to get a lot of Action Points.

            For the Trait, because we won't get Leadership we could take took Raised in a Circus for the +5% Evasion bonus, which helps us maximize Evasion. However, in practice this wasn't as useful as being competent in combat and taking down the enemy quickly, so in the end we went with Delayed Gratification (-1 skill points from levels 2-10, +1 skill points from level 11+).

            Early Game Skill Checks
            If you want to maximize your XP and game experience by succeeding in as many skill checks as possible, you'll need to consider what to do after the Radio Tower as in the early game you don't have many skill resources.
            • The Radio tower has a few easy skill checks but you will have to go back to that location later anyway.
            • Ag Center has a wide variety of skills, but only a few require high-level skills (though you might end up with a miserable chance of success and a lot of reloads). Also, some opportunities to make skills checks disappear if you progress too far in the mission; for example, you can break into Rose's lab and recruit her early, or you can wait for the door to be open for you later.
            • Highpool is a shorter mission with fewer checks but the skill requirements are higher. Fortunately, a lot of the checks can be delayed.
            • If you don't so far enough to get the initial Highpool SOS then you are not under any time pressure to choose. Theoretically, you could grind for levels to increase your skills before going to either Ag Center or Highpool.
              • You won't get a doctor to heal you for free -- you need to finish either Ag Center or Highpool to get this.
              • Therefore you need to find or buy medical resources unless you are lucky enough to avoid severe injury until you can level up (whereupon you are healed for free unless you are dying).
              • You will steadily run out of ammunition unless you have a lot of melee in your party, in which case you can grind the easier encounters that typically don't drop gear or ammunition.
              • You can also buy the radiation suit from the Citadel early and look for caches to the north. This will get you at least two suits of armor, though you might have to run from most encounters at a low 25% chance of success. If you can handle this you also have a good likelihood of encountering Rail raiders who can drop fairly good weapon loot.
            • You could use Veterans -- If your party dies they get exported and available for a new game. You lose your gear but keep your levelling.
              • A quick way to do this is to find the nuclear warhead in the Ranger Citadel museum and press the button.

            You can also get easy XP and Skill Points from Shrines in this area, though that is better done when you have a full roster (including NPCs) as you can only visit Shrines once for the bonus, and team members who weren't with you when you visited cannot get the benefit later.

             
            Wasteland 2 Director's Cut Location Notes: Team Building

            Play Wasteland 2 risk-free with money-back guarantee from Good Old Games.
            We build our team with the goal of getting all dialogue and skill encounters in the game. Therefore, we dropped certain skills (Barter, Leadership) because there were no role-playing events related to them.

            In the early game, melee skills are strong because once you are in melee, you get many chances to attack, so even level 1 skill in Bladed or Blunt Weapons can be very useful. Trading blows with enemy melee or Handgunners is still risky, but once you are a higher level and have more CON, then against easy raider encounters you can basically use melee to clear them and that way get resources without using your own (and run back to a town for free healing, which you can safely do if your party Outdoorsman skill is high enough).
              The initial team was:

              Perception / Sniper
              • This character takes point when moving around the map because they have the Perception skill to spot dangers early.
              • Takes the first shot, initiating combat. Hopefully the Sniper skill will let them kill the enemy mid-range to long-range gunner, forcing remaining members to close the gap under fire.
              • Because Sniper Rifles are single-shot weapons in the short distances of this game they are generally good only as first-strike weapons, after which mid-range weapons and short-range or melee combat takes over. In which case you may just want to go with Assault Rifles for a more rounded character.
              • With all builds here, Handguns is superior to melee because you get both range and point blank range bonuses but it will be very ammunition intensive unless you have enough scrap to buy a lot of ammunition.
              • Skills
                • Handguns 1 OR Bladed Weapons 1
                • Sniper Rifles 1 OR Assault Rifle 1
                • Perception 1, Outdoorsman 1
                  • Angela Deth has the Outdoorsman skill so you can delay taking it; if you rescue Highpool, Vulture's Cry also has this skill and you could maximize hers.
                • Lockpicking 1, Safecracking 1
              Hard Ass / Melee
              • Hard Ass has a combat perk and Brute Force has a melee weapon perk (see our list of Wasteland 2 Director's Cut perks sorted by skill), so this is the only melee weapon character. Also has the Field Medic to aim for the Stimpak perk to help them survive melee.
              • Skills
                • Blunt Weapons 1, Brute Force 1, Hard Ass 1
                  • She is also our main melee combatant. In the early game when a lot of enemies do not have conductive armour and therefore energy weapons are not useful except when the target only has very few CON left, she advances into melee. In the late game, her melee is reinforced by the Stimpack perk from First Aid and other perks from Brute Force and Hard Ass.
                • Energy Weapons 1
                  • Energy Weapons are weak at the start but stronger later on when enemies have conductive armor. So in the early game, she fulfills the melee role but can still use Energy Weapons against targets with very low HP left.
                • Field Medic
                • Weaponsmithing 1
                  • Angela Deth has this skill so you could delay taking it and invest in a weapon skill instead; and then have Angela Deth maximize her Weaponsmithing.
              Smart Ass / Loot
              • Due to skill distribution, the only character without only one weapon proficiency. If you can keep her at mid-range, Assault Rifle is a good all-rounder. Otherwise, try a Handgun with a scope to give her utility from mid to short range.
              • Skills
                • Assault Rifles 1 OR Handguns 1
                • Smart Ass 1
                • Alarm Disarming 1, Computer Science 1, Demolitions 1
                • Surgeon 1
              Kiss Ass
              • Skills
                • Animal Whisperer 1, Kiss Ass 1
                • Assault Rifles 1
                • Handguns 1 OR Brawling 1
                • Mechanical Repair 1, Toaster Repair 1
              Wasteland 2 Director's Cut - team build

              Attributes
              Attributes were ruthlessly specialized. We aimed to improve Strength (for more CON) as we acquire levels (CON gains from Strength are retroactive). In the meantime we maximized Speed for Initiative and Evasion, and Intelligence for Skill Points as we are a skill-focussed party.
              Attributes are as follows:
              • Coordination 1, Luck 1, Awareness 1, Charisma 1
              • Strength 4
              • Speed 10, Intelligence 10
              An alternate build could have Coordination 4 Strength 1 and develop Coordination, to get a lot of Action Points.

              For the Trait, because we won't get Leadership we could take took Raised in a Circus for the +5% Evasion bonus, which helps us maximize Evasion. However, in practice this wasn't as useful as being competent in combat and taking down the enemy quickly, so in the end we went with Delayed Gratification (-1 skill points from levels 2-10, +1 skill points from level 11+).

              Early Game Skill Checks
              If you want to maximize your XP and game experience by succeeding in as many skill checks as possible, you'll need to consider what to do after the Radio Tower as in the early game you don't have many skill resources.
              • The Radio tower has a few easy skill checks but you will have to go back to that location later anyway.
              • Ag Center has a wide variety of skills, but only a few require high-level skills (though you might end up with a miserable chance of success and a lot of reloads). Also, some opportunities to make skills checks disappear if you progress too far in the mission; for example, you can break into Rose's lab and recruit her early, or you can wait for the door to be open for you later.
              • Highpool is a shorter mission with fewer checks but the skill requirements are higher. Fortunately, a lot of the checks can be delayed.
              • If you don't so far enough to get the initial Highpool SOS then you are not under any time pressure to choose. Theoretically, you could grind for levels to increase your skills before going to either Ag Center or Highpool.
                • You won't get a doctor to heal you for free -- you need to finish either Ag Center or Highpool to get this.
                • Therefore you need to find or buy medical resources unless you are lucky enough to avoid severe injury until you can level up (whereupon you are healed for free unless you are dying).
                • You will steadily run out of ammunition unless you have a lot of melee in your party, in which case you can grind the easier encounters that typically don't drop gear or ammunition.
                • You can also buy the radiation suit from the Citadel early and look for caches to the north. This will get you at least two suits of armor, though you might have to run from most encounters at a low 25% chance of success. If you can handle this you also have a good likelihood of encountering Rail raiders who can drop fairly good weapon loot.
              • You could use Veterans -- If your party dies they get exported and available for a new game. You lose your gear but keep your levelling.
                • A quick way to do this is to find the nuclear warhead in the Ranger Citadel museum and press the button.

              You can also get easy XP and Skill Points from Shrines in this area, though that is better done when you have a full roster (including NPCs) as you can only visit Shrines once for the bonus, and team members who weren't with you when you visited cannot get the benefit later.

              reade more... Résuméabuiyad

              Mass Effect Series Table of Contents

              This is a table of contents for all our posts on the Mass Effect Trilogy:

              Mass Effect
              Mass Effect 2

              This is a table of contents for all our posts on the Mass Effect Trilogy:

              Mass Effect
              Mass Effect 2

              reade more... Résuméabuiyad

              Big Fish Games Happy 4th of July Sale

              Big Fish Games is having a sale on ALL GAMES -- All games are TWO FOR ONE from July 2nd to July 4th.

              New Customers can also use code FTC99 at checkout to get standard version games for just 99 cents. Offer valid from July 1st to July 4th.

              Big Fish Games is having a sale on ALL GAMES -- All games are TWO FOR ONE from July 2nd to July 4th.

              New Customers can also use code FTC99 at checkout to get standard version games for just 99 cents. Offer valid from July 1st to July 4th.

              reade more... Résuméabuiyad

              Wasteland 2 Director's Cut - Character Hacking and Respec

              Wasteland 2 Director's Cut: Character Hacking and Respec

              Play Wasteland 2 risk-free with money-back guarantee from Good Old Games.

              To edit your character's Attributes and Skills you can simply open a text file and edit it.

              Savegames are typically stored in ...\Documents\My Games\Wasteland2DC\Save Games\

              This directory will have subdirectories that are named based on the name you gave your savegame.
              Open the directory and you will find two files, a .bin and a .xml
              Open the .xml in a text editor and examine it to find the skills and attributes for each character. Start by searching for your character's name.

              Below is an sample section of the file comprising one character's entry. In larger font are attributes and associated values. Skill entries follow after.
              • For attributes, valid values are 1-10. Any value above 10 is treated as 10 in-game and flagged in red (but apparently harmless).
              • For skills, the values represent the number of Skill Points put into the skill -- NOT the skill level.
              Just edit the numbers and save the file as a text file (but of course do not change the file name).
              You can get away with less editing and do it in-game later by tweaking the <available...> entries, giving you Attribute Points, Skill Points, and Trait Points to spend in game.

              BONUS TIP: The .char files for custom rangers in the ...\Documents\My Games\Wasteland2DC\Characters directory are also plain text files with a similar structure. You could assign a character 10's in every Attribute and Skill (including the two hidden skills) and start with "perfect 10" characters to rapidly explore the Wasteland or replay the game to try different things.

              <pc><name><@>Lady Thor{F}</name><displayName><@>Lady Thor{F}</displayName><portraitName>cosplay Thor</portraitName><position><x>121.9337</x><y>6.401434</y><z>29.14721</z></position><rotationY>348.8566</rotationY><gender>2</gender><religion>None</religion><smokes>None</smokes><ethnicity>Russian</ethnicity><biography></biography><skinColor>0</skinColor><age>20</age><level>1</level><xp>0</xp><curHp>35</curHp><size>4</size><noOfKills>0</noOfKills><damageDone>0</damageDone><availableAttributePoints>0</availableAttributePoints><availableSkillPoints>0</availableSkillPoints><availableTraitPoints>0</availableTraitPoints><isSelected>True</isSelected><isHostage>False</isHostage><perceptionOn>False</perceptionOn><crouch>False</crouch><hasCommittedPoints>False</hasCommittedPoints><isCNPC>False</isCNPC><luckyHitpoints>0</luckyHitpoints><defaultEquipment><item /><item><resourceName>Fem_Robb_Hair_B</resourceName><ammoResourceName></ammoResourceName><slot>-1</slot><ammoCount>-1</ammoCount><firingModeIndex>0</firingModeIndex><isJammed>False</isJammed><quantity>1</quantity><junk>False</junk><fav>False</fav><isOriginalProperty>False</isOriginalProperty><inventoryGridX>-1</inventoryGridX><inventoryGridY>-1</inventoryGridY></item><item><resourceName>Fem_Topekan_Head_B</resourceName><ammoResourceName></ammoResourceName><slot>-1</slot><ammoCount>-1</ammoCount><firingModeIndex>0</firingModeIndex><isJammed>False</isJammed><quantity>1</quantity><junk>False</junk><fav>False</fav><isOriginalProperty>False</isOriginalProperty><inventoryGridX>-1</inventoryGridX><inventoryGridY>-1</inventoryGridY></item><item /><item><resourceName>Fem_UndWear_Torso_C</resourceName><ammoResourceName></ammoResourceName><slot>-1</slot><ammoCount>-1</ammoCount><firingModeIndex>0</firingModeIndex><isJammed>False</isJammed><quantity>1</quantity><junk>False</junk><fav>False</fav><isOriginalProperty>False</isOriginalProperty><inventoryGridX>-1</inventoryGridX><inventoryGridY>-1</inventoryGridY></item><item /><item><resourceName>Fem_UndWear_Legs_I</resourceName><ammoResourceName></ammoResourceName><slot>-1</slot><ammoCount>-1</ammoCount><firingModeIndex>0</firingModeIndex><isJammed>False</isJammed><quantity>1</quantity><junk>False</junk><fav>False</fav><isOriginalProperty>False</isOriginalProperty><inventoryGridX>-1</inventoryGridX><inventoryGridY>-1</inventoryGridY></item><item><resourceName>Fists</resourceName><ammoResourceName></ammoResourceName><slot>-1</slot><ammoCount>-1</ammoCount><firingModeIndex>0</firingModeIndex><isJammed>False</isJammed><quantity>1</quantity><junk>False</junk><fav>False</fav><isOriginalProperty>False</isOriginalProperty><inventoryGridX>-1</inventoryGridX><inventoryGridY>-1</inventoryGridY></item><item /><item><resourceName>Fists</resourceName><ammoResourceName></ammoResourceName><slot>-1</slot><ammoCount>-1</ammoCount><firingModeIndex>0</firingModeIndex><isJammed>False</isJammed><quantity>1</quantity><junk>False</junk><fav>False</fav><isOriginalProperty>False</isOriginalProperty><inventoryGridX>-1</inventoryGridX><inventoryGridY>-1</inventoryGridY></item><item /><item /><item /><item /><item /><item /><item /><item /></defaultEquipment><equipment><item /><item /><item /><item /><item><resourceName>Wearable_Topekan_Torso_B</resourceName><ammoResourceName></ammoResourceName><slot>4</slot><ammoCount>-1</ammoCount><firingModeIndex>0</firingModeIndex><isJammed>False</isJammed><quantity>1</quantity><junk>False</junk><fav>False</fav><isOriginalProperty>False</isOriginalProperty><inventoryGridX>-1</inventoryGridX><inventoryGridY>-1</inventoryGridY></item><item /><item><resourceName>Wearable_Topekan_Legs_A</resourceName><ammoResourceName></ammoResourceName><slot>6</slot><ammoCount>-1</ammoCount><firingModeIndex>0</firingModeIndex><isJammed>False</isJammed><quantity>1</quantity><junk>False</junk><fav>False</fav><isOriginalProperty>False</isOriginalProperty><inventoryGridX>-1</inventoryGridX><inventoryGridY>-1</inventoryGridY></item><item><resourceName>Blunt_Tier_1_1</resourceName><ammoResourceName></ammoResourceName><slot>7</slot><ammoCount>-1</ammoCount><firingModeIndex>0</firingModeIndex><isJammed>False</isJammed><quantity>1</quantity><junk>False</junk><fav>False</fav><isOriginalProperty>False</isOriginalProperty><inventoryGridX>-1</inventoryGridX><inventoryGridY>-1</inventoryGridY></item><item /><item><resourceName>Energy_Tier_1_1</resourceName><ammoResourceName>Ammo_EnergyCell</ammoResourceName><slot>9</slot><ammoCount>6</ammoCount><firingModeIndex>0</firingModeIndex><isJammed>False</isJammed><quantity>1</quantity><junk>False</junk><fav>False</fav><isOriginalProperty>False</isOriginalProperty><inventoryGridX>-1</inventoryGridX><inventoryGridY>-1</inventoryGridY></item><item /><item /><item /><item /><item /><item /><item /><item /></equipment><inventory><item><resourceName>Ammo_EnergyCell</resourceName><ammoResourceName></ammoResourceName><slot>-1</slot><ammoCount>-1</ammoCount><firingModeIndex>0</firingModeIndex><isJammed>False</isJammed><quantity>18</quantity><junk>False</junk><fav>False</fav><isOriginalProperty>False</isOriginalProperty><inventoryGridX>-1</inventoryGridX><inventoryGridY>-1</inventoryGridY></item><item><resourceName>Usable_PainRelievers_1</resourceName><ammoResourceName></ammoResourceName><slot>-1</slot><ammoCount>-1</ammoCount><firingModeIndex>0</firingModeIndex><isJammed>False</isJammed><quantity>2</quantity><junk>False</junk><fav>False</fav><isOriginalProperty>False</isOriginalProperty><inventoryGridX>-1</inventoryGridX><inventoryGridY>-1</inventoryGridY></item><item><resourceName>UsableShovel</resourceName><ammoResourceName></ammoResourceName><slot>-1</slot><ammoCount>-1</ammoCount><firingModeIndex>0</firingModeIndex><isJammed>False</isJammed><quantity>1</quantity><junk>False</junk><fav>False</fav><isOriginalProperty>False</isOriginalProperty><inventoryGridX>-1</inventoryGridX><inventoryGridY>-1</inventoryGridY></item></inventory><hotkeys><hotkey><skillOrItemName>perception</skillOrItemName><isItem>False</isItem></hotkey><hotkey><skillOrItemName>outdoorsman</skillOrItemName><isItem>False</isItem></hotkey><hotkey><skillOrItemName>mechanicalRepair</skillOrItemName><isItem>False</isItem></hotkey><hotkey><skillOrItemName>toasterRepair</skillOrItemName><isItem>False</isItem></hotkey><hotkey><skillOrItemName>Usable_PainRelievers_1</skillOrItemName><isItem>True</isItem></hotkey><hotkey><skillOrItemName>UsableShovel</skillOrItemName><isItem>True</isItem></hotkey><hotkey><skillOrItemName></skillOrItemName><isItem>False</isItem></hotkey><hotkey><skillOrItemName></skillOrItemName><isItem>False</isItem></hotkey></hotkeys><statusEffects><statusEffect><name>Status_Trait_CircusFreak</name><startTime>246436</startTime><nextHitpointChange>0</nextHitpointChange><elapsedTime>89608</elapsedTime><lastUpdate>336044</lastUpdate></statusEffect></statusEffects><attributes><pair><key>coordination</key><value>3</value></pair><pair><key>luck</key><value>3</value></pair><pair><key>awareness</key><value>3</value></pair><pair><key>strength</key><value>3</value></pair><pair><key>speed</key><value>5</value></pair><pair><key>intelligence</key><value>10</value></pair><pair><key>charisma</key><value>1</value></pair></attributes><skillXps><pair><key>alarmDisarm</key><value>0</value></pair><pair><key>animalWhisperer</key><value>0</value></pair><pair><key>atWeapons</key><value>0</value></pair><pair><key>barter</key><value>0</value></pair><pair><key>bladedWeapons</key><value>0</value></pair><pair><key>bluntWeapons</key><value>2</value></pair><pair><key>brawling</key><value>0</value></pair><pair><key>bruteForce</key><value>0</value></pair><pair><key>calvinBackerSkill</key><value>0</value></pair><pair><key>combatShooting</key><value>0</value></pair><pair><key>computerTech</key><value>0</value></pair><pair><key>demolitions</key><value>0</value></pair><pair><key>doctor</key><value>0</value></pair><pair><key>energyWeapons</key><value>2</value></pair><pair><key>fieldMedic</key><value>0</value></pair><pair><key>handgun</key><value>0</value></pair><pair><key>intimidate</key><value>0</value></pair><pair><key>leadership</key><value>0</value></pair><pair><key>manipulate</key><value>0</value></pair><pair><key>mechanicalRepair</key><value>2</value></pair><pair><key>outdoorsman</key><value>2</value></pair><pair><key>perception</key><value>2</value></pair><pair><key>pickLock</key><value>0</value></pair><pair><key>rifle</key><value>0</value></pair><pair><key>safecrack</key><value>0</value></pair><pair><key>shotgun</key><value>0</value></pair><pair><key>smg</key><value>0</value></pair><pair><key>sniperRifle</key><value>0</value></pair><pair><key>spotLie</key><value>0</value></pair><pair><key>toasterRepair</key><value>2</value></pair><pair><key>weaponSmith</key><value>0</value></pair></skillXps><traits><pair><key>Trait_RaisedInTheCircus</key><value>1</value></pair></traits></pc>

                Wasteland 2 Director's Cut: Character Hacking and Respec

                Play Wasteland 2 risk-free with money-back guarantee from Good Old Games.

                To edit your character's Attributes and Skills you can simply open a text file and edit it.

                Savegames are typically stored in ...\Documents\My Games\Wasteland2DC\Save Games\

                This directory will have subdirectories that are named based on the name you gave your savegame.
                Open the directory and you will find two files, a .bin and a .xml
                Open the .xml in a text editor and examine it to find the skills and attributes for each character. Start by searching for your character's name.

                Below is an sample section of the file comprising one character's entry. In larger font are attributes and associated values. Skill entries follow after.
                • For attributes, valid values are 1-10. Any value above 10 is treated as 10 in-game and flagged in red (but apparently harmless).
                • For skills, the values represent the number of Skill Points put into the skill -- NOT the skill level.
                Just edit the numbers and save the file as a text file (but of course do not change the file name).
                You can get away with less editing and do it in-game later by tweaking the <available...> entries, giving you Attribute Points, Skill Points, and Trait Points to spend in game.

                BONUS TIP: The .char files for custom rangers in the ...\Documents\My Games\Wasteland2DC\Characters directory are also plain text files with a similar structure. You could assign a character 10's in every Attribute and Skill (including the two hidden skills) and start with "perfect 10" characters to rapidly explore the Wasteland or replay the game to try different things.

                <pc><name><@>Lady Thor{F}</name><displayName><@>Lady Thor{F}</displayName><portraitName>cosplay Thor</portraitName><position><x>121.9337</x><y>6.401434</y><z>29.14721</z></position><rotationY>348.8566</rotationY><gender>2</gender><religion>None</religion><smokes>None</smokes><ethnicity>Russian</ethnicity><biography></biography><skinColor>0</skinColor><age>20</age><level>1</level><xp>0</xp><curHp>35</curHp><size>4</size><noOfKills>0</noOfKills><damageDone>0</damageDone><availableAttributePoints>0</availableAttributePoints><availableSkillPoints>0</availableSkillPoints><availableTraitPoints>0</availableTraitPoints><isSelected>True</isSelected><isHostage>False</isHostage><perceptionOn>False</perceptionOn><crouch>False</crouch><hasCommittedPoints>False</hasCommittedPoints><isCNPC>False</isCNPC><luckyHitpoints>0</luckyHitpoints><defaultEquipment><item /><item><resourceName>Fem_Robb_Hair_B</resourceName><ammoResourceName></ammoResourceName><slot>-1</slot><ammoCount>-1</ammoCount><firingModeIndex>0</firingModeIndex><isJammed>False</isJammed><quantity>1</quantity><junk>False</junk><fav>False</fav><isOriginalProperty>False</isOriginalProperty><inventoryGridX>-1</inventoryGridX><inventoryGridY>-1</inventoryGridY></item><item><resourceName>Fem_Topekan_Head_B</resourceName><ammoResourceName></ammoResourceName><slot>-1</slot><ammoCount>-1</ammoCount><firingModeIndex>0</firingModeIndex><isJammed>False</isJammed><quantity>1</quantity><junk>False</junk><fav>False</fav><isOriginalProperty>False</isOriginalProperty><inventoryGridX>-1</inventoryGridX><inventoryGridY>-1</inventoryGridY></item><item /><item><resourceName>Fem_UndWear_Torso_C</resourceName><ammoResourceName></ammoResourceName><slot>-1</slot><ammoCount>-1</ammoCount><firingModeIndex>0</firingModeIndex><isJammed>False</isJammed><quantity>1</quantity><junk>False</junk><fav>False</fav><isOriginalProperty>False</isOriginalProperty><inventoryGridX>-1</inventoryGridX><inventoryGridY>-1</inventoryGridY></item><item /><item><resourceName>Fem_UndWear_Legs_I</resourceName><ammoResourceName></ammoResourceName><slot>-1</slot><ammoCount>-1</ammoCount><firingModeIndex>0</firingModeIndex><isJammed>False</isJammed><quantity>1</quantity><junk>False</junk><fav>False</fav><isOriginalProperty>False</isOriginalProperty><inventoryGridX>-1</inventoryGridX><inventoryGridY>-1</inventoryGridY></item><item><resourceName>Fists</resourceName><ammoResourceName></ammoResourceName><slot>-1</slot><ammoCount>-1</ammoCount><firingModeIndex>0</firingModeIndex><isJammed>False</isJammed><quantity>1</quantity><junk>False</junk><fav>False</fav><isOriginalProperty>False</isOriginalProperty><inventoryGridX>-1</inventoryGridX><inventoryGridY>-1</inventoryGridY></item><item /><item><resourceName>Fists</resourceName><ammoResourceName></ammoResourceName><slot>-1</slot><ammoCount>-1</ammoCount><firingModeIndex>0</firingModeIndex><isJammed>False</isJammed><quantity>1</quantity><junk>False</junk><fav>False</fav><isOriginalProperty>False</isOriginalProperty><inventoryGridX>-1</inventoryGridX><inventoryGridY>-1</inventoryGridY></item><item /><item /><item /><item /><item /><item /><item /><item /></defaultEquipment><equipment><item /><item /><item /><item /><item><resourceName>Wearable_Topekan_Torso_B</resourceName><ammoResourceName></ammoResourceName><slot>4</slot><ammoCount>-1</ammoCount><firingModeIndex>0</firingModeIndex><isJammed>False</isJammed><quantity>1</quantity><junk>False</junk><fav>False</fav><isOriginalProperty>False</isOriginalProperty><inventoryGridX>-1</inventoryGridX><inventoryGridY>-1</inventoryGridY></item><item /><item><resourceName>Wearable_Topekan_Legs_A</resourceName><ammoResourceName></ammoResourceName><slot>6</slot><ammoCount>-1</ammoCount><firingModeIndex>0</firingModeIndex><isJammed>False</isJammed><quantity>1</quantity><junk>False</junk><fav>False</fav><isOriginalProperty>False</isOriginalProperty><inventoryGridX>-1</inventoryGridX><inventoryGridY>-1</inventoryGridY></item><item><resourceName>Blunt_Tier_1_1</resourceName><ammoResourceName></ammoResourceName><slot>7</slot><ammoCount>-1</ammoCount><firingModeIndex>0</firingModeIndex><isJammed>False</isJammed><quantity>1</quantity><junk>False</junk><fav>False</fav><isOriginalProperty>False</isOriginalProperty><inventoryGridX>-1</inventoryGridX><inventoryGridY>-1</inventoryGridY></item><item /><item><resourceName>Energy_Tier_1_1</resourceName><ammoResourceName>Ammo_EnergyCell</ammoResourceName><slot>9</slot><ammoCount>6</ammoCount><firingModeIndex>0</firingModeIndex><isJammed>False</isJammed><quantity>1</quantity><junk>False</junk><fav>False</fav><isOriginalProperty>False</isOriginalProperty><inventoryGridX>-1</inventoryGridX><inventoryGridY>-1</inventoryGridY></item><item /><item /><item /><item /><item /><item /><item /><item /></equipment><inventory><item><resourceName>Ammo_EnergyCell</resourceName><ammoResourceName></ammoResourceName><slot>-1</slot><ammoCount>-1</ammoCount><firingModeIndex>0</firingModeIndex><isJammed>False</isJammed><quantity>18</quantity><junk>False</junk><fav>False</fav><isOriginalProperty>False</isOriginalProperty><inventoryGridX>-1</inventoryGridX><inventoryGridY>-1</inventoryGridY></item><item><resourceName>Usable_PainRelievers_1</resourceName><ammoResourceName></ammoResourceName><slot>-1</slot><ammoCount>-1</ammoCount><firingModeIndex>0</firingModeIndex><isJammed>False</isJammed><quantity>2</quantity><junk>False</junk><fav>False</fav><isOriginalProperty>False</isOriginalProperty><inventoryGridX>-1</inventoryGridX><inventoryGridY>-1</inventoryGridY></item><item><resourceName>UsableShovel</resourceName><ammoResourceName></ammoResourceName><slot>-1</slot><ammoCount>-1</ammoCount><firingModeIndex>0</firingModeIndex><isJammed>False</isJammed><quantity>1</quantity><junk>False</junk><fav>False</fav><isOriginalProperty>False</isOriginalProperty><inventoryGridX>-1</inventoryGridX><inventoryGridY>-1</inventoryGridY></item></inventory><hotkeys><hotkey><skillOrItemName>perception</skillOrItemName><isItem>False</isItem></hotkey><hotkey><skillOrItemName>outdoorsman</skillOrItemName><isItem>False</isItem></hotkey><hotkey><skillOrItemName>mechanicalRepair</skillOrItemName><isItem>False</isItem></hotkey><hotkey><skillOrItemName>toasterRepair</skillOrItemName><isItem>False</isItem></hotkey><hotkey><skillOrItemName>Usable_PainRelievers_1</skillOrItemName><isItem>True</isItem></hotkey><hotkey><skillOrItemName>UsableShovel</skillOrItemName><isItem>True</isItem></hotkey><hotkey><skillOrItemName></skillOrItemName><isItem>False</isItem></hotkey><hotkey><skillOrItemName></skillOrItemName><isItem>False</isItem></hotkey></hotkeys><statusEffects><statusEffect><name>Status_Trait_CircusFreak</name><startTime>246436</startTime><nextHitpointChange>0</nextHitpointChange><elapsedTime>89608</elapsedTime><lastUpdate>336044</lastUpdate></statusEffect></statusEffects><attributes><pair><key>coordination</key><value>3</value></pair><pair><key>luck</key><value>3</value></pair><pair><key>awareness</key><value>3</value></pair><pair><key>strength</key><value>3</value></pair><pair><key>speed</key><value>5</value></pair><pair><key>intelligence</key><value>10</value></pair><pair><key>charisma</key><value>1</value></pair></attributes><skillXps><pair><key>alarmDisarm</key><value>0</value></pair><pair><key>animalWhisperer</key><value>0</value></pair><pair><key>atWeapons</key><value>0</value></pair><pair><key>barter</key><value>0</value></pair><pair><key>bladedWeapons</key><value>0</value></pair><pair><key>bluntWeapons</key><value>2</value></pair><pair><key>brawling</key><value>0</value></pair><pair><key>bruteForce</key><value>0</value></pair><pair><key>calvinBackerSkill</key><value>0</value></pair><pair><key>combatShooting</key><value>0</value></pair><pair><key>computerTech</key><value>0</value></pair><pair><key>demolitions</key><value>0</value></pair><pair><key>doctor</key><value>0</value></pair><pair><key>energyWeapons</key><value>2</value></pair><pair><key>fieldMedic</key><value>0</value></pair><pair><key>handgun</key><value>0</value></pair><pair><key>intimidate</key><value>0</value></pair><pair><key>leadership</key><value>0</value></pair><pair><key>manipulate</key><value>0</value></pair><pair><key>mechanicalRepair</key><value>2</value></pair><pair><key>outdoorsman</key><value>2</value></pair><pair><key>perception</key><value>2</value></pair><pair><key>pickLock</key><value>0</value></pair><pair><key>rifle</key><value>0</value></pair><pair><key>safecrack</key><value>0</value></pair><pair><key>shotgun</key><value>0</value></pair><pair><key>smg</key><value>0</value></pair><pair><key>sniperRifle</key><value>0</value></pair><pair><key>spotLie</key><value>0</value></pair><pair><key>toasterRepair</key><value>2</value></pair><pair><key>weaponSmith</key><value>0</value></pair></skillXps><traits><pair><key>Trait_RaisedInTheCircus</key><value>1</value></pair></traits></pc>

                  reade more... Résuméabuiyad